Next 856596, Assembly Instructions Manual
Get ready to assemble your Next 856596 with ease by downloading the free Assembly Instructions Manual from our website. This comprehensive manual will guide you through the process step-by-step, ensuring a smooth setup. Download your manual now and get started with your new product from manualshive.com.
Share
Download


Reviews:
No comments
Related manuals for 856596

DOMINO
Brand: Magres Baldai Pages: 2

TP-02
Brand: TDK Pages: 2

21946
Brand: TDC USA Pages: 9

Round Table
Brand: Vari Pages: 2

NYX
Brand: VALK Pages: 24

Monaco GAP248SO2
Brand: GardenPoint Pages: 5

AC7030
Brand: Twin Star Home Pages: 36

Primp
Brand: Okamura Pages: 4

TV3031
Brand: MAAX Pages: 16

BSBWLB7
Brand: Amerihome Pages: 2

Bowfield 315900KE
Brand: Coaster Pages: 6

150-P4B04
Brand: StandDesk Pages: 9

JBMDT157WE
Brand: J.Burrows Pages: 11
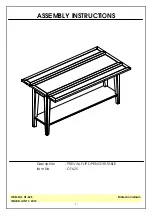
OT-62S
Brand: Unfinished Furniture of Wilmington Pages: 5

YM12810X
Brand: Yardistry Pages: 46

MID-7326CM
Brand: MID Pages: 12

0401997
Brand: Allen + Roth Pages: 60

AMERIWOOD INDUSTRIES 1217317PCOM
Brand: Dorel Pages: 16


