background image

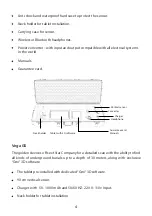
“Gmi” 3D software. 

90 cm vertical sensor.

Charger with  5 V- 1000 mAh and 50/60 HZ- 220 V- 110v Input.

Carrying case for sensor.

Manuals.

Guarantee card. 

Before you start, you need to make sure that the surface you want to scan is empty 

and pristine. Then when the software is ready, it shows an alarm that you must hit the 

“Ground Balance” key to start the operation. 

Hold the sensor perpendicular and press the “Ground Balance” key. Hold the button 

(about f

ve seconds) until there is a new line to scan. When the line is created, the 

device will give alarms, now you can release the button. After the line is presented, 

release the button and then press the button again (in this stage hold the button 

until the end of the route). If you release the button for any reason, the scanning 

process stops, and if you press and hold again, the scanning process will be re-start-

ed from the previous place. You can see all the happenings and scans on the 

software.

Tip: Take the steps slowly and move the sensor in a f

i

xed direction.

To start a route, you f

i

rst need to press the "New Line" button to redirect the route 

and then scan the route to the end with the previous method. All paths traversed and 

scanned are visible on the software. When the scanning of the paths is complete, 

turn off the sensor and the rest is carried out by the software.The battery level of 

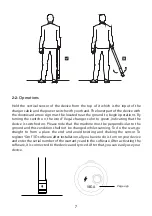
Vega devices can be easily recognized by the color of the word "Vega" on the device. 

Green indicates that the battery is full, yellow indicates that it is half full, and red 

indicates that the device needs to be connected to the charger. 

10

3. Maintenance and protecting the device

Do not keep the device under direct sunlight.

Carry it with a special bag.

The box is moisture-proof but not waterproof.

The device should not be in contact with gasoline and similar liquids.

Clean after use to prevent dust entering the device.

Be diligent in maintaining your system and follow the instructions. 

The system should never be in contact with water even if it is waterproof.

After several times of exploration, clean your metal detector with a soft, damp 

cloth and put it in its cover, and never leave your system out in the rain and 

thunder to avoid damaging your metal detector.

Summary of Contents for Vega DS

Page 1: ...N E X T S T A R Made in Germany Vega Series...

Page 2: ...detectors work 1 1 Vega product 1 2 Contents of each model 2 Various components of the device and assembling 2 1 How to use it correctly 2 2 Operations 3 Maintenance and protecting the device 4 Probl...

Page 3: ...es and pipes as well as metal objects coins precious metals such as gold and silver treasures and wonders and geological anomalies can also be carried out with our machines At Next Star these devices...

Page 4: ...capture data at a depth of 50 meters with dedicated Gmi 3D software The tablet pre installed with dedicated Gmi 3D software 90 cm vertical sensor Horizontal sensor with folding carbon handle Charger...

Page 5: ...ut and output compatible with all electrical systems in the world Manuals Guarantee card Vega NX The new generation of 3D scanning devices with the latest technology in the world along with the exclus...

Page 6: ...nverter with input and output compatible with all electrical systems in the world Manuals Guarantee card Vega GS The golden devices of Next Star Company for a detailed scan with the ability to f nd al...

Page 7: ...Guarantee card Vega SE Nexast Star Special Edition 3D Scanners cost ef ective powerful and high perfor mance with data capture capability up to18 meters deep with dedicated Gmi 3D software Gmi 3D soft...

Page 8: ...indicates the start of the operation The important thing to note is that the hologram must be on the sensor body and the sensor serial number should match the warranty serial number 2 1 How to use it...

Page 9: ...g that the device is switched on Please note that the machine must be perpendicular to the ground and this condition shall not be changed while scanning To do the scan go straight to from a place the...

Page 10: ...holder and attach it to the tablet tightening and securing the tablet by the screw located behind the holder Then turn on the tablet Connect the headphones to your tablet either via Bluetooth or cable...

Page 11: ...talled to place the 50 cm horizontal sensor The way to use this knob is that users can adjust the height of the device as much as they want and place the horizontal sensor inside the intended location...

Page 12: ...ect the route and then scan the route to the end with the previous method All paths traversed and scanned are visible on the software When the scanning of the paths is complete turn off the sensor and...

Page 13: ...anged to green color you need to connect the charger to the converter depending on the area you are in use the appropriate power socket included in the converter and the charger cable from the socket...

Page 14: ...cally The battery is running out and needs replacing The sounds are not played Check the headphones If the device plays the sound the problem lies in the headphones Volume range should be checked The...

Page 15: ...cost 6 Certificate Thedeviceshavetechnicalcertificationsand2yearstandardwarrantyonall3Dscanning devices The pre sale goods are thoroughly tested by our company s engineers and will be delivered to th...

Page 16: ...cidents Damage caused by exposure to corrosive compounds seawater or extreme tempera tures Damage caused by using accessories not specif cally designed for the respective device Damage due to modifica...

Page 17: ...iled explanation on separate a sheet Please send this warranty card along with your defective machine to us for repair The shipper is responsible for the safe packaging of the goods Attention Warranty...

Page 18: ...N E X T S T A R...

Page 19: ...edbytheNextStarCompany All trademarks are owned by the said company andthecontentsofthisbookletmaybechangedwith outpriornotice Pleasevisitourwebsiteformoreinfor mation the full warranty statement and...

Reviews: