


11X
12X
13X
14X
15X
00X
1
API
SB
5V
SD
LED
ERR
XM-350
EM-F4
EM-F4
EM-F4
EM-F4
EM-F4
1
A
B
P
E
2
3
4
1
A
B
P
E
2
3
4
1
A
B
P
E
2
3
4
1
A
B
P
E
2
3
4
1
A
B
P
E
2
3
4
1
A
B
P
2
3
4
E
S
S
S
S
S
S
3rd party devices and software
This Quick Start Guide offers a generic explanation of the setup and operation of the XM-350 controller with EM-F4 expansion.
It does not cover information on how to integrate the Controllers, Elements and their API triggers in specific 3rd party devices
or software. We have manuals available with step-by-step instructions on how to integrate Nexmosphere products with the
products of our hardware, -and software partners. You’ll find these on the support and partner pages of our website.
Functionality
The XM-350 runs our API which provides serial output when a specific sensor Element is triggered (for example a pick-
up, or presence sensor trigger) and provides control over output Elements (for example controlling LEDs) via serial input
commands. These API serial commands are typically used to create interactive Xperiences for Digital Signage.
The complete API Manual and additional helpful documents can be found on
https://nexmosphere.com/support-
documentation
. To get you started, we’ve included some starter examples of our Elements and the corresponding API serial
commands on the following pages.
N ex m o s p h e re
Le H av re 1 3 6
5 6 2 7 SW E i n d h ove n • T h e N e t h e r l a n d s
T
+ 3 1 4 0 2 4 0 7 0 7 0
E
s u p p o r t @ n ex m o s p h e re.c o m
QUICK START GUIDE
XM-350 XPERIENCE CONTROLLER WITH EM-F4 EXPANSION
© 2020-2021 Nexmosphere. All rights reserved. v2.0 / 06-21
All content contained herein is subject to change without prior notice.
2
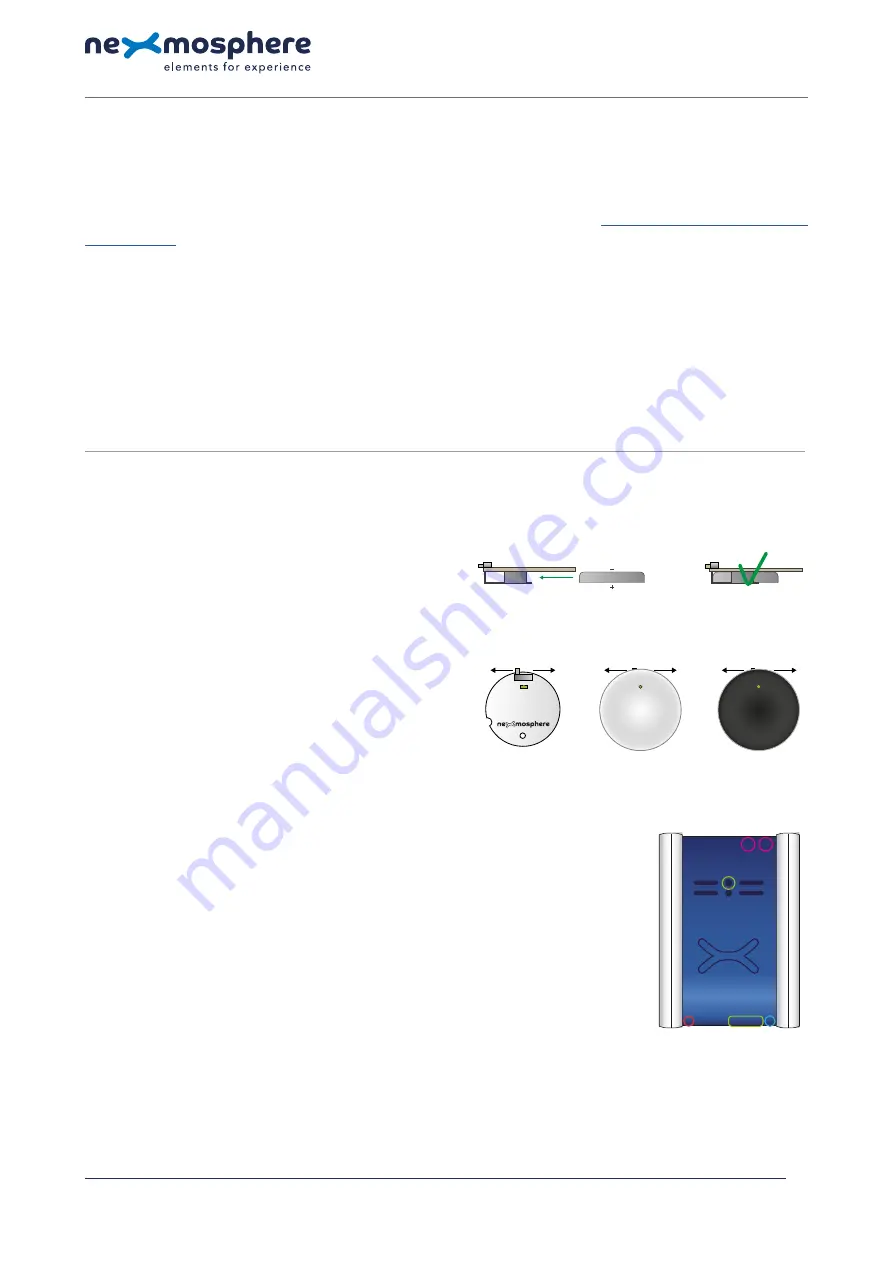
Pairing XF-P3 sensors to an EM-F base station
There are 2 methods to pair an XF sensor to a Wireless X-talk channel of an EM-F base station:
Pair button
or
API command
.
Pair button method
1.
Press and hold control button A for a few seconds.
The blue Pair LED will start to blink.
2.
Press Control button A to toggle to the channel you want to pair.
The green LED of the selected Wireless X-talk channel will blink.
3.
To pair: lift the sensor which you want to pair to the selected channel.
The green LED of the paired channel will be lit continuously for 1 second
to confirm pairing was successful.
4.
After, the next channel in line is automatically selected to be paired.
If the next channel also needs to be paired, simply lift another sensor.
5.
To quit pairing mode, hold button A for a few seconds.
The status LED of the EM-F4 base station will blink 3 times to confirm exit of pairing mode.
CR2032 battery
Make sure the XF-P3 sensors are
switched ON
and that
they
lay still
. The green LED on the sensor will briefly go
on when the device is switched on.
ON
OFF
ON
OFF
ON
OFF
When using an XF-P3N sensor, please make sure to
place a CR2032 battery
before starting the pairing
procedure. The XF-P3W and XF-P3B sensor already
have a battery placed within the enclosure.
XF-P3N
EM-F4
XF-P3W
XF-P3B


