background image

Contents

Preface

Preparation

Description

Attaching the domes and tubes

   Replacing the batteries (on/off control)  

Memory Switch (digital models only)


   Insertion and Removal

Operation

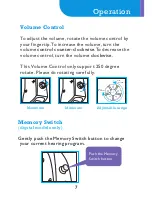
    Volume Control
   

Maintenance

Troubleshooting Guide 

Low Battery Warning

Caring for Batteries
Cleaning

Appendix


  Working condition

    Technical Data

   FDA information

1

2
3

4
5

6

7
8

10

12

9

9

10

12

12

13

4

7

9

Summary of Contents for Aria mini series

Page 1: ...User Manual Aria mini More than simplicity Aria ...

Page 2: ......

Page 3: ...tteries on off control Memory Switch digital models only Insertion and Removal Operation Volume Control Maintenance Troubleshooting Guide Low Battery Warning Caring for Batteries Cleaning Appendix Working condition Technical Data FDA information 1 2 3 4 5 6 7 8 10 12 9 9 10 12 12 13 4 7 9 ...

Page 4: ...hearing loss for them Aria mini is one type of hearing instrument This user manual only applies to Aria mini series hearing instruments For patients with middle ear infection hearing instrument can t be worn until cured or follow your doctor s recommendation Please consult your hearing care professional first when you have any questions about your hearing or hearing instrument Intended use Scope P...

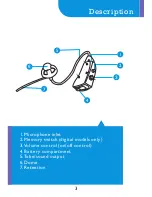
Page 5: ...1 2 3 7 6 Description 5 4 1 Microphone inlet 2 Memory switch 3 Volume control on off control 4 Battery compartment 5 Tube sound output 6 Dome 7 Retention digital models only 3 ...

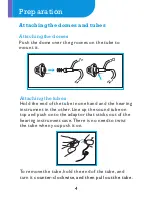
Page 6: ... Hold the end of the tube in one hand and the hearing instrument in the other Line up the sound tube on top and push onto the adaptor that sticks out of the hearing instrument case There is no need to twist the tube when you push it on To remove the tube hold the end of the tube and turn it counter clockwise and then pull out the tube 4 ...

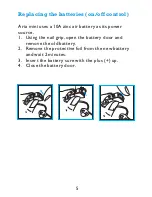
Page 7: ...s a 10A zinc air battery as its power source 1 Using the nail grip open the battery door and remove the old battery 2 Remove the protective foil from the new battery and wait 2 minutes 3 Insert the battery sure with the plus up 4 Close the battery door 5 ...

Page 8: ...ently insert the dome into your ear canal until the tube sits flush against the side of your head 3 Position the retention into the indentation above your ear lobe using your index finger To remove your hearing instrument grasp the tube near the dome and gently pull it out of your ear Please consult your hearing healthcare professional when you have some difficulty inserting or removing the hearin...

Page 9: ... volume control turn the volume This Volume Control only support 250 degree rotate Please do rotating carefully control counter clockwise clockwise Memory Switch digital models only Gently push the Memory Switch button to change your current hearing program Push the Memory Switch button Maximum _ Minimum Start minimum Stop maxmum Adjustable range ...

Page 10: ...eeds are accessed by the memory switch Program 2 noisy environment mode Program 3 telecoil mode and Program 4 mute mode Each time you trigger the memory switch the hearing instrument will move to the next program The sequence is 1 2 3 4 1 Your hearing instrument will alert you to you help you identify which program you are using When you select Program 1 you will hear one beep Program 2 will emit ...

Page 11: ... or debris in the microphone or receiver Clean both microphone and receiver with brush Remove and clean the dome N ot loud enough Low battery Replace battery Excessive ear wax Consult your physician Volume set too low Turn the Volume Control counter clockwise Wax or debris in the microphone or receiver Clean both microphone and receiver with brush Remove and clean the dome Hearing change Contact y...

Page 12: ...hat air should not enter the batteries before use Each battery is therefore provided with an adhesive label that ensures that the batteries are sealed and fresh till use 3 Never let an exhausted battery remain in the hearing instrument Exhausted battery may leak and it would damage the hearing instrument Cerumen will accumulate on it while using your hearing instrument during use It will damage th...

Page 13: ... scratch if the instrument fell 11 Do not use water or other fluids Cleaning the tube After removing the tube from the hearing instrument use the black cleaning rod to push any debris out of the tube The cleaning rod should be inserted where the tube attaches to the instrument and pushed all the way through the tube and out through the dome ...

Page 14: ... during transportation and storage Air pressure between 500 and 1100 hPa is not detrimental to the instrument Appendix 12 Technical Data Maximum Output IEC 118 7 2005 Aria mini series 112dB Typical 2cc coupler Manufactuer Wellkang Ltd t a Wellkang Tech Consulting Suite B 29 Harley Street LONDON W1G 9QR England United Kingdom ...

Page 15: ... your individual needs If you have reservations about your ability to adapt to amplification you should inquire about the availability of a trial rental or purchase option program Many hearing aid dispensers now offer programs that permit you to wear a hearing aid for a period of time for a nominal fee after which you may decide if you want to purchase the hearing aid Federal law restricts the sal...

Page 16: ...Notes ...

Page 17: ...Notes ...

Page 18: ...Notes ...

Page 19: ......

Page 20: ...US HQ 3948 Addison Woods Road Frederick MD 21704 USA E mail sales usnewsound com www usnewsound com Version 1108A 6098 000 ...

Reviews: