background image

18

ICARUS SERIES

5.Basic Operation

Adaptive-Sync

This feature is off by default. To activate, you must have hardware with Adaptive-Sync capability, a DP or HDMI cable, and the latest 
graphic drivers. 
After connecting your computer and monitor with a DP or HDMI cable, you may receive a prompt to enable the feature on your 
computer. If you do not, you may need to enable the function in your graphics card menu. See your graphics card manufacturer’s 
documentation for instructions.

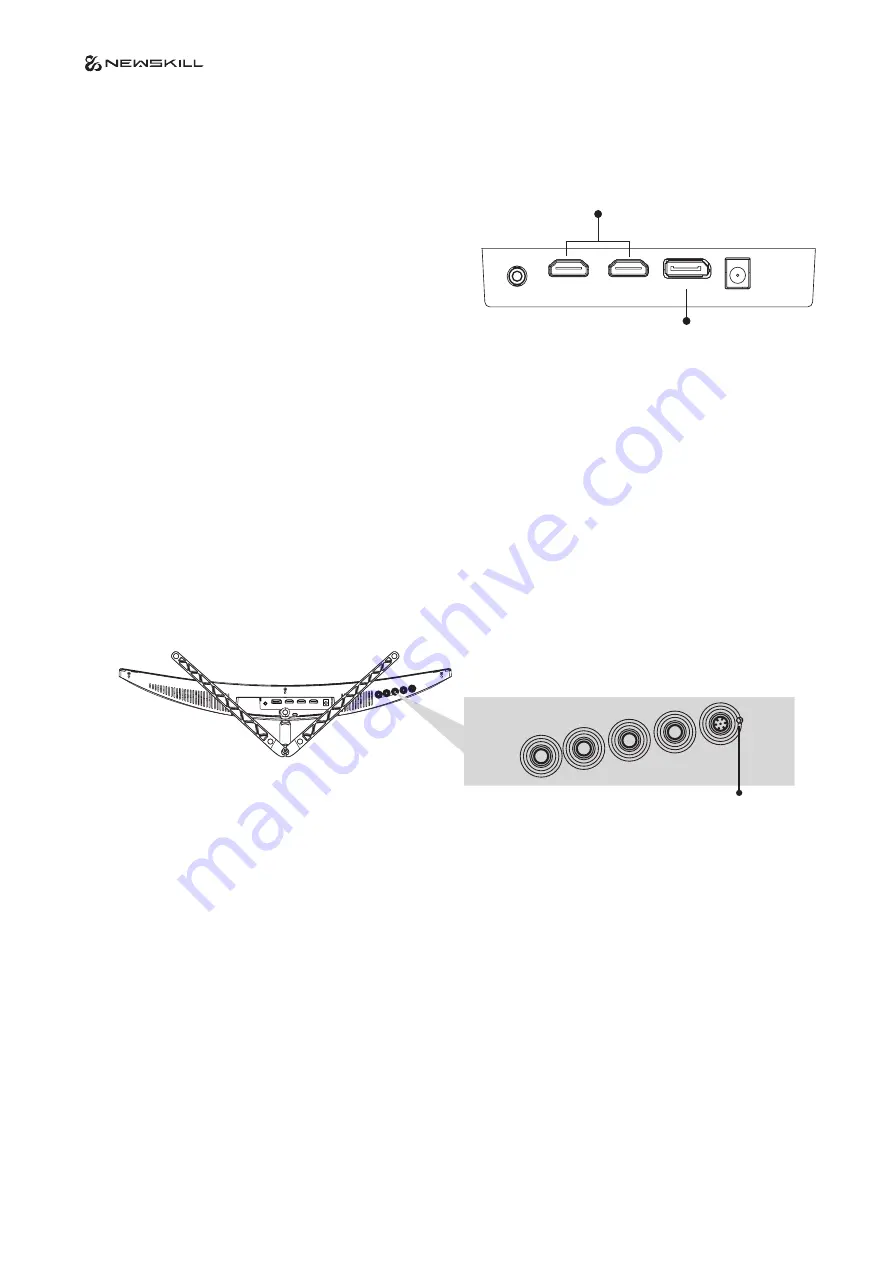
1.  Insert one end of the DP cable into your PC's graphics card. A 

HDMI cable may also be used. A HDMI cables is not included.

2. Connect the other end of the cable to the corresponding 

connector on your monitor.

3. Connect the power cable to your monitor then connect the other 

end to your power source. It is recommended that you use a surge 
protector with adequate voltage if a wall outlet cannot be reached 
directly.

4. Locate the power button on the monitor and press it to turn the 

monitor on.

HDMI Connectors

DP Connectors

Indicator Light

6. lndicator Light

Solid blue light indicates power is on and the monitor is operating normally. Flashing blue light indicates 
no video source, no horizontal or vertical signal has been detected or voltage is low. Please ensure your 
computer is on and all video cables are fully inserted and/or connected.

Summary of Contents for ICARUS 165Hz-VA-IC27F6-V2P

Page 1: ...2 7 I N C H F H D R E S O L U T I O N U S E R M A N U A L 1920x1080P 165Hz FHD RESOLUTION...

Page 2: ...termes HDMI et HDMI High Definition Multimedia Interface ainsi que le logo HDMI sont Marques commerciales ou marques d pos es de HDMI Licensing Administrator Inc aux tats Unis tats et autres pays Die...

Page 3: ...t Overview 15 Stand Installation 16 Wall Mounting 17 Basic Operation 18 lndicator Light 18 OSD Menu 19 OSD Menu Functions 20 LED Effects and Gameplus 22 Technical Specifications of Product 23 27 FHD R...

Page 4: ...ctly grounded In case that your socket is not available for the plug please contact electrician to replace the socket 9 Since there is high voltage or other risks when the shell is opened or moved ple...

Page 5: ...lug The device must be connected to an earthed mains socket outlet Always disconnect the power cord or switch the wall socket off if the devicewould be left unused for a certain time to achieve zero e...

Page 6: ...a desenchufar el cable de alimentaci n 5 Mantenga la pantalla alejada de las fuentes de agua como la ba era el lavabo el fregadero o lavadora NO coloque la pantalla en el suelo mojado o cerca de una p...

Page 7: ...enchufe El dispositivo debe estar conectado a una toma de corriente con conexi n a tierra Desconecte siempre el cable de alimentaci n o apague la toma de corriente si el aparato se dejar a sin usar du...

Page 8: ...an ou de l adaptateur secteur n oubliez pas de tenir la fiche au lieu de tirer sur le cordon pour le d brancher 5 Tenez l cran l cart des sources d eau telles que la baignoire l vier ou machine laver...

Page 9: ...e L appareil doit tre branch une prise de courant avec mise la terre D branchez toujours le cordon d alimentation ou coupez la prise murale si l appareil serait laiss inutilis pendant un certain temps...

Page 10: ...5 Halten Sie die Anzeige von Wasserquellen wie der Badewanne dem Waschbecken oder Waschmaschine Legen Sie den Bildschirm NICHT auf den nassen Boden oder in die N he eines Schwimmbeckens oder Dr cken S...

Page 11: ...ete Netzsteckdose angeschlossen werden Ziehen Sie immer den Netzstecker oder schalten Sie die Wandsteckdose aus wenn das Ger t w rde f r eine gewisse Zeit ungenutzt bleiben um einen Null Energieverbra...

Page 12: ...l cavo per scollegare il cavo di alimentazione 5 Tenere il display lontano da fonti d acqua come la vasca da bagno il lavandino o lavatrice NON posizionare lo schermo sul pavimento bagnato o vicino a...

Page 13: ...ere collegato ad una presa di corrente con messa a terra Scollegare sempre il cavo di alimentazione o spegnere la presa a muro se l apparecchio verrebbe lasciato inutilizzato per un certo periodo di t...

Page 14: ...use a special screen cleaning tissue or solution Do not use benzene thinner ammonia abrasive cleaners or compressed air Use a slightly dampened warm cloth to clean the frame Avoid using detergent of a...

Page 15: ...ton Press to exit Power Button Press to turn the monitor on off LED Indicator Changes colors to indicate status Audio Output Insert one end of the audio cable into the computer s audio output to recei...

Page 16: ...nt them with a screw Open the pacakge and take out the product with the foam still attached Carefully place it on a desk or table and shield the screen Let the stand snap into the back of the monitor...

Page 17: ...75 75mm type mount No VESA mount or mounting accessory is included Remove the original screws x4 from the opening in the back of the monitor Follow the directions received with your mount stand or ac...

Page 18: ...so be used A HDMI cables is not included 2 Connect the other end of the cable to the corresponding connector on your monitor 3 Connect the power cable to your monitor then connect the other end to you...

Page 19: ...on screen after turning on the monitor and pressing the M button Press one of the buttons M E to activate the navigation window 1 Press M to enter the OSD screen Press E to exit the current screen Pre...

Page 20: ...hase to reduce the level of noise Phase 0 100 Adjust picture phase to reduce the level of noise Aspect Wide Auto 4 3 Set aspect ratio Color Temp Color temp Warm User Cool Adjust color temperature Red...

Page 21: ...ting switch projection lamp MISC Signal source DP 1 HDMI1 HDMI2 Display the input signal Volume 0 100 Adjust audio volume Low blue ray 0 100 Set blue light filtering level Adaptive Sync On Off Turn on...

Page 22: ...window Press to switch Gameplus modes Depending on your needs in game choose the corresponding game icon These game icons are primarily designed to optimize your aim during shooting games though they...

Page 23: ...178 V Contrast Ratio 4000 1 VESA Mounting 75 75mm Colours 16 7M Adaptive Sync Yes Signal Input HDMI 1 4 2 DP 1 2 1 Power Input DC 12V 3 0 A Audio Speakers NO Audio Out Yes Accessories Power Cable No...

Page 24: ......

Page 25: ......

Page 26: ...www newskillgaming com M O R E I N F O R M AT I O N AT...

Reviews: