background image

6

INSTALLATION

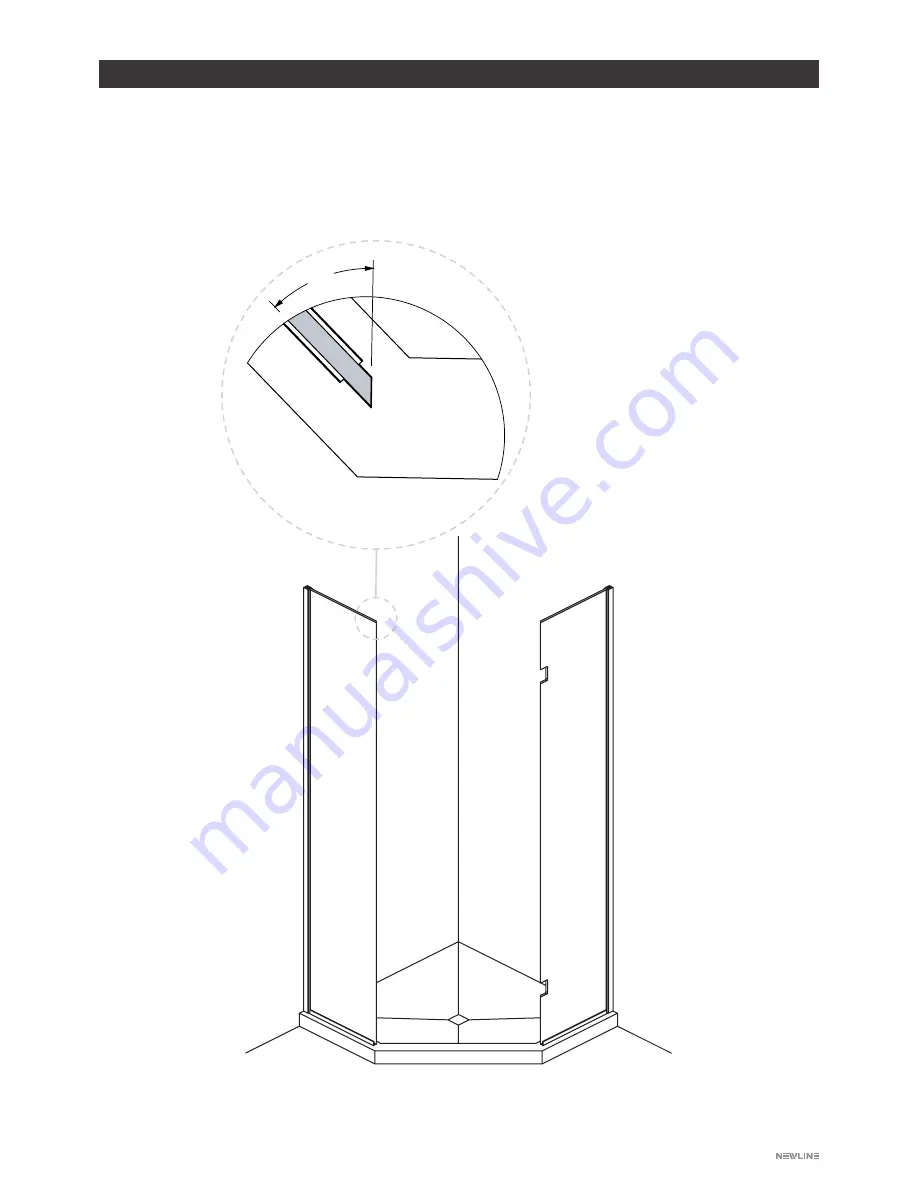
STEP 2
Fit Fixed Glass Panels

1.  Ensure the fixed panel with the cut outs is placed on the side as ordered. 

2. 

Fit the Glass Panels progressively into the Wall Profiles until outer glass edge is at Door line. 


(Prevents horizontal scratching of inner profiles).

 45°


Summary of Contents for Acclaim Neo

Page 1: ...If this is a Custom Order the size will be in the outside of the box Check this is correct 3 Advise Newline on 0508 639 5463 if any damage has occurred or questions on the size within 8 hours of receiving the goods so this is can be rectified 4 Do not proceed with installation until resolved as there cannot be a valid claim later CODE G9632 ...

Page 2: ...ion Glass panels and assemblies are heavy Two man lifting is recommended for handling and installation Determine positioning of wiring and piping within wall cavities before shower installation Mark their positions to ensure electrical and piping areas are avoided Wear appropriate protective clothing and eye protection during installation MATERIALS SUPPLIED 1x Silicone Bostik V60 1x Self Adhesive ...

Page 3: ...d with a Wet Grade lining that meets the NZ building Code Clause E3 Installation must be fastened to manufactures specifications for Tile loadings Plumbing Use a registered plumber for installation all supply and waste items prior to Tray and Wall linings Waterproofing Profinsh Tile Trays This must comply with AS NZS 4858 2004 and be undertaken by certified applicator and a Producer Statement prov...

Page 4: ...r A9076 1 3 10mm Glass Hinge Panel 1 12 Fastening Screw Pack H1665 1 4 Glass Lintel C2879 1 6 x 40 Pan square screws x 9 5 Wall Profiles A1887 2 4 x CSK Machine Screws 6 1 x Curved Handle H5498 1 6gauge x 12mm Pan square screws x 5 7 1 x Set 135 Degree Hinges H5535 2 Screw cap covers x 5 8 Glass Lintel Clips H5412 4 Wall plugs x 9 9 Bottom Door Seal I5979 1 Fastening Screw Pack H1665 1 2 4 5 5 6 7...

Page 5: ...nsion Table A Profinish Tray Size Minimum to Maximum 900 x 900 864 to 876mm 1000 x 1000 964 to 976mm 1100 x 1100 1064 to 1076mm PLEASE NOTE Waterproofing warranties will potentially be void if there are penetrations through the membrane Use Bostik V60 to bond wall channels to the tiles Allow to cure as cartridge information If penetrations through the waterproofing are undertaken you must ensure y...

Page 6: ...ss Panels 1 Ensure the fixed panel with the cut outs is placed on the side as ordered 2 Fit the Glass Panels progressively into the Wall Profiles until outer glass edge is at Door line Prevents horizontal scratching of inner profiles 45 ...

Page 7: ...embly in place Note the Waterbar requires a bead of silicone underneath and the brackets sealed to the lower profiles both sides and floor Equalise the glass panels to boundary line and make sure the Door Gap remains at 656mm top and bottom Use the self adhesive packers to hold fixed glass in place and tape the Waterbar to the tray Corner Bracket Water Bar ...

Page 8: ...top edge of the glass panels using four clamps along the top edge of the panels Ensure the Door gap remains at 656mm top and bottom STEP 5 Re check the glass is still aligned correctly to the Tile Tray Screw with 12 gauge pan head screws and add cover caps ...

Page 9: ...d then install the door glass Close the door carefully and adjust for even clearance in the door opening STEP 7 Silicone seal the outside boundary as indicated lines Tape the Door closed with packers installed to stop the door sagging Leave for 24 hours until silicone has cured ...

Page 10: ...Technokolla NZ Prep Clean and Vac surface Technokolla 101 1 Technokolla RL80 SeamTape joins Rasolastic Advance Two Part 2 Strataflex Rasogum over laps Dave Boyes 0275 635 891 dave technolla co nz 15 years WATERPROOFING The Independent Waterproofing Companies listed below have tested their systems and procedures on Newline Profinish Tile Trays This represents years of proven track record At the tim...

Reviews: