background image

7

SUPERBUG

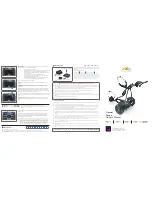
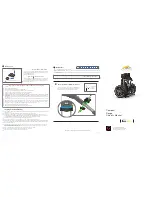
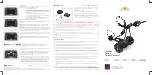
Superbug Assembly - common to all models

Step 1 : Install the Wheels

The wheels are complete with freewheel axles and bearings 

and these fit in the holes at the ends of the crossbar and are

held in place by a screw with a triangular knob.  Slacken the 

screws if necessary, push the axle fully into the hole and 

tighten the screws to secure the wheels in place.

Step 2 : Unfold the Handle

The lower handle locks into position in the folded position to

make the Superbug easy to carry.  To unlock it press the 

two lock buttons on either side of the main pivot and lift the 

lower handle.  The upper handle locks in place by means

of sliding the locking cover fully over the joint.

Step 3 : Install the Battery

The battery pack is fitted in a tough nylon bag.  The bag is

attached to the battery carrier by means of the velcro straps

on the bottom.  To fit the battery bag to the carrier turn the

battery bag upside down with the power lead facing front 

left and open the velcro straps.  Position the battery carrier 

on top of the battery with the hooks facing forward (Fig 7) 

and securely close the velcro straps.  The battery should now 

be turned the right way up and may be carried by the 

integral carry handle. 

To install the battery onto the Superbug, simply locate the 
battery carrier hooks over the plastic mounts on the frame.  NOTE: when installed on 

the trolley the powerlead from the battery should be facing towards the front right of 

the battery carrier.

Step 4 : Connect the Battery

Before connecting the battery ensure that both power switches

are set to the off “O” position.  The battery cable is plugged 

into the socket located on the right hand side of the main 

chassis tube.

Fig 5

Fig 7

Fig 6

Fig 8

7

Summary of Contents for Superbug

Page 1: ......

Page 2: ... 4 Safety Notices 4 Description 4 User Controls 5 Superbug Contents 6 Assembly 7 Using your Superbug 8 Best Practice 10 Care of the Batteries 11 Charging the Batteries 12 Technical Specifications 13 Care of your Superbug 14 Troubleshooting 14 2 ...

Page 3: ... Upper Handle 8 Battery Power Connector 3 Sliding Lock 9 Lower Bag Support 4 Lower Handle 10 Lower Bag Mount 5 Drivewheel with AT tyre 11 Front Wheels 6 Steering bearing 12 Battery Pack 13 Upper Bag Mount 1 2 3 4 5 6 7 8 9 10 11 12 Fig 1 13 3 ...

Page 4: ...connecting or disconnecting the charger Do not put anything metalic near the battery terminals as this risks short circuiting the battery with the risk of fire or explosion In operation ensure that the trolley is under control at all times If it allowed to collide with other people or property then injury or damage may occur Superbug is designed to carry a golf bag of upto 15Kg overloading the trol...

Page 5: ... the centre of the D Handle Fig 3 This can be set to adjust the speed of the trolley from about 2kph to 7kph The actual speed of the trolley will depend on the speed setting and the terrain Auxilliary Functions The function of the auxilliary function button differs with each model in the Superbug Range as follows Model Auxilliary Function Superbug Power Boost press and hold Superbug D200 Electroni...

Page 6: ...s Frame with handle folded integral rear wheel and bag straps Front wheels x 2 Wire Frame Battery Carrier Batteries in a custom fit battery bag Battery Charger Transmitter Superbug Remote only User Manual If any of these items are missing please contact your retailer immediately 6 ...

Page 7: ...n bag The bag is attached to the battery carrier by means of the velcro straps on the bottom To fit the battery bag to the carrier turn the battery bag upside down with the power lead facing front left and open the velcro straps Position the battery carrier on top of the battery with the hooks facing forward Fig 7 and securely close the velcro straps The battery should now be turned the right way u...

Page 8: ...tched on nothing will happen until the user pushes the trolley forwards to approximately 1kph The recommended starting procedure is as follows Turn the speed control to minimum towards you Turn both power switches to the on I position Push the Superbug forwards until the motor begins to drive usually within 1 4 to 1 2 metre and then adjust the speed of the trolley to your preferred walking pace by...

Page 9: ...of this button is an electronic brake This is in addition to the descent control which is standard on all models The electronic brake can be utilized in the following ways If the hill is very steep and requires additional braking the brake button can be switched on and off repeatedly in order to control the speed of the descent or alternatively the brake button can simply be switched on and the tr...

Page 10: ...off to the right and visa versa Care should be taken not to over tighten as this can reduce the turning circle Care The remote is designed to assist hands free use however care should be taken to use the in remote function trolley at a range and in situations where the trolley where a loss of control would not cause damage and where the trolley could easily be taken back under manual control Do no...

Page 11: ...ag It is designed to carry a maximum 15Kg golf bag and should not be used to carry excess weight or to pull you along Neither should you pull the trolley backwards when the power is on as any of these actions may damage the controller and will invalidate the warranty The batteries are a valuable part of your investment and must be looked after correctly Read the safety notice at the start of this ...

Page 12: ...battery will be fully recharged in about 8 hours If the charger is switched off be sure to disconnect the batteries If the batteries are not used for long periods of time charge them fully disconnect them from the charger and store them in a cool dry place When stored like this be sure to recharge them for 24 hours at least once every two months SAFETY NOTICE The charger supplied with your Superbu...

Page 13: ... x 45 5cm x 22 5cm Range 36 holes Battery 2 x 12V 12AH 288WH sealed lead acid Battery Charger Three stage automatic 2A output Superbug D200 as Superbug with the following exceptions Motor 200W 24 volt high torque brushless Weight 18 5 Kg including batteries Superbug Remote as Superbug with the following exceptions Motor 2x 140W 24 volt high torque brushless Weight 23 3 Kg including batteries Range...

Page 14: ...liable battery All pivots have been also designed to elimitate wear and stainless steel and rust proof fastenings have been used throughout Notwithstanding our confidence in Superbug the following guide will help you if you experience any problems Symptom Cause Remedy Superbug works for a while but slows and stops before you complete a round Battery has not been fully charged or is not holding a fu...

Page 15: ...r Superbug to arrange for repair service Vibration or Stalling from the Motor The slope is too steep or the bag weight is too heavy Do not attempt to climb too steep hills or carry bags that weigh 15Kg Battery has not been fully charged See Above Battery is old or flat See Above Remote Transmitter does not work Battery is flat Replace Battery Red Button is not engaged Engage Red Button Antenna is no...

Page 16: ...Copyright 2005 Newhope electric vehicle co Ltd ...

Reviews: