®
C2 Hinge Hub Upper
Replacement Instructions
Use With Spares Kit: 01597
To replace the main hinge hub upper of the main lock is a simple process. We have also
upgraded a few of the parts within the assembly which will also need changing to fit the new
hinge hub upper. All is detailed in the step by step instructions below.
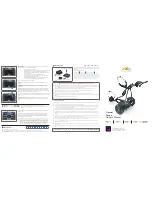
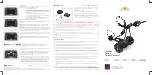
Step 1
With the trolley in a fully open
position, remove the cap on the
middle joint using a flat headed
screw driver or similar then undo
the M8 nyloc nut securing the cam
lock. Remove and place to one
side.
Step 2
Fold the trolley down into a semi
closed position with only the front
wheel assembly open. Remove
the eight 4x14mm and 2x20mm
pozi screws securing the handle.
Unplug the handle wire and place
to one side.
Pozi
Screwdriver
Torque Driver
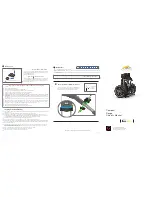
Tools Required:
Please ensure battery is disconnected from the trolley.
Your Kit contains:
1x 01168-01-02 Main Hinge Hub Upper
2x 01153-05-02 Main Central tube (Gun Metal)
1x 01164-01-02 Main Lock Button Upper
1x 01165-01-01 Main Hub Button Upper
2 x14mm Spanner
or socket
1x 01180-01-01 Compact Main Lock Button Spring
1x 01169-01-02 Main Hinge Hub Lower
7x 00174-01-01 4x14mm Pan Pozi Screw
P/N: 01843-01-01