background image

13

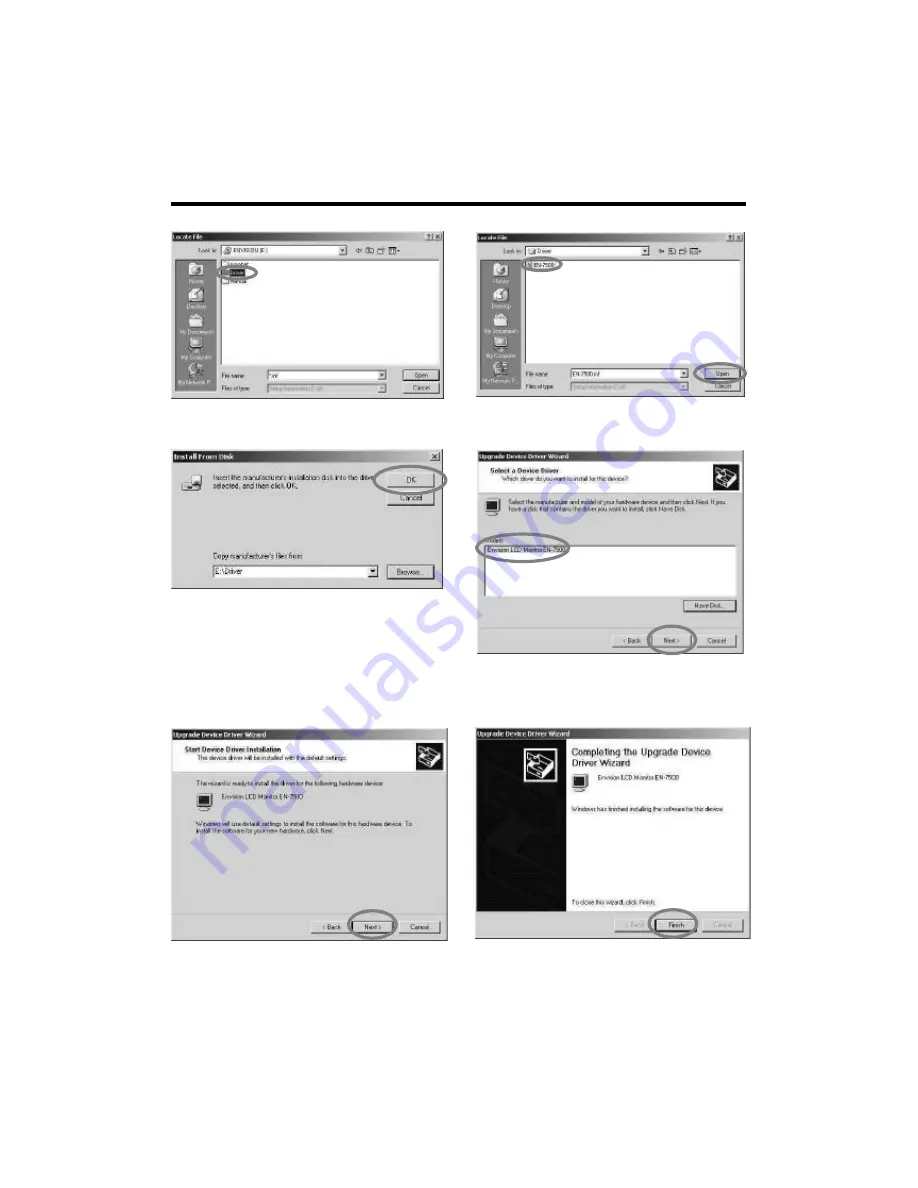
Click 

[OK] 

to proceed to the next step.

14

Choose 

Envision LCD Monitor TP-1701

,

then click 

[Next>] 

to proceed to the 

next step.

11

Double click the 

[Driver]

folder.

MONITOR INSTALLATION

(Continued)

12

Choose

TP-1701.inf

file then click  

[Open].

15

Click 

[Next>] 

to start installation.

16

Click 

[Finish].

(Be sure the screen shows correct model name.)

Summary of Contents for TP-1701 SXGA series

Page 1: ...TP TP 1701 SXGA 1701 SXGA Color TFT LCD Monitor User s Manual...

Page 2: ...emote Control TV Tuner LOCATION OF USERS CONTROL REMOTE CONTROL MONITOR INSTALLATION OSD USAGE 21 22 BEFORE CALLING FOR REPAIR SERVICE TP 1701 Available PC VGA Mode SPECIFICATIONS 17 18 19 20 23 STATU...

Page 3: ...he product and inserting an object can cause electric shock and or short internal parts For the same reason do not spill water or liquid on the product Do not attempt to service the product yourself R...

Page 4: ...can cause the product to fall from the cart The vents and other openings in the cabinet are designed for ventilation Do not cover or block these vents and openings since insufficient ventilation can c...

Page 5: ...which can be determined by turning the equipment off and on the user is encouraged to try to correct the interference by one or more of the following measures Reorient or relocate the receiving antenn...

Page 6: ...e the following accessories are provided with the product Quick Install Guide 1 Operation Manual Monitor Driver CD 1 Remote Control 1 AC Adapter 1 AC Cord 1 Size AAA Battery 2 SUPPLIED ACCESSORIES TV...

Page 7: ...remote control fails to operate LCD TV monitor functions replace the batteries in the remote control 2 Insert batteries two Size AAA batteries Supplied with product 3 Close the battery cover Place bat...

Page 8: ...TV Tuner Installation PREPARATION TV Tuner Option Note The screw bolt is in the screw hole of TV tuner The figure is just to illustrate that there is a bolt to secure the tuner...

Page 9: ...GA Cable 3 S Video 4 Composite Video Yellow 5 Video Sound L White 6 Video Sound R Red 7 PC Stereo Input 8 Headphone Output 9 Line Out Connect to another speaker set 10 Antenna Cable Connector Descript...

Page 10: ...PREPARATION Stand Arm Wall Mount Stand Installation Standard Arm Installation Wall Mount Bracket Installation Note Arm and wall mount bracket are not supplied with the product...

Page 11: ...up Channel up or move upward in OSD menu 7 Decrease volume Move left Volume down or move leftward in OSD menu 8 Increase volume Move right Volume up or move rightward in OSD menu 9 Power Indicator 10...

Page 12: ...play receiving channel number at TV mode or signal source name at another mode Press again Removes displayed channel number Exit Exit the OSD menu or move to previous menu Ch Selects next higher chann...

Page 13: ...Properties window 4 Click Advanced 5 Select Monitor in the window shown above 6 Click Properties 1 Double click Control Panel icon from My Computer folder 2 Double click Display icon from Control Pane...

Page 14: ...ck Update Driver 8 Upgrade Device Driver Wizard will be appeared Select the second list and then click Next 9 Click Have Disk 10 When drive A appears in default click Browse to select CD ROM drive MON...

Page 15: ...Monitor TP 1701 then click Next to proceed to the next step 11 Double click the Driver folder MONITOR INSTALLATION Continued 12 Choose TP 1701 inf file then click Open 15 Click Next to start installat...

Page 16: ...Hz Resolution 1280 1024 In case of PC Mode NTSC Video Info NTSC 4 43 In case of TV Video S Video Mode PAL SECAM Numbers of horizontal pixel Numbers of vertical line Horizontal frequency Vertical frequ...

Page 17: ...se remains on the screen after operating the Auto adjust it by selecting or button Do not make manual adjustment when the picture is in its normal shape or you will create problem on it Phase Button D...

Page 18: ...l to add current channel to channel table and select Delete Channel to delete current channel from channel table Note Press Add Erase of remote control Channel Add and Channel Erase will be constantly...

Page 19: ...rmal Button Decrease Contrast Button Increase Brightness Cold Greenish white Felt cold Medium Normal white Warm Reddish white Felt warm User Mode Able to adjust the color by controlling Red Green and...

Page 20: ...n Language OSD Setup Available Mode PC TV Video S Video Move zoomed window with buttons Not possible to move normal screen Note 1 Screen itself cannot be moved It s window screen that is moving It s l...

Page 21: ...properly connected Bad reception can be considered Reference Pages 8 10 8 10 21 Picture is not clear TV Make sure the antenna cable is properly connected Bad reception can be considered Picture is not...

Page 22: ...180 Stand Depth mm W H D mm Size Max 2 Watt x 2 Speaker Max 5 Watt Off Mode Typ 54Watt On Power Consumption AC100 240V 50 60Hz Power Voltage Mono Sound Signal Type NTSC M Channel System CVBS S VIDEO...

Page 23: ...720 x 400 25 175 N 31 47 N 59 94 640 x 480 30 240 N 35 00 N 66 67 31 500 N 37 86 N 72 81 31 500 N 37 50 N 75 00 36 000 N P 35 16 N P 56 25 800 x 600 40 000 P 37 88 P 60 32 50 000 P 48 08 P 72 19 49 5...

Page 24: ...ebsite www newcommworld co kr Email webmaster newcommworld co kr Toll Free Phone 82 32 652 8782 Fax 82 32 652 8785 Mail 328 5 Songnae 1dong Sosa gu Puchon shi Kyonggi do 422 814 KOREA HOW TO CONTACT U...

Reviews: