Install InstructIons
24 GAGE STEEl RTA BASE CABINET
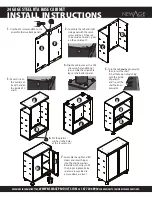
NOTE:
Make sure all shelf tabs are completely in place, see
below diagram.
5. Repeat steps 2 – 4 for the remaining shelves.
Note:
one shelf in the locker must be level with the lock on the
door of the cabinet, in order for the lock to work.
mOUNTING CABINETS INTO DRyWAll / STUDDED WAll:
WARNING: All CABINETS mUST BE mOUNTED TO STUDS
BEFORE lOADING THE CABINETS WITH ITEmS
Each locker or base cabinet must be mounted to the wall with at least
two of the provided mounting screws. Each wall cabinet must be
mounted with four screws.
1. Using a stud finder locate the studs in the wall where the wall
cabinet is to be placed.
2. Once studs are located, using a pencil and a level mark a vertical
line to indicate stud location.
3. Place the cabinet into position tight against the supporting wall.
4. Open the doors and locate the perforated mounting strip on the
top and bottom of the backside of the cabinet.
Note:
the wall cabinet has a perforated strip of holes at the top
and bottom of the cabinet, the locker only has a perforated strip
at the top of the cabinet.
5. Align the previously marked stud lines with a perforated hole by
shifting the cabinet slightly.
6. Place a small magnetic level on top of the wall cabinet and adjust
the orientation of the cabinet to bring it to a level position.
7. Once leveled, using the supplied mounting hardware fasten a
2.5” x ¼” cabinet mounting lag bolt with a large washer through
the cabinet and into the stud. This can be done by hand with
a 7/16th socket wrench or a cordless power drill with a 7/16th
socket attachment. Do not over tighten bolts! Once the fender is
sitting tightly flush with the backside of the cabinet stop.
8. Repeat Step 6 three additional times with the remaining
mounting hardware to install the wall cabinet. You will only
repeat this one more time for the locker, as it only has 2
mounting lag bolts.
WAll AND lOCKER CABINET WAll mOUNTING INTO
CONCRETE BlOCK / mASONRy WAll:
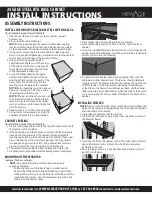
NOTE:
Masonry Hardware
NOT
Included
REQUIRED HARDWARE:
• 2 ¼” x ¼” Tapcon Concrete Anchor (4)
0r
•#10 x 2” Screw with 3/16” masonry plug (4)
1. Place the wall cabinet into position tight against the supporting
wall.
2. Open the doors and locate the perforated mounting strip on the
top and bottom of the backside of the cabinet.
3. Place a small magnetic level on top of the wall cabinet and adjust
the orientation of the cabinet to bring it to a level position.
4. Using a hammer drill, drill 4 pilot holes through the perforated
strip in the backside of the cabinet and through the wall.
5. Using either the 2 ¼” x ¼” Tapcon Concrete Anchor or #10 x 2”
Screw with 3/16” masonry plug method and the supplied fender
washers fasten the cabinet directly to the wall. This application
requires a cordless power dill with a #2 Philips bit for ease of
installation.
6. Repeat Step 3 - 4 three additional times with the remaining
mounting hardware.
THANK yOU
for purchasing a Coleman product.
Please give us a call, or visit us online if you have any other questions
or comments.
Give us your feedback for a chance to WIN! Take our quick 2 minute
survey and enter for your chance to win something FREE from
NEWAGE! Visit the website for details at www.newageproducts.com
need
more
information
?
try
,
WWW.NEWAGEPRODUCTS.COm
or
1 877 306 8930
for
answers
to
commonly
asked
questions
.


