Install InstructIons
24 GAGE STEEl RTA BASE CABINET
ASSEmBly INSTRUCTIONS:
INSTAll THE HEIGHT-ADjUSTABlE STEEl lEvElING lEGS:
(for all cabinets except for wall cabinet)
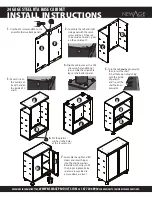
1. Open the cabinet and remove any loose shelves, support
brackets, etc.
2. Close / lock the cabinet drawers.
NOTE:
If you need to open the cabinet / locker doors during
leveler assembly, open them slowly and do not put any weight
on the open doors. This avoids damage to the cabinets hinges.
3. Using two or more people, place the cabinet / locker upside
down. Using supplied packaging material to cushion the cabinet
to prevent any scratching of the painted surfaces.
4. One at a time line up each height-
adjustable leveling legs with the corners
of the cabinet. The holes in the base of
the cabinet should align with the holes
in the adjustable leveling leg.
5. Using the Philips head socket, power
drill or hand tighten the bolt with one
small Foot Plate washer into each of the
holes. There are 4 holes to attach the
leveling leg to the base of the cabinets.
NOTE:
Bolts should be snug. Do not over
tighten or force bolts. This may result in
the damaging of the threads.
NOTE:
When assembling the Locker, Use
the 16 smaller washers, not the 4 larger
washers to fasten the legs. The 4 larger
washers will be used for mounting to the
wall, if necessary.
6. Repeat steps 3 – 5 for the remaining legs.
7. Using two or more people, stand up the
cabinet and place into desired location.
CABINET lEvElING
(for all cabinets except for wall cabinet)
1. Place a small magnetic level onto the top of the cabinet to verify
the levelness of the cabinet.
2. If the floor slopes and the cabinet is not level, lift the adjustable
sleeve on the leg and adjust the cabinets height-adjustable
leveling leg by turning the nut on top of the cabinet’s foot, up or
down to bring the cabinet to a level position. This may require
two people, one person to verify / bring cabinet level and one
person to adjust the legs up and down simultaneously.
3. The cabinet must be adjusted front to back and side to side.
4. Do not put items in the cabinet until the leveling process is complete.
mOUNTING OF THE WORKTOP:
(optional, for base cabinets)
NOTE:
Base Cabinet Drawers must be removed prior to
mounting Worktop.
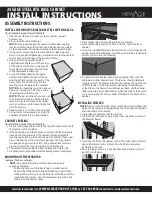
• Pull each drawer out to full extension, simultaneously
depress the left lock down and right lock up in each slider
while pulling out the drawer. The drawer will slide out of the
tracks ready to remove. See the diagram to note where the
locks are on the drawer slides.
1. Place the Worktop on top of both the base cabinet .
2. Align the Worktop so that it is flush with the side of the base
cabinet.
3. Using the supplied Worktop hardware fasten screws through the
cabinet top into the Worktop. A cordless power drill is required to
drive the screws into the Worktop.
4. Put drawers back into base cabinet by aligning them with the
ball-bearing slides drawer tracks. The drawer should slide back
into place. Push the drawer fully into the cabinet, then pull it out
to full extension. If the drawer does not stop at full extension,
or feels loose, the drawer has not been put back into the drawer
slides properly. Ensure both drawer slides attached to the drawer
are running along the drawer slides attached to the frame of the
cabinet.
INSTAllING SHElvES:
NOTE:
Plan your shelf heights and install shelves starting from the
bottom. The shelves are supported by the metal tabs on the back
and side walls of the cabinet.
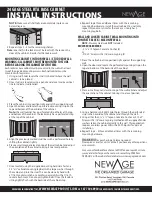
1. Determine the placement of the shelves.
2. Tilt the shelf so that one end is higher than the other as show in
the diagram below.
3. Insert the shelf into the cabinet so that the higher end is directly
above the desired slots and push the shelf down into place
behind the side slots.
4. Raise the lower end so it is directly above the desired slots and
push the shelf down.
need
more
information
?
try
,
WWW.NEWAGEPRODUCTS.COm
or
1 877 306 8930
for
answers
to
commonly
asked
questions
.


