New Yorker microTEKDV Installation, Operating And Service Instructions Download Page 18

18

V.  Electrical and Sequence of Operations

A

Electrical

1.  Install wiring and ground boiler in accordance with 

requirements of authority having jurisdiction, or in 
absence of such requirements the National Electrical 
Code, ANSI/NFPA 70, and/or the CSA C22.1 
Electric Code.

2.  A separate electrical circuit must be run from 

the main electrical service with an over-current 
device/disconnect in the circuit.  A service switch is 
recommended and may be required by some local 
jurisdictions.

3.  Wiring should conform to Figure 15.

B

Sequence of Operations

1. General

.

  A call for heat by the thermostat energizes 

the L8148A limit control which in turn energizes the 
R7184P primary control to turn on the burner.  The 
circulator will operate as long as there is a call for 
heat.  If the call for heat is not satisfi ed and the high 
limit setting is reached, the circulator will continue 
to operate, and the burner will stop until the high 
limit circuit is closed by a drop in boiler water 
temperature.

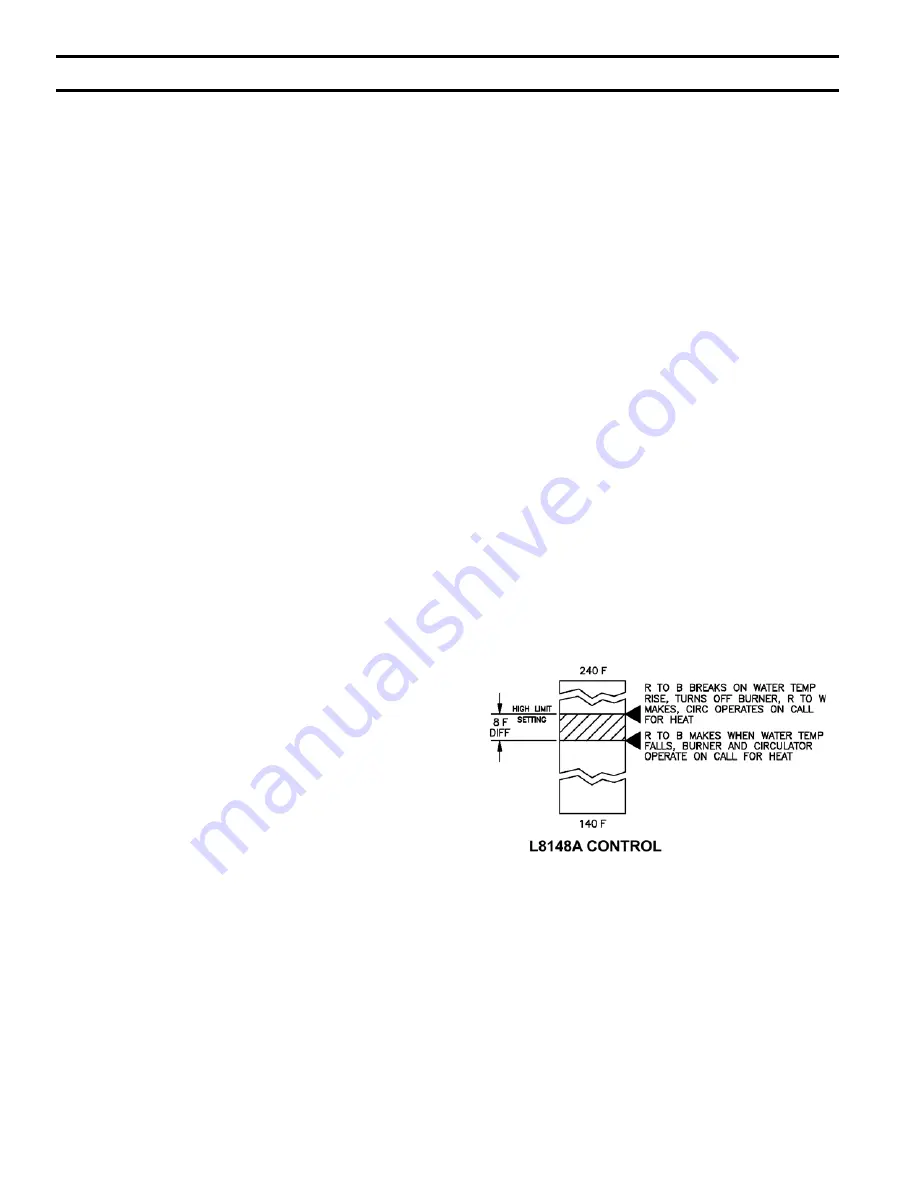
2.  L8148A Combination Limit control.
 

The switching action within the L8148A control has 
one setting, the high limit.  The switching relay is 
controlled by the low voltage room thermostat.  On 
a call for heat, the relay contacts close to complete 
the line voltage circulator circuit and also the burner 
circuit if the boiler water temperature is below the 
high limit setting.  The high limit switch shuts off 
the burner if boiler water temperature exceeds the 
high limit setting.  See Figure 14.

3.  R7184P Oil Primary Control.
 

The R7184P operates the oil burner motor, solenoid 
oil valve, and the ignition transformer in response to 
a call for heat from the L8148A limit control.

a.  A call for heat will energize the burner motor and 

ignition transformer.

b.  After a 15 second pre-purge period, in which 

time a draft is established in the fl ueways, the oil 
valve is opened.

c.  If the burner ignites within 15 seconds from 

the time the oil valve opens and the CAD cell 
senses a fl ame, the ignitor is de-energized and 
the burner will operate until the call for heat 
is satisfi ed or the setting of the high limit is 
reached.

d.  A manual reset button is provided to reset the 

safety switch after lockout.

e.  When the call for heat ends, or the CAD cell 

fails to sense a fl ame, the oil valve will close.  
The combustion blower will continue to operate 
for a postpurge period of approximately two (2) 
minutes.

4. CAD Cell.
 

The Beckett AFII burners used on the microTEKDV 
Series are supplied with a C554A Cadmium Sulfi de 
(cad cell) Flame Detector to monitor the burner 
fl ame and shut down the burner on ignition failure 
or on fl ame failure during the run cycle.  On either 
failure, the manual reset button on the R7184P will 
be tripped.

Figure 14:  Control Differential

Summary of Contents for microTEKDV

Page 1: ...i r e S d n a r e b m u N l e d o M r e l i o B e d i v o r p r e l i o b r e b m u N l e d o M r e l i o B _ _ _ _ _ V D K E T o r c i m r e b m u N l a i r e S r e l i o B _ _ _ _ _ _ _ 6 e t a D n o i t a l l a t s n I r o t c a r t n o C g n i t a e H r e b m u N e n o h P s s e r d d A INSTALLATION OPERATING AND SERVICE INSTRUCTIONS FOR microTEKDV DIRECT VENT OIL FIRED BOILER 8141965R6 2 06 P...

Page 2: ...t a l l a t s n i r e p o r p m I r e d r o r e p o r p e h t n i s n o i t c u r t s n i l l a w o l l o f o t e r u l i a F e f i l f o s s o l r o y r u j n i l a n o s r e p e g a m a d l l a g n i d u l c n i s n o i t c u r t s n i l l a d n a t s r e d n u d n a d a e R h t a e d r o y r u j n i l a n o s r e p e s u a c n a c r e l i o b e h t h t i w d e d i v o r p e r a h c i h w s l a ...

Page 3: ...e h t o s d e l l a t s n i e b t s u m d n a n o i t a r e p o e f a s r o f r i a h s e r f s d e e n r e l i o b s i h T r i a n o i t a l i t n e v d n a n o i t s u b m o c e t a u q e d a e h t e r o f e b d e n a e l c d n a d e t c e p s n i e b t s u m s m e t s y s e k a t n i r i a d n a g n i t n e v e h t f o r o i r e t n i e h T g n i t a e h e h t t u o h g u o r h t y l l a c i d ...

Page 4: ...e p o d n a y l b m e s s a r o f s r e l i o B d e r i F y l l a c i t a m o t u A r o f s e c i v e D y t e f a S s e c i v e d y t e f a s d n a n o d e l l a t s n i e b t o n n a c r e l i o B g n i r o o l f e l b i t s u b m o c n o n o i t a l l a t s n i r o f e l b a t i u s s i r e l i o b s i h T g n i t e p r a c g n i w o l l o f e h t o t e r e h d a t i n u s i h t m o r f y t i l ...

Page 5: ...ion 6 II Unpack Boiler 7 III Water Piping and Trim 9 IV Venting Air Intake Piping 12 V Electrical and Sequence of Operations 18 VI Oil Piping 20 VII System Start up 22 VIII Service and Cleaning 26 IX Repair Parts 29 X Appendix Low Water Cut Off 35 Water Content 6 1 Gallons ...

Page 6: ...date proper combustion of oil Local and national codes may apply and should be referenced 1 In unconfined spaces basement in buildings of conventional frame brick or stone construction infiltration normally is adequate to provide air for combustion An unconfined space is a space whose volume is greater than or equal to 50 cubic feet per 1000 BTUH of the combined input of all air consuming applianc...

Page 7: ... Insulation Pieces and Combustion Chamber Liner see Paragraph G 4 Remove 4 hex nuts from bolts that attach hinges and hinge spacers to left side of Tubesheet Remove 4 hex head cap screws that attach hinges to door 5 Attach 2 hinge brackets spacers to Tubesheet and 2 hinge brackets to Door on right side of boiler 3 Holes in each Hinge Bracket must line up with 3 matching holes in Spacer Tubesheet o...

Page 8: ...8 Figure 2 Minimum Clearances to Combustible Materials Figure 3 Proper Hinge Bracket Installation and Assembly ...

Page 9: ...operation of the cooling system 3 If boiler is used with a New Yorker Mate Indirect Fired Domestic Water Heater install the New Yorker Mate as a separate heating zone Refer to the New Yorker Mate Installation Operating and Service Instructions for additional information N O I T U A C r e t a w n r u t e r h t i w r e l i o b e t a r e p o t o n o D F 0 2 1 w o l e b s e r u t a r e p m e t 4 Use a...

Page 10: ...5 1 Close isolation valve in boiler supply piping 2 Isolate all circuits by closing zone valves or balancing valves 3 Attach a hose to hose bib located just below isolation valve in boiler supply piping Note Terminate hose in five gallon bucket at a suitable floor drain or outdoor area 4 Starting with one circuit open zone valve 5 Open hose bib 6 Open fill valve Make up water line should be locate...

Page 11: ...11 Figure 6 Recommended Piping for Combination Heating Cooling Refrigeration Systems Figure 7 Recommended Boiler Piping for Zoning with Circulators ...

Page 12: ...at vent terminal may be installed through is 12 inches G N I N R A W d e s o p x e e r e h w l a n i m r e t t n e v e t a c o l T O N O D y a m e c i d n a e r u t s i o M d n i w g n i l i a v e r p o t n o i t a n i m r e t t n e v d n u o r a s e c a f r u s n o m r o f d l u o h s s e c a f r u s n o i t a r o i r e t e d t n e v e r p o T c t e d e t n i a p d e l a c s r i a p e r d o o g n...

Page 13: ...e l i o b e t a r e p o t o n o D e p i p t n e v h g u o r h t e p i p t n e V d e h s u r c n e e b s a h e p i p t n e v e t a r e p o t o n o D d e l a e s y l e t e l p m o c e b t s u m s i e v e e l s n o i t a l u s n i e p i p t n e v f i r e l i o b g n i s s i m r o d e y a r f d e g a m a d B Vent Installation Direct Vent and Side Wall Vent 1 Install Vent Terminal See Figure 10 a After...

Page 14: ...14 Figure 10 Vent Installation Figure 11 Vent Connector Un Assembled ...

Page 15: ...15 Figure 13 Air Intake Installation Figure 12 Vent Connector Assembled ...

Page 16: ...ion sleeve with the gear clamps provided 6 Secure vent pipe in position with pipe straps a All horizontal runs must rise at least inch per foot toward vent terminal b Avoid any sags or dips in vent pipe C Air Intake Installation Direct Vent only See Figure 13 G N I N R A W e p i p e k a t n i r i a f o e z i s e c u d e r t o n o D n o i t s u b m o c w o l l o f d n a d n a t s r e d n u d a e R ...

Page 17: ... t a c o l t o n o D e l i t a l o v s t n e g r e t e d s C F C s e t a l l i t s i d t n e s e r p e r a s l a c i m e h c r e h t o y n a r o s r o p a v l l i w e r u l i a f d n a n o i s o r r o c r e l i o b e r e v e S t l u s e r D Air Intake Installation Indoor Air for Combustion 1 Remove the black plastic inlet cover from the right side of the Beckett AFII burner 2 Attach the Air Intake...

Page 18: ...cuit and also the burner circuit if the boiler water temperature is below the high limit setting The high limit switch shuts off the burner if boiler water temperature exceeds the high limit setting See Figure 14 3 R7184P Oil Primary Control The R7184P operates the oil burner motor solenoid oil valve and the ignition transformer in response to a call for heat from the L8148A limit control a A call...

Page 19: ...19 Figure 15 Schematic Wiring Diagram ...

Page 20: ...ed for single pipe installations 2 The single stage fuel unit may be installed single pipe with gravity feed or lift Maximum allowable lift is 8 feet See Figure 16 E C I T O N y l e t u l o s b a e b t s u m s n o i t a l l a t s n i e p i p e l g n i S t l u s e r y a m e m i r p f o s s o l r o s k a e l r o t h g i t r i a y l e t e l p m o c t i n u l e u f d n a e n i l d e e l B Figure 16 Si...

Page 21: ... both suction and return lines Refer to Figure 17 Figure 17 Two Pipe Installation 3 E L B A T M P R 0 5 4 3 S T I N U E G A T S O W T S M E T Y S E P I P O W T H t f i L g i F e e S g n i b u T f o h t g n e L m u m i x a M e r u g i F e e S R H D O 8 3 H P G 3 g n i b u T D O 2 1 H P G 3 g n i b u T 0 3 9 0 0 1 2 5 8 0 0 1 4 7 7 0 0 1 6 9 6 0 0 1 8 0 6 0 0 1 0 1 2 5 0 0 1 2 1 4 4 0 0 1 4 1 6 3 0 ...

Page 22: ... catch the oil 4 REMOVE GAUGE PORT PLUG from fuel pump and install pressure gauge 5 REMOVE TEST PLUG IN FLUE COLLAR 6 Close the service switch to start the burner If the burner does not start immediately check the manual overload switch on the motor if so equipped and the safety switch of the burner primary control G N I N R A W e l o h t h g i s f o t u o e m o c s e s a g e u l f t o h y r e V g...

Page 23: ...pplied with the microTEKDV boiler is the result of extensive testing to obtain the best flame shape and efficient combustion Other brands of the same spray angle and spray pattern may be used but may not perform at the expected level of CO2 and smoke Nozzles are delicate and should be protected from dirt and abuse Nozzles are mass produced and can vary from sample to sample For all of those reason...

Page 24: ... best solution is to bury the tank and lines deep enough to keep the oil above 40 F i HIGH ALTITUDE INSTALLATIONS Air openings must be increased at higher altitudes Use instruments and set for 11 5 to 12 5 CO2 j START UP NOISE Late ignition is the cause of start up noises If it occurs recheck for electrode settings flame shape air or water in the fuel lines k SHUT DOWN NOISE If the flame runs out ...

Page 25: ...ler operating open drain valve and slowly drain boiler c Burner should stop when water level drops below low water cutoff probe Verify limit thermostat or other controls have not shut off boiler d Adjust thermostat to lowest setting Refill boiler H Boiler is now ready to be put into service E C I T O N S I T I N O I T A R E P O L A M R O N G N I R U D F I E R O M R E T A W D D A O T Y R A S S E C ...

Page 26: ...start burner unless burner swing door is securely closed Close door install fasteners and tighten securely Door should be parallel to tubesheet when viewed from top and sides Reconnect two halves of Swing Door Interlock C Vent Air Intake System Inspect for obstructions soot accumulation proper support and deterioration of pipe fittings and joints 1 Inspect inside of vent pipe a Disconnect applianc...

Page 27: ...nditions warrant to flush out the sediment chamber so the device will be free to function properly b Annual Service Float type low water cutoffs should be dismantled annually by qualified personnel to the extent necessary to insure freedom from obstructions and proper functioning of the working parts Inspect connecting lines to boiler for accumulation of mud scale etc and clean as required Examine...

Page 28: ...ive gear 1 A National Institute for Occupational Safety and Health NIOSH approved respirator 2 Long sleeved loose fitting clothing 3 Gloves 4 Eye Protection Take steps to assure adequate ventilation Wash all exposed body areas gently with soap and water after contact Wash work clothes separately from other laundry and rinse washing machine after use to avoid contaminating other clothes Discard use...

Page 29: ...or its authorized distributors Please contact New Yorker s main office for closest local source and or any additional information regarding repair parts New Yorker Boiler Co Inc P O Box 10 Hatfield PA 19440 0010 Phone 215 855 8055 Attn Customer Service Department Figure 19 microTEKDV Boiler Trim Controls ...

Page 30: ...30 Figure 20 microTEKDV Boiler Jacket Insulation ...

Page 31: ...31 Figure 21 microTEKDV Bare Boiler Assembly ...

Page 32: ...32 Figure 22 Vent Kit Repair Parts ...

Page 33: ...gure 23 Beckett AFII Oil Burner Repair Parts For replacement oil burner parts contact your wholesaler or the burner manufacturer R W Beckett Co P O Box 1289 Elyria OH 44036 800 OIL BURN 645 2876 440 327 1060 ...

Page 34: ... e r c S p o t S 2 0 5 6 6 1 3 3 0 5 6 6 1 3 5 0 5 6 6 1 3 e n i L l e u F 4 9 3 5 e v l a V d i o n e l o S w e g a t S e l g n i S p m u P l e u F 7 5 7 1 2 e v l a V d i o n e l o S w e g a t S o w T p m u P l e u F 3 8 5 2 e v l a V d i o n e l o S l i O 9 8 7 1 2 e g n a l F t e k s a G 8 5 6 1 3 I I F A y l b m e s s A d a e H t o l s 6 1 7 6 1 5 t o l s 9 2 7 6 1 5 g u l P e l o H 9 3 1 2 p...

Page 35: ...e boiler in either the supply or return piping The minimum safe water level of a water boiler is at the uppermost top of the boiler that is it must be full of water to operate safely What Kind Typically in residential applications a probe type LWCO is used instead of a float type due to their relative costs and the simplicity of piping for a probe LWCO How to Pipe A tee is commonly used to connect...

Page 36: ...not be applicable if the boiler is used or operated over its rated capacity is installed for uses other than home heating or is not maintained in accordance with New Yorker s Installation Operating and Service Instructions and hydronics industry standards 5 Improper Operation These warranties will not be applicable if the boiler has been damaged as a result of being improperly serviced or operated...

Reviews: