3
rbors.com
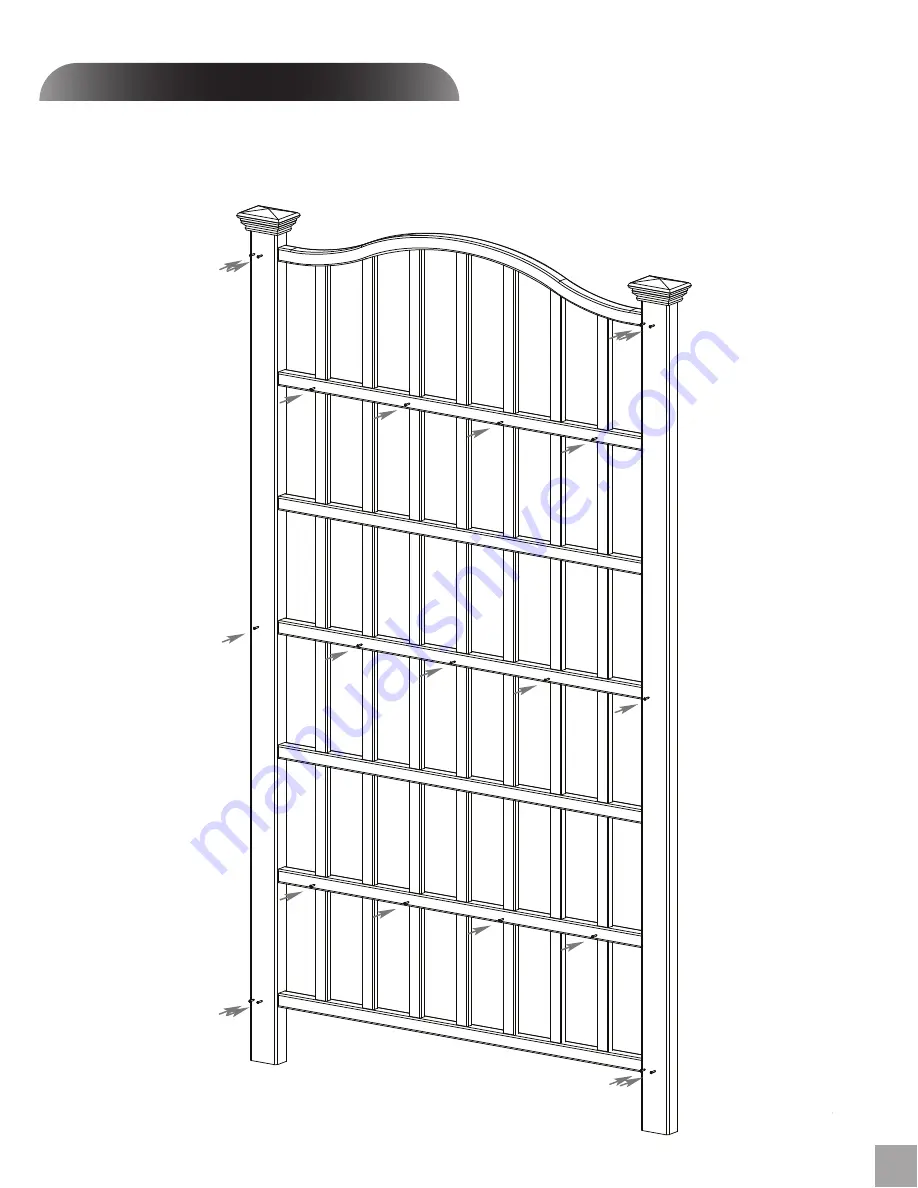
STEP T WO
W
hile making sure the trellis is square
,
secure the trellis with 21 of
the provided screws at the locations shown
b
elow:
Install the Screws
The Trellis
Page 1: ...CHECK THE INSIDE OF YOUR POSTS FOR ALL MATERIALS 10 47 in 54 in 8 in 87 38 in 96 in 2 in 5 6 7 1 Arched Top Rail 1 1 1 2 Square x 53 3 4 White Composite 2 Post Caps 2 White Composite 3 Posts 2 2 x 3 1 2 x 95 White Composite 4 Vertical Spindles 2 7 8 X 1 1 2 X 83 White Composite 5 Vertical Spindles 2 7 8 X 1 1 2 X 84 3 4 2 White 2 Composite 6 Vertical Spindles 2 7 8 X 1 1 2 X 86 1 2 White Composite...
Page 2: ...erted according to the pattern shown spindles are labeled accordingly Continue assembly by inserting the top arched rail end into the post and progressively into each of the vertical spindles Proceed to attach the second post to the trellis assembly as shown below Ensure tabs are inserted all the way into the posts Install the post caps 1 2 3 4 STEP ONE 2 3 NOTE There are locking tabs located at t...
Page 3: ...3 rbors com STEP TWO While making sure the trellis is square secure the trellis with 21 of the provided screws at the locations shown below Install the Screws The Trellis ...
Page 4: ...rtheappropriate galvanized bracket hardware STEP FOUR Move the trellis to its final location When you are satisfied with the location mark the positions of the posts then move the trellis aside and lay it carefully on it s side Excavate the 2 post holes approximately 22 deep x 6 diameter Carefully move the trellis back into position Level it both vertically and horizontally into the excavated hole...