background image

2

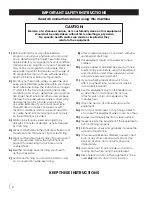
IMPORTANT SAFETY INSTRUCTIONS

1)

Before starting this or any other exercise 
program, consult your physician, who can assist
you in determining the target heart rate zone
appropriate for your age and physical condition.
Certain exercise programs or types of equipment
may not be appropriate for all people. This is
especially important for people over the age of
35, pregnant women, or those with pre-existing
health problems or balance impairments.

2)

Monitor your heart rate while you exercise and
keep your estimated pulse rate within your target
heart rate zone. Follow the instructions on pages
17 and 18 in this manual regarding heart rate 
monitoring and how to determine your appropri-
ate target heart rate zone. When used properly,
the heart rate pulse sensors, wireless chest strap
and display monitor provide a reasonably 
accurate estimate of your actual heart rate.
This estimate is not exact and persons with 
medical conditions and/or a specific need for
accurate heart rate monitoring should not rely 
on the estimations provided.

3)

Warm up before any exercise program by 
doing 5-10 minutes of aerobic activity, followed
by stretching.

4)

Wear comfortable clothes that allow freedom of
movement and that are not tight or restricting.

5)

Wear comfortable shoes made of good support
with non-slip soles. Follow the instructions on 
page 10 for exercising in your bare or sock 
covered feet.

6)

Breathe naturally, never holding your breath 
during an exercise.

7)

Avoid over training. You should be able to carry
on a conversation while exercising.

8)

After an exercise session, cool down with slow
walking and stretching.

9)

This equipment should not be used by or near 
children.

10)

Handicapped or disabled people must have
medical approval before using this equipment
and should be under close supervision when
using any exercise equipment.

11)

If you are taking medication which may 
affect your heart rate, a physician's advice 
is absolutely essential.

12)

Use this equipment only for its intended use 
as described in this manual. Do not use 
attachments not recommended by the 
manufacturer.

13)

Only one person at a time should use this 
equipment.

14)

Do not put hands, feet, or any foreign objects 
on or near this equipment when in use by others.

15)

Always use this equipment on a level surface.

16)

Never operate the equipment if the equipment is 
not functioning properly.

17)

Start exercise slowly and gradually increase the
amount of resistance.

18)

If the user experiences dizziness, nausea, chest
pain, or any other abnormal symptoms, stop 
exercise at once and consult a physician 
immediately.

19)

Use caution not to pinch fingers or hands in
moving parts when using the equipment.

20)

Risk of electrical shock. This equipment is to be
used 

only

indoors and in a dry location.

Read all instructions before using this machine

CAUTION:

Exercise of a strenuous nature, as is customarily done on this equipment,

should not be undertaken without first consulting a physician.

No specific health claims are made or implied as they

relate to the equipment.

KEEP THESE INSTRUCTIONS

Summary of Contents for 5K 5100

Page 1: ...OWNER S MANUAL FOR MAXIMUM EFFECTIVENESS AND SAFETY PLEASE READ THIS OWNER S MANUAL BEFORE USING YOUR NEW BALANCE 5K 5100 UPRIGHT BIKE 5K 5100 Upright Bike...

Page 2: ...How Much How Often 16 When to Exercise 16 Measuring Your Heart Rate 17 Clothing 17 Tips to Keep You Going 17 Heart Rate Target Zone Chart 18 Warm Up Cool Down Stretches 19 20 Care Storage 21 Workout P...

Page 3: ...your breath during an exercise 7 Avoid over training You should be able to carry on a conversation while exercising 8 After an exercise session cool down with slow walking and stretching 9 This equip...

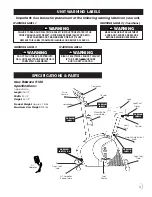
Page 4: ...ARNING LABEL 1 MAKE SURE HEIGHT ADJUSTMENT KNOB AND T KNOBS ARE SECURE BEFORE BEGINNING EXERCISES WARNING LABEL 2 3 locations UNIT WARNING LABELS SPECIFICATIONS PARTS Water Bottle and Holder Rear Foot...

Page 5: ...ur serial number and this manual ready when calling for parts Serial _______________________________ Please also provide the following information 1 Name Mailing Address and Telephone Number 2 Date of...

Page 6: ...ts for foot tubes M8 curved washers and acorn nuts for foot tubes T knob and long sleeve for handlebar T knob and short sleeve for seat post slider M5 x 16mm phillips bolts for water bottle M8 x 20mm...

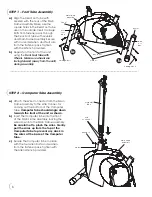
Page 7: ...nector from the Main Frame Assembly to the Wire Connector coming out the bottom of the Computer Tube Computer Tube should angle down towards the front of the unit as shown b Insert the Computer Tube i...

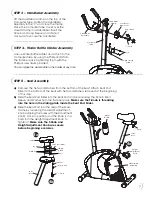
Page 8: ...ith Nuts and Washers removed at the beginning of this step b Slide the Seat Post Slider into the Seat Post and secure using the T Knob Short Sleeve and Washer from the fastener pack Make sure the T Kn...

Page 9: ...for Computer tucking the Wires inside the Computer Tube Be careful not to pinch the wires c Attach the Computer using the four Phillips Bolts you removed in step a Tighten with the Phillips Screwdriv...

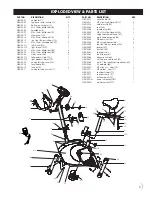
Page 10: ...62 61 27R 53 58 59 30 32 33 34 30 29 28 1 7 3 4 2 4 5 31 14 15 24 54 23L 69 18 19 56 55 27L 23R 25 60 26 33 73 48 46 46 PART NO DESCRIPTION QTY NB5100 32 water bottle 32 1 NB5100 33 M5 x 16mm phillips...

Page 11: ...a completely smooth and natural feeling that minimizes the impact on your hips knees and ankles while providing a superior aerobic and muscle toning workout The durable steel frame and front transport...

Page 12: ...The small heart will begin to blink 3 Your estimated heart rate will appear in the window approximately 6 seconds after you grasp the pulse sensors 4 Refer to the Target Heart Rate Zone Chart found on...

Page 13: ...your Computer is based on realistic expecta tions however your Computer is not individually programmable for all necessary variables to accurately monitor actual calories burned The Computer will cou...

Page 14: ...t resistance by pressing the UP or the DOWN button To PAUSE your exercising program press the START button then to resume press the START button again Programs 11 and 12 These unique programs allow th...

Page 15: ...e 4 minutes The following graphs are all the profiles in the Computer MANUAL RAMP INTERVALS RANDOM ROLLING FITNESS TEST MOUNTAIN VALLEY 60 OF TARGET HEART RATE FAT BURN PLATEAU 85 OF TARGET HEART RATE...

Page 16: ...d to remove wastes over sustained periods of time Using your bike will improve this MUSCULAR STRENGTH the ability of a muscle to exert force for a brief period of time Upper body strength for example...

Page 17: ...m of 20 continuous minutes Of course if that is too much start with a shorter time span and gradually build up to the minimum Then gradually progress until you are able to work aerobically for 20 40 m...

Page 18: ...b Gently grab both metal pulse sensors on both handlebars Wait 6 seconds c Your estimated heart rate range will be displayed on screen Check the chart on the following page to see if you are within y...

Page 19: ...3 90 min 9 10 5 min 70 85 25 5 min 35 min 3 105 min 11 12 5 min 70 85 25 5 min 35 min 3 105 min HEART RATE TARGET ZONE FOR CARDIOVASCULAR FITNESS TABLE 1 Maximum Attainable Heart Rate 85 Target Zone 7...

Page 20: ...when you feel the stretch Keep your kneecap pointing straight down and keep your knees close together Do not let the lifted knee swing outward Hold the stretch for 20 to 30 seconds Repeat for the othe...

Page 21: ...gently grasp the bent knee with your hands and pull it over your body and towards the ground You should feel a stretch in your hips abdominals and lower back Hold for 20 to 30 seconds and release Repe...

Page 22: ...require minimum maintenance However we recommend the following to keep your unit operating smoothly Use your unit indoors only Wipe all perspiration from your unit with a soft clean cloth after each...

Page 23: ...a notebook You will find it both informative and motivational to look back at what you ve done and this data will help you to chart future fitness goals as you progress Every two weeks measure yourse...

Page 24: ...23 Resting Heart Rate Calves Thighs Hips Abdomen Waist Weight Date Resting Heart Rate Calves Thighs Hips Abdomen Waist Weight Date ADDITIONAL WORKOUT PROGRESS CHARTS...

Page 25: ...____ ___________ ___________ ___________ Week Date Of Workouts Total Workout Time ___________ ___________ ___________ ___________ ___________ ___________ ___________ ___________ ___________ __________...

Page 26: ...from all defects in material and workmanship when used according to the manufacturer s instructions See Limited Warranty Card for details Save your sales receipt You may wish to staple it into this ma...

Reviews: