Nevco MPCX2 Football Operator Instructions Manual Download Page 29

25 


LED STATUS 

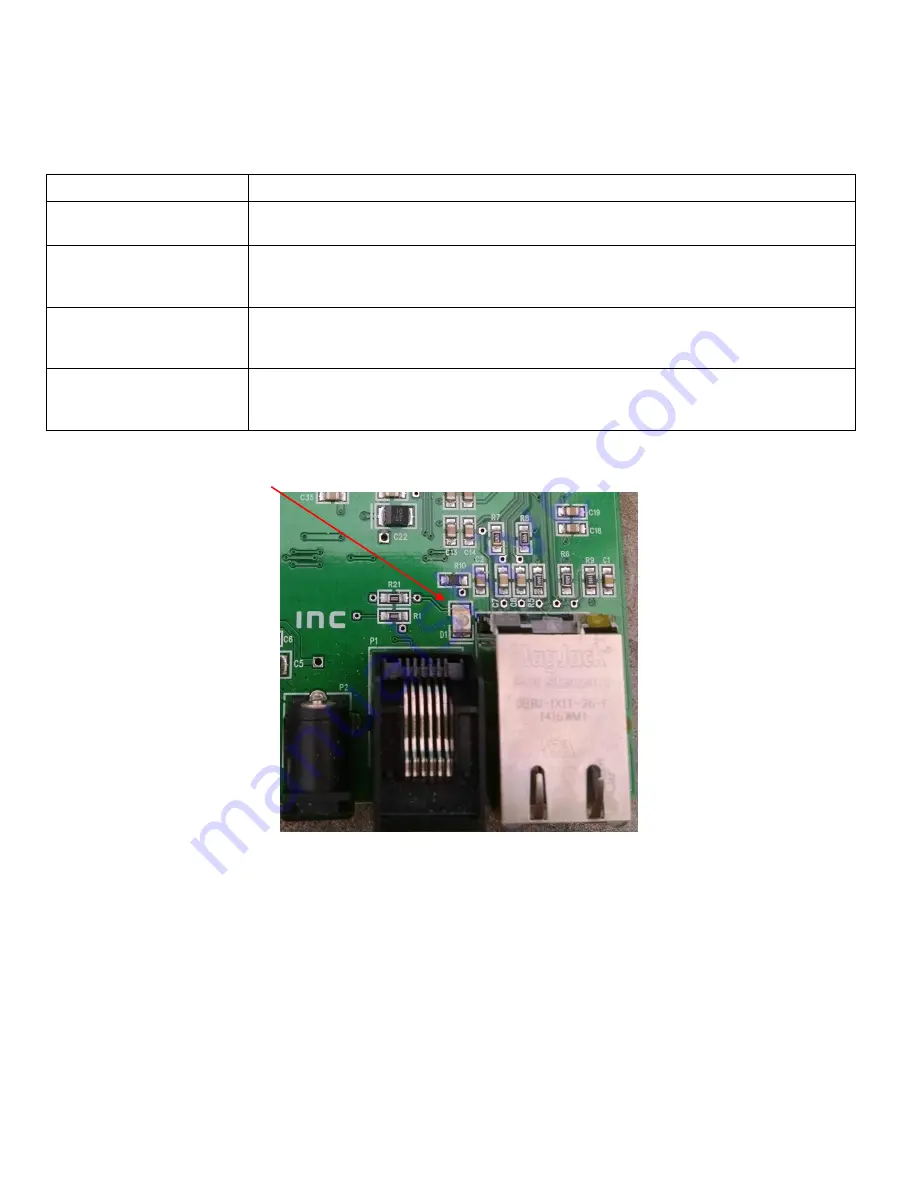
The receiver has a red status LED next to the RJ12 and Ethernet jack. It can be used to diagnose the status of the 
MPCX2 receiver.  


MPCX2 receiver status LED 


RECEIVER IDENTIFICATION ON POWERUP 

On powerup the receiver connected to the OCM will identify itself by flashing from the most significant 2 
digit numbers to the least significant 2 digit numbers. For example, a receiver with ID 123456 will flash 12, 
34, and then 56 on power up. This is used to distinguish which X2 receiver is connected to which OCM’s 
without having to open up the scoreboard.  


LED Status 

MPCX2 Connection Status 

Solid On 

The receiver is powered on, but a connection attempt has not yet been made, or a connection 
attempt was unsuccessful.   

Blinking Fast  

(multiple times a second) 

The receiver is in the network and connected. The receiver may appear to not be blinking due to it 
blinking very quickly. If the receiver is connected to Scorbitz through the Ethernet jack, then it 
will blink more visibly.  

Blinking Slow  

(approximately once a second) 

The receiver is not connected but connection attempts are being made. Each slow blink is a 
connection attempt. If the receiver is intended for the network and it is flashing slowly but never 
connects then verify that the receiver list in the MPCX2 control is correct.  

Solid Off 

The receiver is not powered on. It is also possible that the receiver is powered on but for some 
reason the LED has been turned off. If this is suspected to be the case then cycle power to the 
receiver and the LED should turn on after a brief delay.  

Summary of Contents for MPCX2 Football

Page 1: ...Rev 8 27 2015 135 0249 Scoreboard Operator s Instructions MPCX2 Segment Timer Control Since 1934 Retain this manual in your permanent files...

Page 2: ...VCO We appreciate your business The following instructions will help you become familiar with the operation and features of the scoreboard system Please take a few minutes to study this manual and to...

Page 3: ...press twice to change seconds Hold to clear segment Add to or Subtract from the selected feature also used to select options HORN KEY causes immediate manual sounding of the horn LCD Display 16 charac...

Page 4: ...s that pre date x6xx outdoor and x7xx indoor scoreboards Boards that have coax input only NOTE This version can also be used in addition but not simultaneous operation to a W6 system for dual operatio...

Page 5: ...Inserting a Segment 11 Horn Function 11 Time Function 11 MPCX2 Power function 11 2 Time Off 12 Segment Selection 12 Setting Time 12 Removing a Segment 13 Clearing Multiple Segments 13 Inserting a Segm...

Page 6: ...grammed segment time to zero The Segment timer control has a maximum of 40 segments The MPCX2 Segment Timer Control controls the Portable Segment Timer and compatible Nevco scoreboards The MPCX2 Segme...

Page 7: ...ds to indicate segment 1 complete Time On is pressed to begin Segment 2 Segment 2 Horn Sounds to indicate segment 2 complete Automatically begins time on segment 3 Seg 3 of 5 A 2 00 Time ON Strikes 0...

Page 8: ...9710 24xx 9410 3000 Series For models 3500 3502 3504 3514 3515 3516 3520 3525 3534 3550 9505 DGT 5 9405 3020 3400 3402 3414 3415 3416 3425 3434 3455 and 9515 7000 Series For models 7504 7505 7516 752...

Page 9: ...shing o If time is above a minute the display will display the minutes in the segment o If time is below a minute the display will count down the seconds Standalone Segment F Displays the current segm...

Page 10: ...tings The scoreboard settings preprogrammed into the control are the brightness setting and the scoreboard model type setting Display Brightness is set to bright Scoreboard model type is set to type A...

Page 11: ...he first option to come up will be to insert a segment Press the and new segment will be placed at the end and will be copied from the previously last segment Note A segment cannot be inserted added i...

Page 12: ...key down for fast advance Press the Next Segment key to save your segment and update the segment timer To Start the Timer Press The control will display To Stop the Timer Press The control will displa...

Page 13: ...to the control then the receiver was not found Power the control OFF make sure all associated receivers are powered ON and power on the control again Please allow time for each control to complete its...

Page 14: ...horn and auto advance Segment Editing Segment editing is disabled when time is on The following functions lead to the Time Off To Edit screen This function is disabled while time is on Seg 1 of 40 HA...

Page 15: ...emoving a Single Segment Hold to delete current segment Each segment number will go down by 1 2 is now 1 etc and total segments will decrease by one each time this is done Inserting a Segment To inser...

Page 16: ...es will toggle between editing minutes and seconds of the selected segment Use the or keys to change the time settings for minutes or seconds Note Hold the key down for fast advance Note Each segment...

Page 17: ...added to the segment list in the last segment spot Setting Segment Function Options Segment function options are Auto Advance Enables the segment to automatically advance to the next segment when the...

Page 18: ...14 Horn Function Sounds the horn Time Function Turns time on the segment timer MPCX2 Power function Turns the control and segment timer off TIME ON Seg 1 of 40 HA 0 31 Time ON ON OFF HORN...

Page 19: ...ime on each segment desired to use One press of the SET TIME button will highlight the minutes of the current segment to be edited Additional presses will toggle between editing minutes and seconds of...

Page 20: ...Setting Segment Function Options Segment function options are Auto Advance Enables the segment to automatically advance to the next segment when the time is completed If it is not enabled then the se...

Page 21: ...coreboard with another control Standard Options The options key can be used to access the following features Each press of the options key moves you to the next option screen Note In this illustration...

Page 22: ...valid Time Of Day Otherwise blanks the entire scoreboard Note Not all scoreboard models support Time Of Day and thus not all controllers will display Time of Day Reports the condition of the batteries...

Page 23: ...ess the button to scroll through the different link menus Please refer to sections Mating a New Control to Receiver s and Adding Deleting or Enabling Disabling Receiver ID s for detailed instructions...

Page 24: ...ed on before turning on the MPCX2 controller in order to allow enough time for the receiver to be initialized Step 4 Insert the batteries included with the MPCX2 control or turn the control ON by pres...

Page 25: ...splay reads Step 5 Press the key to select the scoreboard model shown in the table below Step 6 Press the key to exit the menu Multiple Receivers and Controllers Both multiple controllers and receiver...

Page 26: ...5 3516 3520 3525 3534 3550 3555 9605 9505 9715 9515 3402 3404 3414 3415 3416 3425 3434 3455 9405 Type C 7504 7524 9505 9515 9605 9715 7404 7405 7424 Type D 7604 7605 7614 7615 7616 7620 7624 7625 7630...

Page 27: ...8 10 16 18 With Models 1615 1620 1625 1632 3656 3680 3685 3688 7616 7680 7685 X6XX Timer PCD A 08 10 16 18 With Models 1600 1609 1610 1630 1635 1640 1650 3600 3656 3680 3685 3688 7680 7685 X6XX Standa...

Page 28: ...reboard module Check all cables and connections Scoreboard timer is ON but does not respond to control Control and receiver are not communicating Turn control OFF then ON to establish communications M...

Page 29: ...en made or a connection attempt was unsuccessful Blinking Fast multiple times a second The receiver is in the network and connected The receiver may appear to not be blinking due to it blinking very q...

Page 30: ...to existing wired installations FCC part 15 Class B CE RoHS NOTE This equipment has been tested and found to comply with the limits for a Class B digital device pursuant to part 15 of the FCC Rules T...

Reviews: