Spraying
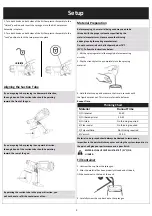
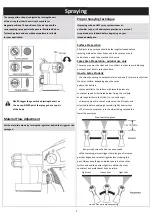
The
spray
pattern
shape
is
adjusted
by
turning
the
ears
of
the
air
cap
to
either
the
vertical,
horizontal,
or
diagonal
positions.
The
positions
of
the
air
cap
and
the
corresponding
spray
pattern
shapes
are
illustrated
below.
Test
each
pattern
and
use
whichever
pattern
is
suitable
for
your
application.
NEVER
trigger
the
gun
while
adjusting
the
ears
on
the
air
cap.
NEVER
point
the
spray
gun
at
any
part
of
the
body.
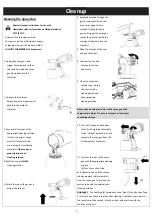
Material
Flow
Adjustment
Set
the
material
volume
by
turning
the
regulator
behind
the
trigger
of
the
spray
gun.
Proper
Spraying
Technique
If
spraying
with
an
HVLP
spray
system
is
new
or
unfamiliar
to
you,
it
is
advisable
to
practice
on
a
piece
of
scrap
wood
or
cardboard
before
beginning
on
your
intended
workpiece.
Surface
Preparation
All
objects
to
be
sprayed
should
be
thoroughly
cleaned
before
spraying
material
on
them.
Areas
not
to
be
sprayed
may,
in
certain
cases,
need
to
be
masked
or
covered.
Spray
Area
Preparation
‐
outdoor
use
only
The
spray
area
must
be
clean
and
free
of
dust
in
order
to
avoid
blowing
dust
onto
your
freshly
sprayed
surface.
How
to
Spray
Properly
•
Position
the
spray
gun
perpendicular
to
and
one
(1)
or
more
inches
from
the
spray
surface,
depending
upon
the
spray
pattern
size
desired.
•
Spray
parallel
to
the
surface
with
smooth
passes
at
a
consistent
speed
as
illustrated
below.
Doing
this
will
help
avoid
irregularities
in
the
finish
(i.
e.
runs
and
sags).
•
Always
apply
a
thin
coat
of
material
on
the
first
pass
and
allow
to
dry
before
applying
a
second,
slightly
heavier
coat.
•
The
closer
your
sprayer
is
to
the
object
being
sprayed
the
lower
the
overspray.
Even
coat
throughout
Keep
stroke
smooth
and
at
an
even
speed
•
When
spraying,
always
trigger
the
spray
gun
after
spray
pass
has
begun
and
release
trigger
before
stopping
the
pass.
Always
keep
the
gun
pointed
squarely
at
the
spray
surface
and
overlap
passes
slightly
to
obtain
the
most
consistent
and
professional
finish
possible.
Light
coat
Heavy
coat
Light
coat
Do
not
flex
wrist
while
spraying.
5

