background image

@

A

B

C

D

E

F

G

H

I

C

# @

A

B

E

G

H

I

D

F

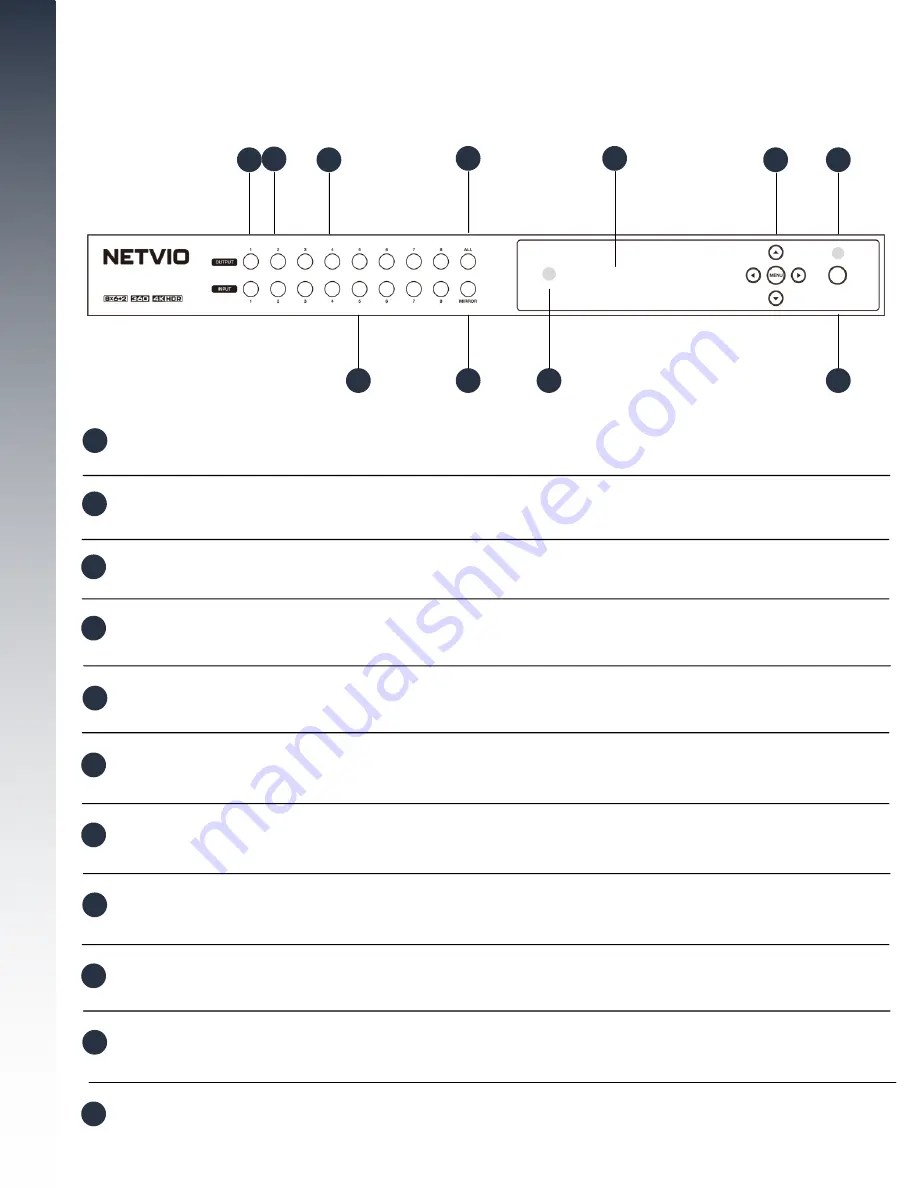
Front Panel

#

Dual purpose function

. In normal operation, it allows you to select output 1, followed by the input selection to

initiate a manual video switch. However if this button is pressed and held for 40s it will 

reset all network

settings

, returning to factory default. The LCD display will provide confirmation of reset.

Output - 1

Output - 2

LED display showing status of input/output, current IP settings, RS-232 settings & EDID input status for each

output. Use the MENU button to scroll through options, using arrows to navigate. Use MENU to return to home

position.

Output Selection

Pressing the ALL button, followed by an input selection will send the video source to all connected displays.

All Displays

Status Display

Use the MENU button to scroll through options, using arrows to navigate. Use MENU to return to home position.

Menu Arrows

Red LED indicates that standby mode is active.

Standby LED

Use any of the input selection buttons after selecting the required output to initiate a manual video switch.

Input Selection

One button press to initiate output 1 to input 1, output 2 to input 2 etc.

Mirror

Dual purpose function

. In normal operation, it allows you to select output 2, followed by the input selection  to

initiate a manual video switch. However if this button is pressed and held for 40s it will 

reset all settings

,

returning to factory default.  The LCD display will provide confirmation of reset.

Area to focus direct IR commands 

IR receiving window

Press & hold for 3 seconds to put matrix into standby mode. Short press to wake Matrix.

Power standby button

Use any of the output numbers to select a display, followed by a video input button below, to initiate a manual

video switch.

6

Summary of Contents for MX-HT2-0806-10

Page 1: ...USER GUIDE MX HT2 0806 10 V1 Simplifying Complexity AUDIO VIDEO SOFTWARE...

Page 2: ...Wiring Cable connector guidelines Which HDBaseT receiver Product features Front panel Rear panel Rear panel continued IR accessories wiring guidelines Netvio 360 Setting up your HT2 Matrix Netvio 360...

Page 3: ...following QR codes IP Settings DHCP auto assigned without DHCP Serial Settings 115200 Baud 8n1 Default User Name Password admin password Factory reset Press hold output 2 for 40 seconds display will c...

Page 4: ...uct service requirements please contact Netvio Ltd or an authorised reseller for service procedures Any unauthorised attempt to repair the product or attempts to replace components with non approved p...

Page 5: ...System wiring suggestion Drivers available at www netvio co uk 3...

Page 6: ...as this will undoubtedly cause transmission issues Use moderate to low pressure when pulling category cable avoiding pressures in excess of 11kgf of force Keep category cable away from sources of EMI...

Page 7: ...to 70m Enhanced outputs 7 8 performance provides 4K 60 HDR support to 70m 1080p to 100m All outputs support 4K 1080p scaling All HDBaseT outputs are mirrored with variable line level audio outputs via...

Page 8: ...MENU button to scroll through options using arrows to navigate Use MENU to return to home position Menu Arrows Red LED indicates that standby mode is active Standby LED Use any of the input selection...

Page 9: ...accessories Global IR Input Port Used to send IR signals received from the display location then repeated to a media source via a supplied IR emitter cable Netvio does not support the use of 3rd third...

Page 10: ...ng remote commands from the display area 2 person finding the best position on media source Moving the IR emitter around maybe needed to find the sweep spot IR devices that use the same IR commands wi...

Page 11: ...ftware direct from the Netvio website there is no security risk to your PC or MAC A suitable wired and wireless network with a router supporting DHCP Dynamic Host Configuration Protocol is required wh...

Page 12: ...ing into the world of Netvio GO From a doodle to onscreen AV system design More in depth instructional videos on how to use Netvio 360 including more advanced set ups can be found at www netvio co uk...

Page 13: ...displays and audio products Simply add each smart user device by scanning a 360 software generated QR code or download the uploaded project directly from the matrix Netvio GO can be used as a simple A...

Page 14: ...HDR Max Pixel Clock 600MHz 600Mcsc HDR Compatibility HDR10 HDR10 Hybrid Log Gamma Dolby Vision Scaler Function 4K to 1920x1080 progressive Modes include pass through no scaling Fixed 4K 2K Automatic H...

Page 15: ...party integration via public API Drivers Control Drivers available for control systems including C4 Crestron RTi Elan Discovery configure optimise design via Netvio 360 utility Full spectrum AV contro...

Page 16: ...vio co uk UK 44 0 870 448 7001 US 1 833 720 0637 Sales E sales netvio co uk UK 44 0 870 448 7001 44 0 7444 807 836 Netvio Ltd InfoLab21 Lancaster University Bailrigg Road Lancaster UK LA1 4WA Contact...

Reviews: