


Customizing the Tester for your Network
51
3
Select
Profile Setup
from the left side navigation menu.
4
Edit a Profile:
If necessary, transfer the “Default” Profile (or a profile
created on AirCheck G2) from
AirCheck Profiles
, in the
left pane, to
Local Profiles
in the right pane by
dragging and dropping the Profile name.
Then, double-click the Profile name, or click the pencil
icon
to edit the Profile’s configuration.
You can also click the icon
to “Create a new Profile.”
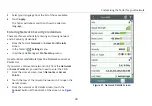
5
In the
Create Profile
or
Edit Profile
dialog box, select
Networks
from the left-side headings.
6
Click the
Add
button.
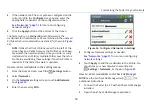
7
Enter the required network configuration information,
and click
Save
.
8
Transfer the new or updated Profile from the
Local
Profiles
pane to the
AirCheck G2 Profiles
pane by
dragging and dropping the Profile name.
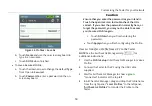
Once added, the network or AP name will appear in the
AirCheck G2 unit’s
Settings
menu on the
Networks
screen as shown in
Using Profiles to Manage Settings and Security
Credentials
Profiles are files that save configuration settings for the
Tester and security credentials for networks and APs, which
let the Tester connect and perform roaming tests and
connectivity tests to DNS servers, DHCP servers, the default
router, and network targets. Profiles also include the
following information:
All 802.11 settings (For example,
Enable 2.4-GHz band
and
Enable 5-GHz band
)
AutoTest settings
Ethernet test settings
Interferer Settings
IP addresses used for ping or TCP Port Connect tests
iPerf Settings
Location and Language
Thresholds for the colored bar graphs and Pass,
Warning, and Fail ratings
Profiles can be password protected so that unauthorized
users cannot use the Tester to connect to secure networks or
access network security credentials on the AirCheck G2
Manager PC application.


