background image

  Chapter 2.  Wireless Settings


|


15

Wireless Cable Modem Gateway CG2003D User Manual 

Consider Every Device on Your Network

Before you begin, check the following:

•     

Every wireless computer has to be set up to get an IP address by DHCP from the 

gateway as described in 

Use Standard TCP/IP Properties for DHCP 

on page


18

•     

To join your wireless network, each computer or wireless adapter has to be compatible 

with the wireless mode (bandwidth/data rate) of the gateway. Check that each wireless 
computer or device supports the mode you want to use.

•     

The security option on each wireless device in the network has to match the gateway. For 

example, if you use WPA2 or WPA, you need to use the pre-shared key from each 
wireless computer in order for it to join the wireless network. 

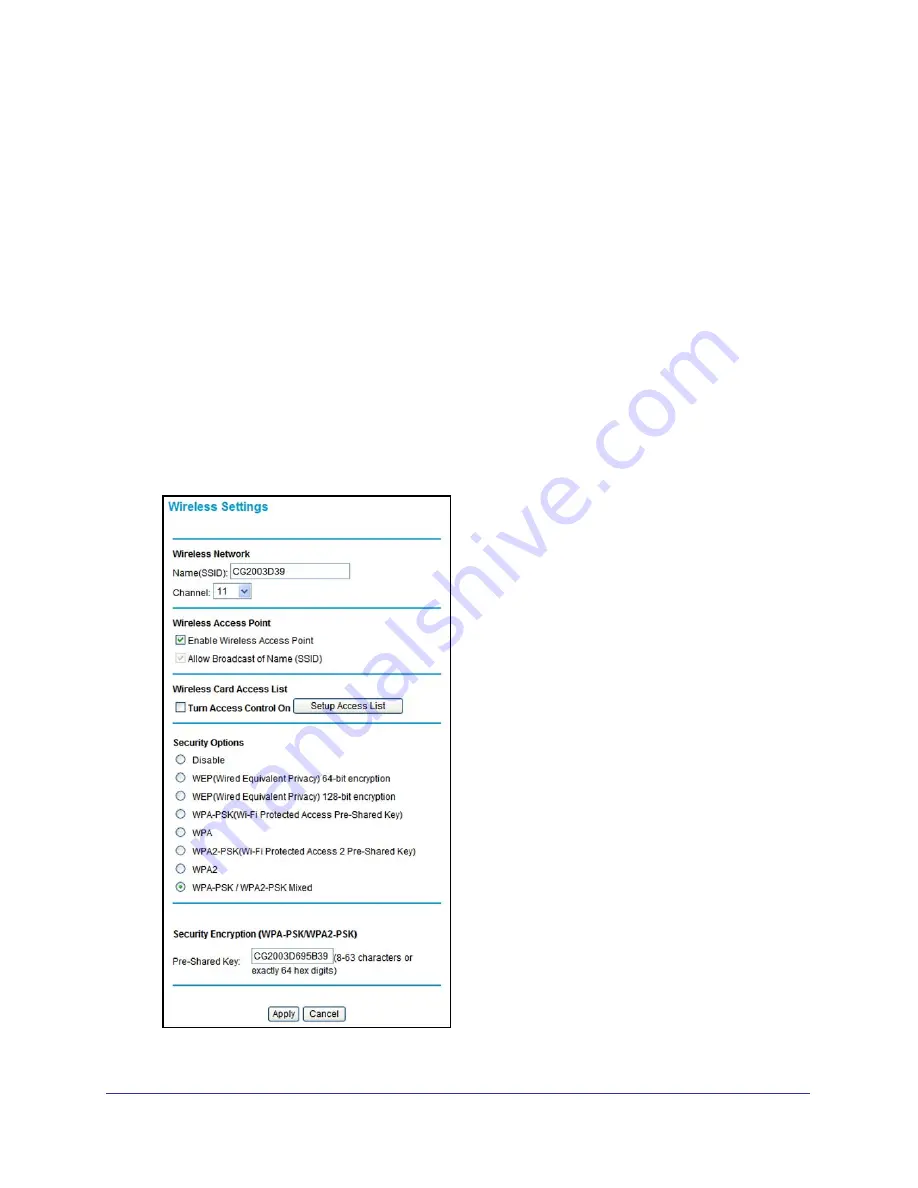
View or Change Wireless Settings

To view or change the wireless settings:

1. 

Select 

Setup > Wireless Settings

. The Wireless Settings screen displays.

2. 

If you make changes, you have to click 

Apply 

for them to take effect.

Summary of Contents for CG2003D

Page 1: ...350 East Plumeria Drive San Jose CA 95134 USA January 2011 202 10773 01 v1 0 Wireless Cable Modem Gateway CG2003D User Manual ...

Page 2: ...Countries See Support information card Trademarks NETGEAR the NETGEAR logo ReadyNAS ProSafe Smart Wizard Auto Uplink X RAID2 and NeoTV are trademarks or registered trademarks of NETGEAR Inc Microsoft Windows Windows NT and Vista are registered trademarks of Microsoft Corporation Other brand and product names are registered trademarks or trademarks of their respective holders Statement of Condition...

Page 3: ...s or Devices to Your Network 13 Manual Method 13 Wi Fi Protected Setup WPS Method 13 Wireless Settings Screen 14 Consider Every Device on Your Network 15 View or Change Wireless Settings 15 Set up Access Control by MAC Address 16 Change the WPA Security Option and Pre Shared Key 18 Set WEP Encryption and Passphrase 19 Wireless Guest Networks 20 Wireless Guest Network Screen Fields 21 Set up Wi Fi ...

Page 4: ...Set up Remote Management 43 Remote Management After a Reset 44 URL to Connect to The Gateway 44 Universal Plug and Play UPnP 45 Chapter 6 Troubleshooting Using LEDs to Troubleshoot 47 Cannot Log in to the Gateway 48 Troubleshooting the Internet Connection 49 Troubleshooting a TCP IP Network Using a Ping Utility 49 Test the LAN Path to Your Gateway 49 Test the Path from Your PC to a Remote Device 5...

Page 5: ...n the following items Wireless Cable Modem Gateway CG2003D AC power adapter Category 5 CAT5 Ethernet cable Stand If any parts are incorrect missing or damaged contact your NETGEAR dealer Keep the carton and original packing materials in case you need to return the product for repair Gateway Stand You can place the gateway vertically or horizontally To place the gateway vertically attach the stand ...

Page 6: ...powered up or it is getting upstream configuration information Off The gateway s self test and initialization is complete but it has not completed the upstream scan Cable Link On green Configuration by your cable service provider is complete Blink Both downstream and upstream links are established but the configuration is not done Off Configuration of the cable interface is in progress The downstr...

Page 7: ...ngs MAC address and serial number Reset to Factory Defaults button Serial number MAC address Default wireless settings Figure 4 Label on gateway bottom What You Need Before You Begin A computer with an Ethernet port to connect to the gateway while you set it up The computer has to be set up to use DHCP For help with DHCP configuration see the link to the online document ITCP IP Networking Basics i...

Page 8: ...way coaxial cable connection 2 Use the Ethernet cable that shipped with your gateway to connect a LAN port B to the Ethernet adapter in your computer B Figure 6 Gateway Ethernet cable connection 3 Connect the power adapter to the gateway and plug it into an outlet 4 Wait about 30 seconds for the lights to stop blinking and then verify the following The power LED is lit The cable link LED is solid ...

Page 9: ...m Internet service type http 192 168 0 1 in the address field of your Internet browser A login window opens 2 Log in to the gateway There are two methods to log in For superuser access enter MSO for the user name and changeme for the password Both are case sensitive To access the gateway features except for content filtering enter admin for the user name and password for the password both in lower...

Page 10: ...ateway wirelessly NETGEAR recommends that during setup you use an Ethernet cable to connect your computer so that you can log in to the gateway Note If you cannot connect to the gateway check the Internet Protocol TCP IP properties in the Network Connections section of your PC Control Panel They should be set to obtain both IP and DNS server addresses automatically See your computer documentation ...

Page 11: ...page 14 Wireless Guest Networks on page 20 Set up Wi Fi Multimedia on page 21 Wireless Adapter Compatibility A wireless adapter is the wireless radio in your PC or laptop that lets the PC or laptop connect to a wireless network Most PCs and laptops come with an adapter already installed but if it is outdated or slow you can purchase a USB adapter to plug into a USB port Make sure the wireless adap...

Page 12: ...e broadcast be sure to keep wireless security enabled Restrict Access by MAC Address You can enhance your network security by allowing access to only specific PCs based on their Media Access Control MAC addresses You can restrict access to only trusted PCs so that unknown PCs cannot wirelessly connect to the gateway The Wireless Station MAC address filtering adds additional security protection to ...

Page 13: ...Wi Fi Protected Setup WPS is a standard that lets you easily join a secure wireless network with WPA or WPA2 wireless security The gateway automatically sets security for each computer or device that uses WPS to join the wireless network To use WPS make sure that your wireless devices are Wi Fi certified and support WPS NETGEAR products that use WPS call it Push N Connect1 Note If the wireless net...

Page 14: ...n enter the client security PIN number WPS PIN method While the gateway attempts to connect the WPS LED on the front of the gateway blinks green When the gateway establishes a WPS connection the LED is solid green and the gateway WPS screen displays a confirmation message 4 Repeat to add another WPS client to your network Wireless Settings Screen The Wireless Settings screen lets you view or chang...

Page 15: ...ompatible with the wireless mode bandwidth data rate of the gateway Check that each wireless computer or device supports the mode you want to use The security option on each wireless device in the network has to match the gateway For example if you use WPA2 or WPA you need to use the pre shared key from each wireless computer in order for it to join the wireless network View or Change Wireless Set...

Page 16: ...al in the gateway so it can accept wireless clients When not enabled the gateway accepts wired clients only This check box is selected by default Allow Broadcast of Name SSID This setting allows the gateway to broadcasts its SSID so wireless stations can see this wireless name SSID in its scanned network list This check box is selected by default To turn off the SSID broadcast clear the Allow Broa...

Page 17: ...r fields The MAC address can usually be found on the bottom of the wireless device Then click Add Note If no device name displays when you enter the MAC address you can type a descriptive name for the computer that you are adding 4 Click Apply to save these settings Now only devices in the Access List table are allowed to wirelessly connect to the gateway Security Options Settings The Security Opt...

Page 18: ...the WPA Security Option and Pre Shared Key 1 In the Security Options section select the WPA option that you want 2 Enter the pre shared key that you want to use The pre shared key acts as a password to access your wireless network It is a text string from 8 to 63 characters 3 Click Apply ...

Page 19: ...e field and click Generate The four key fields are automatically populated Manual The number of hexadecimal digits that you enter depends on the encryption strength setting For 64 bit WEP enter 10 hexadecimal digits any combination of 0 9 a f or A F For 128 bit WEP enter 26 hexadecimal digits any combination of 0 9 a f or A F 3 Select the radio button for the key you want to make active Make sure ...

Page 20: ...work that you want to work with NETGEAR strongly recommends that you change the SSID to a different name Note that the SSID is case sensitive For example GuestNetwork is not the same as Guestnetwork For guest networks wireless security is disabled by default NETGEAR strongly recommends that you implement wireless security for the guest network 3 Select a security option for the guest network and s...

Page 21: ...s are as follows 192 168 1 10 and 192 168 1 99 192 168 2 10 and 192 168 2 99 192 168 3 10 and 192 168 3 99 Lease Time Enter the lease time for the guest network The default is 86400 seconds 24 hours Enable Guest Network check box Guest Network Name SSID You can use this field to change the SSID for the selected guest network Set up Wi Fi Multimedia Wi Fi Multimedia WMM also referred to as Wireless...

Page 22: ...t message ACK to confirm the reception of a packet Disabling acknowledgement messages might improve the efficiency of packet transmission When the wireless communication quality is poor enable acknowledgement messages so that you are notified when a package is lost On Acknowledgement messages are enabled Off Acknowledgement messages are disabled Power Save Support Select the power save mode to con...

Page 23: ...o use content filtering and firewall rules for the gateway This chapter includes Logs on page 24 Block HTTP Traffic by Keywords or Domains on page 25 Block Services on page 26 Port Forwarding and Port Blocking on page 27 Set Up Port Blocking on page 27 Set Up Port Forwarding on page 28 Set up Port Triggering on page 30 ...

Page 24: ... 1 Select Content Filtering Logs The Logs screen displays 2 Enter the following information Contact Email Address Enter an email address to which the logs will be sent Use a full email address for example ChrisXY myISP com SMTP Server Name Enter the outgoing SMTP mail server of your ISP for example mail myISP com If you leave this box blank no alerts or logs will be sent Sender Email Address Enter...

Page 25: ... click Add Keyword The Keyword List supports up to 32 entries 3 In the Add Domain field enter a domain and click Add Domain Here are some sample entries Specify XXX to block http www badstuff com xxx html Specify com if you want to allow only sites with domain suffixes such as edu or gov Enter a period to block all Internet browsing access 4 When you are finished making changes click Apply Note To...

Page 26: ... clear its check box Firewall Features When firewall features are enabled the gateway performs stateful packet inspection SPI and protects against denial of service DoS attacks Ipsec PassThrough When Ipsec passthrough is enabled IPSec traffic is forwarded When it is disabled this traffic is blocked PPTP PassThrough When PPTP passthrough is enabled PPTP traffic is forwarded When it is disabled this...

Page 27: ...Port Blocking These rules control access to outside resources from local users The default rule is to allow all access from the LAN side to the outside You can use port blocking to add predefined or custom rules to specify exceptions to the default rules Set Up Port Blocking You can use port blocking to block outbound traffic on specific ports Note Any outbound traffic that is not blocked by rules...

Page 28: ...s that are currently forwarded To delete a service select the radio button in the Active Filters table for the service that you want to delete and then click Delete Set Up Port Forwarding Because the gateway uses Network Address Translation NAT your network presents only one IP address to the Internet and outside users cannot directly address any of your local computers However by defining an inbo...

Page 29: ...er a name for the service Start Port Enter the start port for the service End Port Enter the end port for the service Protocol Select the protocol for the ports TCP Select TCP only UDP Select UDP only Both Select both TCP and UDP Local IP Address Complete the local IP address for the computer that is using the service Note To reset the selection in the Service field and to clear all the fields in ...

Page 30: ... used to easily enable gaming and other Internet applications that would otherwise be blocked by the firewall Using this feature requires that you know the port numbers that are used by the application Once set up port triggering operation is as follows 1 A PC makes an outgoing connection using a port number defined in the Port Triggering table 2 The gateway records this connection opens the incom...

Page 31: ...t for the trigger range Target Range The target range consists of the range of incoming ports to be opened when triggered Start Port Enter the start port for the target range End Port Enter the start port for the target range Protocol Select the protocol for the ports TCP Select TCP only UDP Select UDP only Both Select both TCP and UDP Select the Enable check box to activate the port trigger 3 Per...

Page 32: ...is chapter includes Gateway Status on this page Connection Status on page 34 Change Passwords on page 34 Back Up and Restore Your Settings on page 36 Event Log on page 36 Run the Diagnostic Ping Utility on page 37 Log in to the gateway using its default address of http 192 168 0 1 or at whatever IP address the unit is currently configured Use the default user name of admin and default password of ...

Page 33: ...gateway Software Version The software version of the gateway Cable MAC Address The MAC address used by the cable modem port of the gateway This MAC address may need to be registered with your Cable Service Provider gatewayCable Modem Serial Number The serial number of the gateway CM certificate If the Cable Modem certificate is Installed it is possible for the service provider to upgrade your Data...

Page 34: ...locks the downstream channel 2 It acquires the upstream parameters and range 3 It locks the upstream channel 4 It acquires the IP address through DHCP Change Passwords The gateway has two user names and passwords They are case sensitive For superuser access the user name is MSO and its default password is changeme For access to all gateway features except content filtering the user name is admin a...

Page 35: ... configuration and reset it to the factory default settings For information about the factory default settings see Factory Default Settings in Appendix A To reset the gateway to its factory settings 1 In the Set Password screen see Figure 1 Select Maintenance Set Password The Set Password screen displays to the right of Restore Factory Defaults select the Yes radio button 2 Click Apply to save you...

Page 36: ...urrent configuration settings click Backup 3 To restore the saved configuration settings from a backup file a Click Browse b Locate and select the previously saved backup file by default CG2003D cfg c Click Restore A message notifies you when the gateway has been restored to previous settings Then the gateway restarts which takes about one minute Note When restoring configuration settings do not i...

Page 37: ...ogs in an e mail message For information about email notifications see Logs on page 24 Run the Diagnostic Ping Utility You can use the Diagnostics screen to test connectivity to a PC using the ping command To start a ping test 1 Select Maintenance Diagnostics The Diagnostics screen displays 2 Under Ping Test Parameters enter the following settings Target Enter the IP address of the computer that y...

Page 38: ... of times you would like to ping the computer Ping Interval Enter the time you would like to wait between the pings 3 Click Start Test To stop the test while in progress click Abort Test 4 To see the results of the ping test click REFRESH To clear the test results after the test has completed click Clear Results ...

Page 39: ...n page 40 Set Up a DMZ Host on page 41 LAN IP Settings on page 41 Set up Remote Management on page 43 Universal Plug and Play UPnP on page 45 Note For information about port forwarding and port blocking see Chapter 3 Content Filtering and Firewall Rules Log in to the gateway using its default address of http 192 168 0 1 or at whatever IP address the unit is currently configured Use the default use...

Page 40: ...ynamic DNS client service provider will give you a password or key To configure dynamic DNS 1 Select Advanced Dynamic DNS The DDNS screen displays 2 Select www DynDNS org in the DDNS Service drop down list 3 Enter the following information User Name Enter the user name for your dynamic DNS account Password Enter the password or key for your dynamic DNS account Host Name Enter the host same that yo...

Page 41: ...sponding to pings can be useful in a diagnostic situation 3 Complete the DMZ IP address in the DMZ Address field to designate a PC that is available to anyone on the Internet for services that you have not defined Because of security concerns only do this if you are willing to risk open access If you do not assign a DMZ address the gateway discards any undefined service request 4 Click Apply to sa...

Page 42: ...ovides the TCP IP configuration for all the computers that are connected to the gateway You can change the default setting Yes Select this settings to enable the DHCP server on the gateway and assign IP addresses to computers on your LAN automatically No Select this settings to assign IP addresses manually or if you have another DHCP server on your network If you disable the DHCP server you will n...

Page 43: ...Lease Info table click the radio button for the MAC and IP address that you want to remove 2 Click Delete to remove the information for the selected MAC and IP address from the DHCP Client Lease Info table To remove all information from the DHCP Client Lease Info table click Clear DHCP Leases Set up Remote Management With remote management you can allow a user or users on the Internet to configure...

Page 44: ... select the Allow Remote Management after Factory Default Reset check box under Revert to factory default settings in the Remote Management screen Then click Erase CAUTION Do not attempt to go online turn off the gateway shut down the computer or do anything else to the gateway until the gateway finishes restarting When the test light turns off wait a few more seconds before you do anything with t...

Page 45: ...sult in less fresh device status Advertisement Time to Live Enter the time to live for the advertisement which is measured in hops steps for each UPnP packet that is sent A hop is the number of steps that are allowed to propagate for each UPnP advertisement before it disappears The number of hops can range from 1 to 255 The default value for the advertisement time to live is 4 hops which should be...

Page 46: ...ay Tip NETGEAR provides helpful articles documentation and the latest software updates at http www netgear com support This chapter includes Using LEDs to Troubleshoot on page 47 Cannot Log in to the Gateway on page 48 Troubleshooting the Internet Connection on page 49 Back Up and Restore Your Settings on page 36 ...

Page 47: ...al support All LEDs Stay On Clear the Gateway s configuration to factory defaults This will set the Gateway s IP address to 192 168 0 1 See Back Up and Restore Your Settings on page 36 If the error persists you might have a hardware problem and should contact technical support LAN LED Stays Off If a LAN LED is off for a port with an Ethernet connection check the following Make sure that the Ethern...

Page 48: ...ection from the PC to the gateway and reboot your PC If your gateway s IP address has been changed and you don t know the current IP address clear the gateway s configuration to factory defaults This will set the Gateway s IP address to 192 168 0 1 This procedure is explained in Set up Remote Management on page 43 Make sure your browser has Java JavaScript or ActiveX enabled If you are using Inter...

Page 49: ...using the ping utility in your PC or workstation Test the LAN Path to Your Gateway You can use ping to verify that the LAN path to your Gateway is set up correctly To ping the gateway from a PC running Windows 95 or later 1 From the Windows toolbar click on the Start button and select Run 2 In the field provided type Ping followed by the IP address of the gateway as in this example ping 192 168 0 ...

Page 50: ...S server If the path is functioning correctly replies as in the previous section are displayed If you do not receive replies Check that your PC has the IP address of your gateway listed as the default gateway If the IP configuration of your PC is assigned by DHCP this information will not be visible in your PC s Network Control Panel Verify that the IP address of the Gateway is listed as the defau...

Page 51: ...T many to one TFTP client VPN pass through IPSec PPTP Power Adapter North America input 120V 60 Hz input All regions output 12 V DC 1A output 12W maximum Physical Specifications Dimensions 175 by 114 by 30 mm 6 9 by 4 5 by 1 2 in Weight 0 31 kg 0 68 lb Environmental Specifications Operating temperature 32 140 F 0 to 40 C Operating humidity 90 maximum relative humidity noncondensing Electromagnetic...

Page 52: ... frequency ranges 2 412 2 462 GHz US 2 412 2 472 GHz Japan 2 412 2 472 GHz Europe ETSI Encryption 40 bit also called 64 bit 128 bit WEP data encryption WPA PSK TKIP and WPA2 PSK AES Table 2 Default Configuration Settings Feature Default Behavior Gateway Login User login URL http 192 168 1 1 User names and passwords case sensitive MSO changme admin password Local Network LAN LAN IP 192 168 0 1 Subn...

Page 53: ...y region United States varies by region RF channel 6 Operating mode g and b Data rate Best Output power Full Access point Enabled Authentication type Open System Wireless card access list All wireless stations allowed a Maximum Wireless signal rate derived from IEEE Standard 802 11 specifications Actual throughput will vary Network conditions and environmental factors including volume of network t...

Page 54: ...ions http documentation netgear com reference enu winzerocfg index htm ITCP IP Networking Basics http documentation netgear com reference enu tcpip index htm Wireless Networking Basics http documentation netgear com reference enu wireless index htm Preparing Your Network http documentation netgear com reference enu wsdhcp index htm Virtual Private Networking Basics http documentation netgear com r...

Page 55: ...Appendix B Related Documents 55 Wireless Cable Modem Gateway CG2003D User Manual ...

Page 56: ...tter FCC Declaration of Conformity We NETGEAR Inc 350 East Plumeria Drive San Jose CA 95134 declare under our sole responsibility that the Wireless Cable Modem Gateway CG2003D complies with Part 15 Subpart B of FCC CFR47 Rules Operation is subject to the following two conditions This device may not cause harmful interference and This device must accept any interference received including interfere...

Page 57: ... does not exceed the Class B limits for radio noise emissions from digital apparatus as set out in the Radio Interference Regulations of the Canadian Department of Communications Industry Canada statement This device complies with RSS 210 of the Industry Canada Rules Operation is subject to the following two conditions 1 This device may not cause harmful interference and 2 this device must accept ...

Page 58: ...ist tulenevatele teistele asjakohastele sätetele English Hereby NETGEAR Inc declares that this Radiolan is in compliance with the essential requirements and other relevant provisions of Directive 1999 5 EC Español Spanish Por medio de la presente NETGEAR Inc declara que el Radiolan cumple con los requisitos esenciales y cualesquiera otras disposiciones aplicables o exigibles de la Directiva 1999 5...

Page 59: ...ozostałymi stosownymi postanowieniami Dyrektywy 1999 5 EC Português Portuguese NETGEAR Inc declara que este Radiolan está conforme com os requisitos essenciais e outras disposições da Directiva 1999 5 CE Slovensko Slovenian NETGEAR Inc izjavlja da je ta Radiolan v skladu z bistvenimi zahtevami in ostalimi relevantnimi določili direktive 1999 5 ES Slovensky Slovak NETGEAR Inc týmto vyhlasuje že Rad...

Page 60: ...P address 43 server 42 diagnostics 37 disable SSID 12 disabling SSID broadcast 12 DMZ host 41 DNS dynamic service 40 E e mailing logs 24 Erase configuration 36 Ethernet cable 8 F factory default settings 35 44 52 factory settings resetting 7 firewall rules 27 front panel 6 G gateway backup 36 diagnostics 37 event log 36 factory default settings 35 44 52 main menu 48 password 34 remote management 4...

Page 61: ... options security features 12 security options described 12 settings 12 security PIN 7 14 serial number product label 7 sites blocking 25 SSID described 16 disable 12 SSID product label 7 T TCP IP network troubleshooting 49 technical specifications 51 technical support 2 trademarks 2 troubleshooting 46 ISP connection 49 ping utility 49 TCP IP network 49 U Universal Plug and Play UPnP 45 USB cable ...

Reviews: