background image

N3GS003 3G Serial Modem 

YML886 draft 0.2

16 

www.netcomm.com.au

5.3 Status Register

The following table lists all Status Register and their default value.

Reg

Description

Range

Default

Units

0

Set the number of rings before answer

Value of 0 disable auto-answering

0-255

000

rings

3

Set command line termination character

0-127

013 (CR)

ASCII

4

Set response formatting character

0-127

010 (LF)

ASCII

5

Set command line editing character

0-127

008 (BS)

ASCII

6

Set length of pause time before dialing

0-255

002

seconds

7

Set wait time for connection

1-255

050

seconds

8

Set length of comma pause

0-255

002

seconds

10

Set carrier detection and carrier loss delay

1-255

014

0.1s

5.4 Result Codes

The modem returns result codes when AT commands are entered. The following table lists the standard 
result codes.

Code

verbose

Meaning

0

OK

Command executed without errors

1

CONNECT

Connected at any of the supported speeds

2

RING

Alerting Signal (Ring) signal received from the network

3

NO CARRIER

Carrier signal lost or not detected. Unable to activate the service

4

ERROR

Command not recognized or could not be executed. Illegal command. Error in 
command line. Command line exceeds buffer size. Parameters out of range.

6

NO DIAL TONE

Dial tone not detected within timeout and subsequent commands not processed

7

BUSY

Reorder (Busy) signal detected and subsequent commands not processed.

8

NO ANSWER

Five seconds of silence not detected after ring back when “@” (quite answer) dial 
modifier is used.


Summary of Contents for N3GS003

Page 1: ...User Guide N3GS003 3G Serial Modem...

Page 2: ...ssion 14 5 2 Standard Modem Commands V 250 15 5 3 Status Register 16 5 4 Result Codes 16 5 5 Jumper 17 Appendix A Legal and Regualtory information 18 Important Notice and Safety Precaution 1 Do not op...

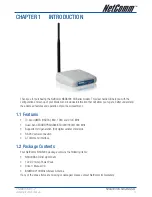
Page 3: ...eatures and operation of your new investment 1 1 Features Tri band UMTS HSDPA 850 1900 and 2100 MHz Quad band EDGE GPRS GSM 850 900 1800 1900 MHz Supports third generation 3G digital cellular standard...

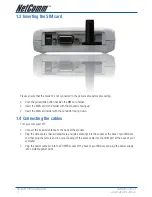
Page 4: ...ert the SIM card holder with the conductor facing down 1 4 Connecting the cables Turn your computer off Connect the included antenna to the back of the modem Plug the data cable s Serial Cable male en...

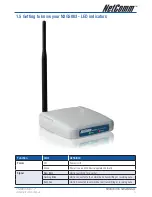
Page 5: ...unction Color Definition Power Off Power is Off Green Power is on and the device operates normally Signal Slow Blink Unit is searching for a carrier Flashing Blink Unit is connected to the network and...

Page 6: ...hapter 2 Driver installation 2 1 Windows Vista 1 Open Control panel window using the Start Menu 2 On the Control Panel window click on the Phone and Modem Options to open the Phone and Modem window 3...

Page 7: ...886 draft 0 2 N3GS003 3G Serial Modem www netcomm com au 4 Click on the Add Button 5 Tick on Don t detect my modem I will select it from a list and click on Next 6 Click on Have Disk to select the dri...

Page 8: ...omm com au 7 Click Browse to select the location of the drivers file 8 Navigate to the folder that contain the driver files for your Operating System and click on OK 9 Click on OK again 10 Choose Sier...

Page 9: ...rial Modem www netcomm com au 11 Choose the correct COM port and click on Next 12 Click Finish to finish the installation Note This example shows Windows Vista installation other Windows OS will have...

Page 10: ...removal process 1 Open Phone and Modem Options in Control Panel 2 Click on Modems tab 3 Click on Sierra Wireless AirCard HSDPA Modem and click on Remove 4 Click OK Note This example shows Windows Vist...

Page 11: ...he Set up a connection or network on the left menu 3 Click on Set up a dial up connection and press Next 4 If you have multiple modems installed on your computer choose Sierra Wireless AirCard HSDPA M...

Page 12: ...om au 6 The computer will try to connect to the internet Please wait or click on Skip to not connect to the internet now 7 If you press Skip on the previous window click on Set up the connection anywa...

Page 13: ...m www netcomm com au 13 Chapter 4 How to dial the connection 1 Open Network and Sharing center from Control Panel window 2 Click on the Manage network connections on the left menu 3 Double click on th...

Page 14: ...e details www 3gpp org SMS commands 3GPP TS 27 005 Please consult the 3GPP website for more details www 3gpp org Note Some standard commands are not supported or are partially supported Calling out us...

Page 15: ...ption V Display current modem configuration DR V 42bis compression reporting GCAP Request complete TA capabilities list GMI Modem manufacturer GMM Modem model GMR Current modem firmware version GSN Di...

Page 16: ...carrier loss delay 1 255 014 0 1s 5 4 Result Codes The modem returns result codes when AT commands are entered The following table lists the standard result codes Code Verbose Meaning 0 OK Command exe...

Page 17: ...l is not passed to the modem controller default Position 3 DTR Jumper in this position the DTR signal is not passed to the modem controller Jumper 2 Position 4 DSR With a jumper in this position the D...

Page 18: ...C Tick and or A Tick as set by the ACA These standards are designed to provide reasonable protection against harmful interference in a residential installation This equipment generates uses and can r...

Page 19: ...duct either by the way of power supply or communication line whether caused by thunderstorm activity or any other cause s 3 The fault is the result of accidental damage or damage in transit including...

Page 20: ...m com au Note NetComm Technical Support for this product only covers the basic installation and features For further information regarding the advanced features of this product please refer to the con...

Reviews: