


System Startup 1 - 5
Quick Start Guide
1
System Startup
1.
Remove all packing materials.
2.
Place the computer on a stable surface.
3.
Securely attach any peripherals you want to use with the notebook (e.g. keyboard and mouse) to their ports.
4.
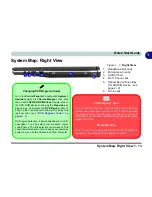
Attach the AC/DC adapter to the DC-In jack on the right of the computer, then plug the AC power cord into an
outlet, and connect the AC power cord to the AC/DC adapter (
Note
: If you have included the Port Replicator in
your purchase option see page
7 - 12
).
5.
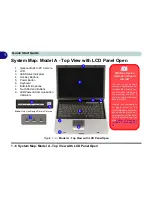
Raise the lid/LCD (you will need to press the LCD latch to release the lid of
Model A
computers) to a
comfortable viewing angle, and press the power button to turn the computer “on”.
6.
Adjust the LCD panel to a comfortable viewing angle.
7.
The LED Power & Communication indicators show the power and battery status of the computer, and give
notification of e-mail received.
Figure 1 - 1 - Computer with AC/DC Adapter Plugged-In
Shutdown
Please note that you should always shut your computer down by
choosing the
Turn Off Computer
command from the
Start
menu
in
Windows.
This will help prevent hard disk or system problems.
Summary of Contents for M54N
Page 1: ......
Page 2: ......
Page 20: ...XVIII Preface...
Page 40: ...Quick Start Guide 1 20 1...
Page 68: ...Power Management 3 14 3...
Page 80: ...Drivers Utilities 4 12 4...
Page 94: ...BIOS Utilities 5 14 5...
Page 113: ...Modules Options PC Camera 7 7 7 Figure 7 2 Audio Setup Windows XP...
Page 140: ...Interface Ports Jacks A 6 A...
Page 152: ...Intel Video Driver Controls B 12 B...
Page 158: ...Specifications C 6 C...