background image

ELC 250WATT MINI NEO-ONE 

Neo-Neon International   

©

  Neo Neon LTD, GuangDong china 

All rights reserved.    No part of this manual may be reproduced, in any form, 

Without the express permission, in writing from Neo – Neon LTD GUANGDONG, 

China 

Printed in China 2006 


To install the main fuse 

Fuses are provided for 100 - 130 V and 200 - 250 V operation.   

Use only the fuse specified for the operating voltage. 

1. 

Locate the bag containing the fuse for your AC voltage. 

Insert the fuse in the fuse holder. The holder may be 

packed with the other fuse. 

2. 

Remove the label covering the mains input socket. 

3. 

Insert the fuse holder in the empty slot in the mains input 

socket (C). 

 
To install a plug on the power cable 

The power cable must be fitted with a grounding-type cord cap that fits 

your power distribution system. Consult an electrician if you have any 

doubts about proper installation. 

Following the cord cap manufacturer’s instructions, connect the yellow 

and green wire to ground (earth), the brown wire to live, and the blue wire 

to neutral. The table below shows some pin identification schemes. 


Table 1: Cord cap connections


To apply power 

Warning! The power cables must be undamaged and rated for the electrical requirements of 

all connected devices.  Important! Powering through a dimmer system can damage the 

fixture. 


Connect the prepared cable to the mains input socket and the AC mains distribution system. Do 

not connect the fixture to a dimmer system. 


Wire


Pin


Marking


Screw color 


brown live 

“L” 

yellow 

or 

brass 


blue neutral 

“N”  silver 


yellow/green ground 


green 

Summary of Contents for SRM-25007

Page 1: ...Neon International Neo Neon LTD GuangDong china All rights reserved No part of this manual may be reproduced in any form Without the express permission in writing from Neo Neon LTD GUANGDONG China Printed in China 2006 1 SRM 25007 ...

Page 2: ...ovides a 17 hard focused beam manually adjustable focus and 7 Gobos SAFETY INFORMATION Warning This product is for professional use only It is not for household Use This product presents risks of lethal or severe injury due to fire and heat electric shock ultraviolet radiation lamp explosion and falls Read this manual before powering or installing the fixture follow the safety precautions listed b...

Page 3: ...pass the thermostatic switch or fuses Always replace defective fuses with ones of the specified type and rating Keep all combustible materials for example fabric wood paper at least 0 3 meters 12 inches away from the fixture Keep flammable materials well away from the fixture Do not illuminate surfaces within 0 3 meters 12 inches of the fixture Provide a minimum clearance of 0 1 meters 4 inches ar...

Page 4: ...onditions Always use the setting that is closest to the local AC supply Warning For protection from electric shock the fixture must be grounded earthed The power supply shall have overload and ground fault protection Important Install fuse and verify that power supply settings match local AC supply before use To change the voltage setting 1 Disconnect the fixture from power 2 Remove the 4 base cov...

Page 5: ... on the power cable The power cable must be fitted with a grounding type cord cap that fits your power distribution system Consult an electrician if you have any doubts about proper installation Following the cord cap manufacturer s instructions connect the yellow and green wire to ground earth the brown wire to live and the blue wire to neutral The table below shows some pin identification scheme...

Page 6: ...ense light can burn or melt parts within a distance of 0 3 meters 12 inches When installing fixtures side by side avoid illuminating one fixture with another Clamp The Neo One Mini includes a bracket for attaching a rigging clamp with 12 mm 1 2 in hardware TO R IG THE FIXTURE WITH A CLAMP WARNING Ensure a safety Cable is secured to the safety anchor point at the base of the fixture 1 Verify that t...

Page 7: ... permission in writing from Neo Neon LTD GUANGDONG China Printed in China 2006 7 fully clockwise 4 Attached the safety cable that can bare at least 10 times its weight through the safety cable anchor point at the base 5 Block access below the work area 6 Working from a stable platform clamp the fixture to the structure INSTALLATION OF FIXTURE INCLUDE DIAGRAM OF CLAMPS ...

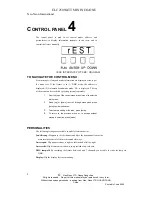
Page 8: ...menu can be reached by pressing menu repeatedly 1 From the top of the control menu press menu to enter the main menu 2 Press up or down to scroll through menus and press enter to view submenus 3 To activate a setting or function press enter 4 To return to the previous menu or to escape without making a selection press menu PERSONALITIES The following settings are available to modify fixture behavi...

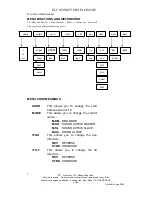
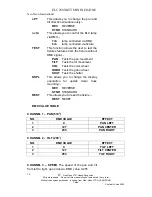
Page 9: ... help you to read understand the menu codes MENU CODE MEANINGS ADDR This allows you to change the start address one to 512 MODE This allows you to change the control mode M DM DMX MODE M SO SOUND ACTIVE MASTER M SL SOUND ACTIVE SLAVE M AU STAND ALONE rPAN This allows you to change the pan direction REV REVERSE STND STANDARD rTILT This allows you to change the tilt direction REV REVERSE STND STANDA...

Page 10: ...his function allows the user to test the fixtures features from the fixture without DMX signal PAN Tests the pan movement TILT Tests the tilt movement COL Tests the color wheel GOBO Tests the gobo wheel SHUT Tests the shutter DSPL This allows you to change the display orientation for upside down truss mounting REV REVERSE STND STANDARD REST This allows you to reset the fixture REST RESET DMX VALUE...

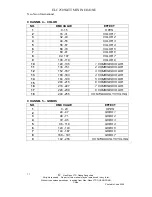
Page 11: ...5 COLOR 3 5 56 67 COLOR 4 6 68 79 COLOR 5 7 80 91 COLOR 6 8 92 107 COLOR 7 9 108 119 COLOR 8 10 120 135 1 COMBINED COLOR 11 136 151 2 COMBINED COLOR 12 152 167 3 COMBINED COLOR 13 168 183 4 COMBINED COLOR 14 184 199 5 COMBINED COLOR 15 200 215 6 COMBINED COLOR 16 216 227 7 COMBINED COLOR 17 228 239 8 COMBINED COLOR 18 240 255 CONTINUOUSLY CYCLING CHANNEL 5 GOBOS NO DMX VALUE EFFECT 1 0 23 OPEN 2 2...

Page 12: ... from the controller The total number of channels used depends on the control mode Be sure to allow adequate channels when setting the control address If control channels for one fixture overlap control channels for another fixture then one of the fixtures will receive the wrong commands To find the highest usable address channel subtract the number of channels required from the last controller ch...

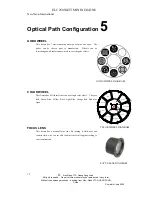
Page 13: ...e open The gobos can be chosen prior to manufacture Wheels can be interchanged with replacement wheels to vary the gobo effects COLOR WHEEL This fixture has 8 Dichroic filters on one single color wheel They are Red Green Blue Yellow Rose Light Blue Orange Red Pink plus Open FOCUS LENS This fixture has a manual focus lens By turning it clock wise and counter clock wise you are able to adjust the fo...

Page 14: ... 5Amps Size 220 x 220 x 350mm Weight 6kg Lamp is loose Ensure Lamp is properly inserted into ceramic base Lamp Does not Strike Reassign DMX address DMX ADDRESS OFFSET and ensure all fixtures use the same profile No Power Check to see if fixture has power Lamp is blown Replace lamp with same Poor signal from Control control DMX selection switch if one is present But undesired or no connection betwe...

Reviews: