background image

6.5 RESISTIVE PROGRAMMING OF OUTPUT VOLTAGE AND CURRENT LIMIT

For resistive programming, internal current sources, for output voltage and/or output current control,

supply 1mAcurrent through external programming resistors connected between J1-9 & 22 and J1-10

& 23. The voltage across the programming resistors is used as a programming voltage for the power

supply. Resistance of 0~5Kohm or 0~10Kohm can be selected to program the output voltage and

current limit from zero to full scale.

A variable resistor can control the output over its entire range, or a combination of variable resistor

and series/parallel resistors can control the output over restricted portion of its range.

Perform the following procedure to set the power supply to Resistive programming:

1. Turn the AC On/Off switch to Off.

2. Set setup switch SW1-1 to its UP position for output voltage external programming and

SW1-2 to its UP position for Output Current limit external programming.

3. Set SW1 position 3 to select programming resistor range according to Table 6-4.

4. Set SW1-7 to its UP position for output voltage resistive programming and

SW1-8 to its UP position for Output Current limit resistive programming.

5. Connect a short between J1-8 and J1-12 (refer to Table 4-4).

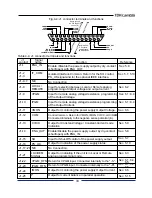
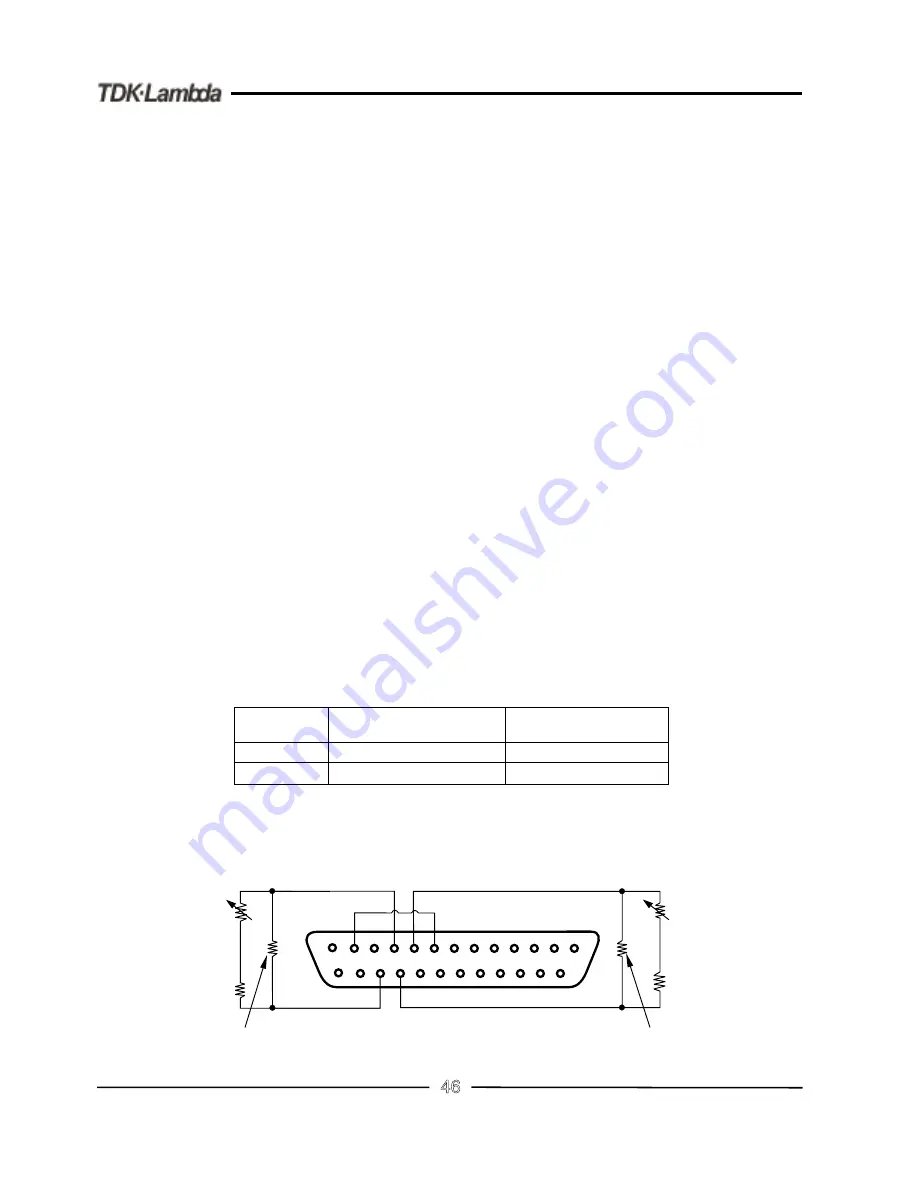
6. Connect the programming resistors to the mating plug of J1 as shown in Fig.6-2.

7. Set the programming resistors to the desired resistance and turn the power supply ON.

Adjust the resistors to change the power supply output.

1. SW1 positions 4, 5, 6 and 9 are not required for remote programming. Their setting can be

determined according to the application requirements.

2. The control circuits allow the user to set the output voltage and current limit up to 5% over

the model-rated maximum value. The power supply will operate within the extended range,

however it is not recommended to operate the power supply over its voltage and current

rating and performance is not guaranteed.

3. To maintain the temperature stability specification of the power supply, the resistors used for

programming should be stable and low noise resistors, with temperature coefficient of less

than 50ppm.

4. When resistive programming is used, front panel and computer control (via serial communication

port) of output voltage and current are disabled.

NOTES:

SW1-3 setting

UP

DOWN

Output Voltage programming

VPGM (J1-9)

0-10Kohm

0-5Kohm

Current limit programming

IPGM (J1-10)

0-10Kohm

0-5Kohm

Table 6-4: SW1-3 setting and programming range

46

1

14

13

25

10

9

23

22

CURRENT LIMIT

PROGRAMMING

OUTPUT VOLTAGE

PROGRAMMING

J1 connector, rear panel view

Fig.6-2: Remote resistive programming

PROGRAMMING

RESISTOR

PROGRAMMING

RESISTOR

OPTIONAL SETS

LOWER LIMIT

OPTIONAL SETS

LOWER LIMIT

OPTIONAL SETS

UPPER LIMIT

OPTIONAL SETS

UPPER LIMIT

12

8

Summary of Contents for TDK-Lambda Genesys GEN100-15

Page 1: ...000 4 2 1995 IEC 61000 4 3 1995 IEC 61000 4 4 1995 IEC61000 4 5 1995 IEC 61000 4 6 1996 IEC 61000 4 8 1993 IEC 61000 4 11 1994 Conducted Emissions Radiated Emissions Harmonic Emissions Voltage Fluctuations ESD Radiated Immunity EFT B Conductive Surges Conducted Disturbances Immunity to Magnetic Field Voltage Dips Class A Class A Class A AD 8KV CD 4KV 3V m Power leads 2KV Signal leads 0 5KV Common ...

Page 2: ...This page intentionaly left blank ...

Page 3: ...WINGS 3 1 GENERAL 3 2 PREPARATION FOR USE 3 3 INITIAL INSPECTION 3 4 RACK MOUNTING 3 4 1 To install the power supply in a rack 3 4 2 Rack mount slides 3 5 LOCATION MOUNTING AND COOLING 3 6 AC SOURCE REQUIREMENTS 3 7 AC INPUT POWER CONNECTION 3 7 1 AC input connector 1500W models 3 7 2 AC input connector 750W models 3 7 3 AC input cord 3 7 4 AC input wire connection 1500W models 3 8 TURN ON CHECKOU...

Page 4: ... Activated OVP protection indications 5 3 3 Resetting the OVP circuit 5 4 UNDER VOLTAGE LIMIT UVL 5 4 1 Setting the UVL level 5 5 FOLDBACK PROTECTION 5 5 1 Setting the Foldback protection 5 5 2 Resetting activated Foldback protection 5 6 OUTPUT ON OFF CONTROL 5 7 OUTPUT SHUT OFF SO CONTROL VIA REAR PANEL J1 CONNECTOR 5 8 ENABLE DISABLE CONTROL VIA REAR PANEL J1 CONNECTOR 5 9 CV CC SIGNAL 5 10 PS_O...

Page 5: ...R MESSAGES 7 7 COMMAND SET DESCRIPTION 7 7 1 General guides 7 7 2 Command set categories 7 7 3 Initialization control commands 7 7 4 ID control commands 7 7 5 Output control commands 7 7 6 Global output commands 7 7 7 Status control commands 7 8 STATUS ERROR AND SRQ REGISTERS 7 8 1 General 7 8 2 Conditional registers 7 8 3 Service Request Enabled and Event Registers 7 9 SERIAL COMMUNICATION TEST S...

Page 6: ...This page intentionaly left blank ...

Page 7: ... shipment The information contained in this document is subject to change without notice Nemic Lambda shall not be liable for errors contained in this document or for incidental or consequential damages in connection with the furnishing performance or use of this material No part of this document may be photocopied reproduced or translated into another language without the prior written consent of...

Page 8: ...on of the protective ground conductor or disconnection of the protective earth terminal will cause a potential shock hazard that might cause personal injury There is a potential shock hazard at the RS232 485 and the IEEE ports when using power supplies with rated or combined voltage greater than 400V and the Positive Output of the Power Supply is grounded Do Not connect the Positive Output to grou...

Page 9: ...unications Operation of this equipment in a residential area is likely to cause harmful interference in which case the user will be required to correct the interference at his own expense Instruction manual symbol The instrument will be marked with this symbol when it is necessary for the user to refer to the instruction manual CAUTION Risk of Electrical Shock Indicates hazardous voltage Indicates...

Page 10: ...g des PE Leiters oder Trennung der PE Masse kann einen möglichen elektrischen Schlag hervorrufen der Personenschäden zur Folge hätte Es besteht Energiegefahr am RS232 485 und IEEE Anschluss falls die Ausgangsspannung des Gerätes grösser ist als 400V und der positive Ausgangsanschluss des Netzteiles geerdet wird Dies gilt insbesondere auch bei Reihenschaltungen von unterschiedlichen Netzteilen Wird...

Page 11: ...nungsfuhrendeTeile mit gefährlicher Spannung an Zeigt Masse Anschluss an keine Schutzerde z B Masseanschlussan einen Verbraucher Schutzleiter Anschlussklemme Symbol fur Schalter oder Druckknöpfe Zeigt die Ein Stellung hier an Symbol fur Schalter oder Druckknöpfe Zeigt die Aus Stellung hier an Dieses Warnaufschrift weist auf eine Gefahr hin die eine Uberprufunganweisung nach sich zieht Nichteinhalt...

Page 12: ...built in serial communication RS232 485 GPIB programming and Isolated Analog programming monitoring are optional Model Voltage Current Model Voltage Current range V range A range V range A GEN6 100 0 6 0 100 GEN60 12 5 0 60 0 12 5 GEN6 200 0 6 0 200 GEN60 25 0 60 0 25 GEN8 90 0 8 0 90 GEN80 9 5 0 80 0 9 5 GEN8 180 0 8 0 180 GEN80 19 0 80 0 19 GEN12 5 60 0 12 5 0 60 GEN100 7 5 0 100 0 7 5 GEN12 5 1...

Page 13: ...supply The output voltage and the current limit can be programmed by analog voltage or by resistor and can be monitored by analog voltage The power supply output can be remotely set to On or Off and analog signals monitor the proper operation of the power supply and the mode of operation CV CC Genesys power supplies of the same output voltage and current rating can be paralleled in master slave co...

Page 14: ...3A125V unshielded 2m typical length with IEC320 connector on one end and NEMA 5 15Pconnector on the other end NC302 Europe 10A 250V unshielded 2m typical length with IEC320 connector on one end and INT L 7 standard VII dual earthing NC303 General 10A 250V unshielded 2m typical length with IEC320 connector on one end and unterminated stripped wires on the other end Use the cable only with plug appr...

Page 15: ...re drift 7 Rem sense compensation wire 8 Up prog response time 0 Vomax 9 9 Down prog response time Full load No load 10 Transient response time 11 Hold up time V 6 8 12 5 20 30 40 50 60 80 100 150 300 600 mV mV V mS mS mS mS PPM C 0 01 of rated output voltage 2mV 0 01 of rated output voltage 2mV 60 8 60 8 60 8 60 8 60 8 60 8 60 8 60 8 80 8 80 8 100 10 150 25 300 60 100PPM from rated output voltage...

Page 16: ...2400 4800 9600 and 19200 Re start modes automatic restart safe mode Vout 4 digits accuracy 0 5 1count Iout 4 digits accuracy 0 5 1count VOLTAGE CURRENT ALARM FINE PREVIEW FOLDBACK LOCAL OUTPUT ON 1 Control functions 2 Display 3 Indications 2 9 ENVIRONMENTAL CONDITIONS 1 Operating temperature 2 Storage temperature 3 Operating humidity 4 Storage humidity 5 Altitude 0 50 C 100 load 20 70 C 30 90 RH n...

Page 17: ...0 output voltage and full output current 9 With rated resistive load 10 For 6V 300V models Measured with JEITA RC 9131A 1 1 probe For 600V model Measured with 10 1 probe The supplemental characteristics give typical but non warranted performance characteristics The supplemental characteristics are useful in assessing applications for the power supply Several kinds of supplemental characteristics a...

Page 18: ...ly 2 Bus bars for 6V to 60V models See detail Wire clamp connector for 80V to 600V models shown 3 AC cable strain relief for 1500W models only supplied with power supply 4 IEC connector for 750W models Wire clamp terminal for 1500W models shown 5 Chassis slides mounting holes 10 32 marked A GENERAL DEVICES P N CC3001 00 S160 or equivalent 104 2 0mm Note 4 Note 3 39 5 0 5mm 22 0mm 3 0mm 30 0mm Bus ...

Page 19: ...ave occured in transit The inspection should confirm that there is no exterior damage to the power supply such as broken knobs or connectors and that the front panel and meters face are not scratched or cracked Keep all packing material until the inspection has been completed If damage is detected file a claim with carrier immediately and notify the Lambda sales or service facility nearest you The...

Page 20: ... C The Genesys series can be operated from a nominal 100V to 240V single phase 47 63Hz The input voltage range and current required for each model is specified in Chapter 2 Ensure that under heavy load the AC voltage supplied to the power supply does not fall below the specifications described in Chapter 2 3 5 LOCATION MOUNTING AND COOLING 3 6 AC SOURCE REQUIREMENTS 3 7 AC INPUT POWER CONNECTION o...

Page 21: ... the end of each of the wires 2 Unscrew the base of the strain relief from the helix shaped body Insert the base through the outside opening in theAC input cover and screw the locknut securely 11 14 Lb inch into the base from the inside 3 Slide the helix shaped body onto theAC cable Insert the stripped wires through the strain relief base until the outer cable jacket is flush with the edge of the ...

Page 22: ...rational and may be used as a basic incoming inspection check Refer to Fig 4 1 and Fig 4 2 for the location of the controls indicated in the procedure 1 Ensure that the power supply is configured to the default setting AC On Off switch at Off position Dip switch All positions at Down Off position Sense connector Configured to Local Sense as shown in Fig 3 4 1 Remote sense 2 Local sense 3 Not conne...

Page 23: ...lay Ensure that the front panel CURRENTLED is on 6 Turn off the front panelAC power switch 7 Remove the shunt from the power supply output terminals Refer to Section 5 3 for explanation of the OVPfunction prior to performing the procedure below 1 Turn the front panelAC power switch to On position and turn on the output by pressing OUT pushbutton 2 Using the VOLTencoder adjust the output voltage to...

Page 24: ...rt Baud Rate 2 Using The CURRENT adjust encoder check that the Baud Rate can be set to 1200 2400 4800 9600 and 19200 3 8 8 Address Setting 3 8 9 Baud Rate Setting 3 9 CONNECTING THE LOAD 18 Shorting the output may expose the user to hazardous voltages Observe proper safety procedures Turn off the AC input power before making or changing any rear panel connection Ensure that all connections are sec...

Page 25: ...ire size AWG 14 12 10 8 6 4 2 0 2 526 1 589 0 9994 0 6285 0 3953 0 2486 0 1564 0 0983 5A 80 120 200 320 500 800 1200 2000 10A 40 60 100 160 250 400 600 1000 20A 20 30 50 80 125 200 300 500 50A 8 12 20 32 50 80 125 200 150A 2 3 4 6 10 16 26 40 68 Resistivity Ohm 1000ft Maximum length in Feet to limit voltage drop to 1V or less Cross sect area mm 2 2 5 4 6 10 16 25 35 8 21 5 09 3 39 1 95 1 24 0 795 ...

Page 26: ... may be harmful to the power supply Adiode should be connected across the output The diode voltage and current rating should be greater than the power supply maximum output voltage and current rating Connect the cathode to the positive output and the anode to the negative output of the power supply Where positive load transients such as back EMF from a motor may occur connect a surge suppressor ac...

Page 27: ... live parts Ensure that the load wiring insulation rating is greater than or equal to the maximum output voltage of the power supply Fig 3 5 Load wires connection 6V to 60V models Fig 3 6 Bus bars shield mounting 80V to 600V Models M8x15 screw 2 places Hex Nut 2 places Flat washer 2 places Spring washer 2 places Wire terminal lug 2 places Flat washer 2 places Shield Screws tightening torque 104 11...

Page 28: ...sert the stripped wires into the terminal and tighten the terminal screw securely see Fig 3 7 Fig 3 7 Load wires connection to the output connector 4 Loosen the two chassis screws marked A halfway as shown in Fig 3 8 5 Assemble the protective shield to the chassis and tighten the two screws to fix the shield to the chassis see Fig 3 8 Screws tightening torque 4 8 5 3 Lb inch Fig 3 8 Shield assembl...

Page 29: ...o minimize noise pick up If shielded wires are used the shield should be connected to the ground at one point either at the power supply chassis or the load ground The optimal point for the shield ground should be determined by experimentation Rem sense Local sense Local sense Rem sense Sense lines Twisted pair or shielded V V Load Power Supply Load lines Twisted pair shortest length possible Fig ...

Page 30: ...ed wires Each load should be separately connected to the remote distribution terminals see Fig 3 13 If remote sensing is required the sensing wires should be connected to the distribution terminals or at the most critical load 3 9 11 Grounding outputs Either the positive or negative output terminals can be grounded To avoid noise problems caused by common mode current flowing from the load to grou...

Page 31: ...an the maximum output voltage of the power supply Ensure that the connections at the load end are shielded to prevent accidental contact with hazardous voltages 3 10 2 Local sensing The power supply is shipped with the rear panel J2 sense connector wired for local sensing of the output voltage See Table 3 4 for J2 terminals assignment With local sensing the output voltage regulation is made at the...

Page 32: ...hat the J2 mating connector is plugged securely into the rear panel sense connector J2 4 Turn On the power supply 1 If the power supply is operating in remote sense and either the positive or negative load wire is not connected an internal protection circuit will activate and shut down the power supply To resume operation turn the AC On Off to the Off position connect the open load wire and turn O...

Page 33: ...ront panel TM Fig 4 1 Front panel controls and indicators 27 1 Number Control Indicator Description Section High resolution rotary encoder for adjusting the Output Voltage Also adjusts the OVP UVL levels and selects theAddress VOLTAGE control VOLTAGE indicator Green LED lights for Constant Voltage mode operation 2 3 VOLTAGE display 4 digit 7 segment LED display Normally displays the output voltage...

Page 34: ...isplay shows OUP Press again to set the UVLusing VOLTAGE encoder the current display shows UUL Main function Auxiliary function Go to local Press REM LOC to put the unit into Local REM LOC button is disabled at Local Lockout mode Address and Baud Rate setting Press and hold REM LOC for 3sec to set the Address with the VOLTAGE encoder and the Baud Rate with the CURRENTencoder Green LED lights when ...

Page 35: ...es in a power system the first unit Remote In is connected to the computer and the remaining units are chained Remote In to Remote Out Remote In connector 7 3 7 4 J2 AC INPUT ON OFF OUT IN J3 J1 SW1 10 5 7 3 8 9 4 6 1 2 750W 1500W 6 60V Models 80 600V Models 16 Number Control Indicator Description Section FINE button 18 ALARM indicator 17 FINE indicator AC Power switch 19 Voltage and Current Fine ...

Page 36: ...S232 485 mode when IEEE option is installed Number Item Description Section 4 5 Connector for making remote sensing connections to the load for regulation of the load voltage and compensation of load wire drop 4 4 4 4 1 4 4 2 3 8 2 3 10 2 3 10 3 4 5 6 7 8 10 9 Remote Out connector Programming and Monitoring connector SW1 Setup switch Remote sense connector Blank Sub plate Ground screw IEEE switch ...

Page 37: ...utput Voltage Programmed by remote analog External Voltage or Extenal Resistor Output Current Limit Programmed by remote analog External Voltage or External Resistor 0 10V 0 10Kohm 0 10V On High 2 15V or Open Off Low 0 0 6V or Short RS485 interface Output Voltage Programmed by External Resistor Output Current Limit Programmed by External Resistor Rear panel Enable Disable control is active Down Fa...

Page 38: ...r equivalent Manual Pistol grip tool Handle AMP P N 58074 1 Head AMP P N 58063 2 Before making any connection turn the AC On Off switch to the Off position and wait until the front panel display has turned Off 4 5 1 Making J1 connections To prevent ground loops and to maintain the isolation of the power supply when programming from J1 use an ungrounded programming source CAUTION Terminals 12 22 an...

Page 39: ...ndicating if the unit is in Local or Remote analog programming mode Output for monitoring the power supply Output Current Output for current balance in parallel operation Control Common Return for VMON IMON CV CC LOC REM S Connected internally to the negative sense potential Return for VPGM input Connected internally to the S Return for IPGM input Connected internally to the S J1 1 J1 2 J1 3 J1 4 ...

Page 40: ... voltage When the output is disabled press the PREV button and then rotate the VOLTAGE encoder knob The VOLTAGE meter will show the programmed output voltage for 5 seconds after the adjustment has been completed Then the VOLTAGE meter will display OFF 4 Adjustment resolution can be set to coarse or fine resolution Press FINE button to select between the lower and higher resolution The FINE LED tur...

Page 41: ...the VOLTAGE encoder knob to adjust the OVP level The display will show OUP and the setting value for 5 seconds after the adjustment has been completed and then will return to it s previous state The minimum setting level is approx 105 of the set output voltage or the value in Table 7 6 whichever is higher The maximum setting level is shown inTable 5 1 5 2 3 Automatic Crossover 5 3 1 Setting the OV...

Page 42: ...cancel the Foldback protection The power supply output will be disabled and the VOLTAGE display will show OFF Press the OUTbutton to enable the power supply output 3 Turn the power supply output Off and then On using the SO control refer to sect 5 7 In this method the foldback protection remains armed therefore if the load current is higher than the current limit setting the Foldback protection wi...

Page 43: ...pen collector output with a 30V parallel zener at J1 13 referenced to the COM potential at J1 12 connected internally to the negative sense potential When the power supply operates in Constant Voltage mode CV CC output is open When the power supply operates in Constant Current mode CV CC signal output is low 0 0 6 with maximum 10mAsink current PS_OK signal indicates fault condition in the power su...

Page 44: ...shows O7P and the ALARM LED blinks Resetting the OTP circuit can be automatic non latched or manual latched depending on the Safe orAutomatic restart mode In Safe start mode the power supply stays off after the over temperature condition has been removed The display continue to shows O7P and theALARM LED continues to blink To reset the OTPcircuit press OUTbutton or send OUTON command via the seria...

Page 45: ...ne of the units shuts down Each diode should be rated to at least the power supply rated output voltage and output current Refer to Fig 5 1 and 5 2 for series operation with local and remote sensing S S LS LS POWER SUPPLY S S LS LS POWER SUPPLY LOAD S S LS LS POWER SUPPLY S S LS LS POWER SUPPLY LOAD Fig 5 1 Series connection local sensing Fig 5 2 Series connection remote sensing Remote programming...

Page 46: ...85 4 Programming via the Serial Communication port RS232 RS485 5 14 2 Series connection for positive and negative output voltage In this mode two units are configured as a positive and negative output Set the current limit of each power supply to the maximum that the load can handle without damage It is recommended that diodes be connected in parallel with each unit output to prevent reverse volta...

Page 47: ...it to the desired load current limit divided by the number of parallel units During operation the master unit operates in CV mode regulating the load voltage at the programmed output voltage Connect the sensing circuit to local or remote sensing as shown in Fig 5 4 or Fig 5 5 1 The output voltage of the slave units should be programmed 2 5 higher than the output voltage of the master unit to preve...

Page 48: ...f The system will return to the Master Slave mode upon re application of AC power In the advanced parallel mode the total current is programmed and reported by the Master In this method the CURRENT display accuracy is 2 1 count In cases that higher accuracy is required it is recommended to use the basic parallel operation mode Slave units can be released using the following procedure a Depress FIN...

Page 49: ...WER SUPPLY 1 J1 2 3 J1 16 J1 16 J1 16 J1 15 PS_OK POWER SUPPLY 2 J1 2 3 J1 15 PS_OK SO POWER SUPPLY 3 J1 2 3 J1 15 PS_OK SO SO IF_COM IF_COM IF_COM 5 17 FRONT PANEL LOCKING The front panel controls can be locked to protect from accidental power supply parameter change Press and hold PREV button to toggle between Locked front panel and Unlocked front panel The display will cycle between LFP and UFP...

Page 50: ...the output voltage and current limit can be programmed via the front panel VOLTAGE and CURRENT encoders or via the RS232 485 port In Remote Analog mode the output voltage and current limit can be programmed by analog voltage or by programming resistors via J1 contacts 9 and 10 refer to sec 6 4 and 6 5 Refer to Table 6 1 for Local Remote Analog control J1 8 function and Setup switch SW1 1 2 setting...

Page 51: ...nd SW1 2 to its UP position for Output Current limit external programming 3 Set SW1 position 3 to select programming voltage range according to Table 6 3 4 Ensure that SW1 positions 7 and 8 are at their Down default position 5 Connect a short between J1 8 and J1 12 refer to Table 4 4 6 Connect the programming source to the mating plug of J1 as shown in Fig 6 1 Observe correct polarity for the volt...

Page 52: ...esistors to the mating plug of J1 as shown in Fig 6 2 7 Set the programming resistors to the desired resistance and turn the power supply ON Adjust the resistors to change the power supply output 1 SW1 positions 4 5 6 and 9 are not required for remote programming Their setting can be determined according to the application requirements 2 The control circuits allow the user to set the output voltag...

Page 53: ... monitor Iout monitor Vout monitor Iout monitor Signal J1 11 J1 24 J1 11 J1 24 J1 12 J1 12 0 5V 0 10V Down Up Range SW1 4 Return J1 connection Table 6 5 Monitoring signals setting FCC requirements for radiated emissions use shielded cable for the analog control signals In case of using unshielded cable attach an EMI ferrite suppressor to the cable as close as possible to the power supply 1 Radiate...

Page 54: ...d hold for approximately 3sec the REM LOC button The VOLTAGE display will indicate the communication port address 3 Using the VOLTAGE adjust encoder select the address To preview the address at any time press and hold the REM LOC button for approx 3sec The VOLTAGE display will indicate the power supply address To select between RS232 or RS485 set the rear panel setup switch SW1 6 position to Down ...

Page 55: ...t to set the status registers and read them while the unit is in Local mode If the Enable registers are set refer to section 7 8 the power supply will transmit SRQ s while in Local Front panel control in Remote mode is disabled except for 1 PREV use to preview the Voltage and Current limit setting 2 OVP UVL use to preview the OVP UVLsetting 3 LOC REM use to set the unit into Local mode In Local Lo...

Page 56: ...IELD TX RX SG SHIELD RX TX SG DB 25 CONNECTOR 8 PIN CONNECTOR REMARKS TWISTED PAIR 8 1 13 1 2 3 5 7 8 1 PIN NO HOUSING HOUSING PIN NO NAME NAME SHIELD RX TX SG SHIELD TX RX SG DB 9 CONNECTOR 8 PIN CONNECTOR REMARKS TWISTED PAIR 8 1 5 1 9 8 1 5 4 6 3 1 5 4 PIN NO HOUSING HOUSING PIN NO NAME NAME TWISTED PAIR TWISTED PAIR SHIELD TXD TXD SG RXD RXD SHIELD RXD RXD SG TXD TXD DB 9 CONNECTOR 8 PIN CONNE...

Page 57: ...mand It is recommended to add a 100 msec software delay between query or sent command to next unit addressing Refer to section 7 7 3 for details The end of message is the Carriage Return character ASCII 13 The power supply ignores the Line Feed ASCII 10 character The backslash character will cause the last command to be repeated The user may optionally add a checksum to the end of the command The ...

Page 58: ...a numeric value the value may be up to 12 characters long 4 Carriage Return If the CR character ASCII 13 is received by itself the power supply will respond with OK and CR The Genesys 750W and 1500W series command set is divided into four categories as follows 1 Initialization control 2 ID control 3 Output control 4 Status control TM E01 E02 E04 E06 E07 Description Returned when program voltage PV...

Page 59: ... 5 Output control commands 7 7 4 ID control commands Command Description Returns the power supply model identification as an string Returns the software version as an ASCII string Returns the unit serial number Up to 12 characters Returns date of last test Date format yyyy mm dd ASCII LAMBDA GENX Y 1 2 3 4 IDN REV SN DATE Command Description Sets the output voltage value in Volts The range of volt...

Page 60: ...setting level is shown in Table 5 1 Attempting to program the OVP below this level will result in execution error response E04 The OVP setting stays unchanged 15 OVP n Returns the power supply operation mode When the power supply is On OUT 1 it will return CV or CC When the power supply is OFF OUT0 it will return OFF Returns the Master Slave setting Master n 1 2 3 or 4 Slave n 0 Saves present sett...

Page 61: ...onditional register FLT and STAT are updated Other registers are not changed Non Latching faults FB OVP SO are cleared OUT fault stays Sets the output voltage value in volts The range of voltage values is shown in Table 7 3 n may be up to 12 char plus dec pt Program the output current value in amperes The range of current values is shown in Table 7 4 n may be up to 12 char plus dec pt Turns the ou...

Page 62: ...he following data separated by commas Table 7 6 OVP programming range Table 7 7 UVL programming range Model RatedOutputVoltage V Minimum V Maximum V 6 8 12 5 20 30 40 50 60 80 100 150 300 600 0 5 0 5 1 0 1 0 2 0 2 0 5 0 5 0 5 0 5 0 5 0 5 0 5 0 7 50 10 0 15 0 24 0 36 0 44 0 57 0 66 0 88 0 110 0 165 0 330 0 660 0 Model RatedOutputVoltage V Minimum V Maximum V 6 8 12 5 20 30 40 50 60 80 100 150 300 6...

Page 63: ...ommand or query received One SRQ when SEVE goes from all zeroes to any bit set Setting more SEVE bits does not cause more SRQs Positive Logic 0 No Event 1 Event Occured 7 8 STATUS ERROR AND SRQ REGISTERS This section describes the various status error and SRQ registers structure The registers can be read or set via the RS232 485 commands When using the IEEE option refer to the user manual for Gene...

Page 64: ...utdown has occurred The supply output is turned On by front panel button or OUT 1 command The supply output is turned On by front panel button or OUT 1 command The supply output is turned On by front panel button or OUT 1 command OVP shutdown has occurred Rear panel J Shut Off condition has occurred Rear panel J1 Shut Off condition removed Front panel OUT button pressed to Off Rear panel J1 Enable...

Page 65: ...P SO OFF ENA Bit Set condition Bit reset condition User command FENA nn where nn is hexadecimal User command FENA nn where nn is hexadecimal if nn 00 no fault SRQs will be generated Table 7 11 Fault Event Register 0 LSB 1 2 3 4 5 6 7 MSB Spare bit AC Fail Over Temperature Foldback Over Voltage Shut Off Output Off Enable SPARE AC OTP FOLD OVP SO OFF ENA Entire Event Register is cleared when user se...

Page 66: ... command to read the register CLS and power up also clear the Status Event Register The Fault Event Register is not cleared by RST BIT Status name Status symbol Bit Set condition Bit reset condition Changes in status occurs and it is enabled The change can set a bit but when the change clears the bit remains set 3 Status Enable register The Status Enable Register is set by the user to enable SRQs ...

Page 67: ...ends with line feed On some PC systems pressing the number keypad Enter will distort displayed messages Use the alphabetic Enter instead Bits per second 9600 Data bits 8 Parity None Stop bits 1 Flow control None 3 1 Connect the power supply to the PC using the RS232 cable 3 2 Set via the front panel Baud Rate 9600 Address 06 3 3 Set via the rear panel RS232 485 to RS232 refer to section 4 4 4 1 Mo...

Page 68: ...age programming temperature coefficient Output current programming temperature coefficient Input impedance Absolute maximum voltage Max voltage between program inputs and supply outputs Output voltage monitoring accuracy Output current monitoring accuracy Output Impedance see note Max voltage between monitoring outputs and supply outputs PPM C PPM C Ohm Vdc Vdc Ohm Vdc o o 1 1 100 100 1M 0 15 600 ...

Page 69: ... option Chassis ground Chassis ground SHLD 1 Output voltage programming input Output current programming input 2 IPROG_ISO 3 Ground for programming signals Ground for programming signals Output voltage monitoring output Output current monitoring output Shield connected internally to chassis of the supply GND GND VMON_ISO IMON_ISO SHLD 4 5 6 7 8 Ground Ground Ground Ground Table 8 1 Detailed descri...

Page 70: ... the voltage source 8 Set the programming sources to the desired levels and turn the power supply ON Perform the following procedure to configure the power supply 1 Turn the power supplyAC power switch to Off 2 Connect a short between J1 8 and J1 12 refer toTable 4 4 3 Set setup switch SW1 1 to its UPposition for Output Voltage external programming and SW1 2 to its UPposition for Output Current li...

Page 71: ... made only by the manufacturer or by authorized service facilities no parts replacement information is provided in the manual In case of failure unusual or erratic operation of the unit contact a Lambda sales or service facility nearest you Please refer to the Lambda sales offices addresses listing on the back cover of this user manual If the power supply appears to operating improperly use the tr...

Page 72: ...e unit is installed adjacent to heat generating equipment Check Foldback setting and load current Connect the sense wires according to User s manual instructions Turn Off the AC power and wait until the display turns off Turn on the AC power and press front panel REM LOC button 9 7 FUSE RATING There are no user replaceable fuses in the power supply Internal fuses are sized for fault protection and...

Page 73: ...nking power supplies line feed local operation local sensing lock front panel maintenance otp outline over voltage parallel operation parity ps_ok preview rack mounting rear panel remote sensing remote local registers structure RS232 RS485 RXD RX RS232 safe start safety series operation shield specifications status control SRQ shut off SW1 T U V W TXD TX RS232 under voltage limit volts display war...

Page 74: ...NOTS ...

Reviews: