Nektar GX49 User Manual Download Page 9

www.nektartech.com                                                                 Nektar Impact GX49 & GX61 User Guide    

9


Sending a Bank LSB Message 

To send a Bank LSB message, do the following:


 

Press the [Setup] button. The LED button is illuminated blue to indicate setup is active. 

 

Press the low F1 on your GX keyboard.  

 

Enter the Bank number you want (from 0 to 127) using the white number keys spanning G3–B4 (G4-B5 on GX61).  

 

Press Enter (C5). This will send the message immediately and exit Setup.  


Sending a Bank MSB Message 

To send a Bank MSB message, do the following:


 

Press the [Setup] button. The LED button is illuminated blue to indicate setup is active. 

 

Press the low F#1 on your GX keyboard.  

 

Enter the Bank number you want (from 0 to 127) using the white number keys spanning G3–B4 (G4-B5 on GX61).  

 

Press Enter (C5). This will send the message immediately and exit Setup.  


Transpose 

You  can  quickly  set  a  transpose  value  in  the  Setup  menu.  This  is  ideal  if  the  Transpose  buttons  are  assigned  to  other 
functions or if you just need to change a value quickly. 

 

Press the [Setup] button. The LED button is illuminated blue to indicate setup is active. 

 

Press the low G1 on your GX keyboard.  

 

Enter the transpose value number you want, entering 0 first for negative transpose settings (i.e. 01 for  –1) and regular 
values for positive settings (i.e 1 for +1). You enter the values using the white number keys spanning G3–B4 (G4-B5 on 
GX61).  

 

Press Enter (C5). This will change the Transpose setting immediately and exit Setup.  


Keyboard Velocity Curves 

There are 4 different keyboard velocity curves and 3 fixed velocity levels to choose between, depending on how sensitive and 
dynamic you want the Impact GX keyboard to play.  


Here is how you change a velocity curve: 

 

Press the [Setup] button. The LED button is illuminated blue to indicate setup is active. 

 

Press the G#1 key on your keyboard to select Velocity Curve.  

 

Enter the value corresponding to the velocity curve you want (1 to 7) using the white number keys spanning G3–B4 (G4-
B5 on GX61).  

 

Press Enter (C5). This will change the velocity curve setting immediately and exit Setup.  
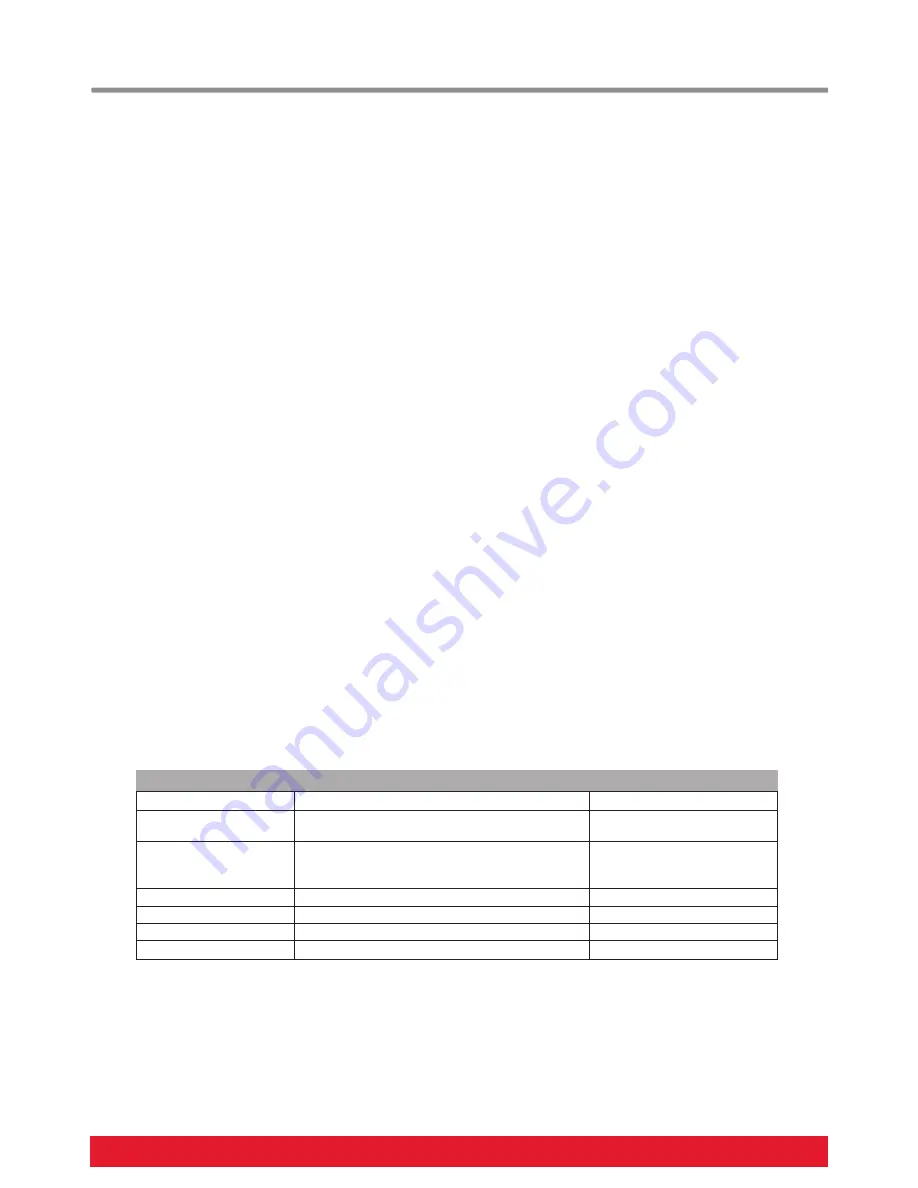
Name 

Description 

Numeric number 

Normal 

Focus on mid to high velocity levels 

Soft 

The most dynamic curve with a focus on the low to 

mid velocity levels 

Hard 

Focus on the higher velocity levels. If you don't 

like exercising your finger muscles, this may be 
the one for you 

Linear 

Approximates a linear experience from low to high 

127 Fixed 

Fixed velocity level at 127 

100 Fixed 

Fixed velocity level at 100 

64 Fixed 

Fixed velocity level at 64 

Summary of Contents for GX49

Page 1: ...www nektartech com Nektar Impact GX49 GX61 User Guide www nektartech com...

Page 2: ...for a Class B digital device pursuant to part 15 of the FCC Rules These limits are designed to provide reasonable protection against harmful interference in a residential installation This equipment...

Page 3: ...oy playing using and being creative with Impact GX as much as we have enjoyed creating it Box Content Your Impact GX49 box contains the following items The Impact GX49 or GX61 Controller keyboard Prin...

Page 4: ...set it up for your DAW Nektar DAW Integration If your DAW is supported with Nektar DAW integration software you ll need to first create a user account on our website and subsequently register your pro...

Page 5: ...ard up 1 semi tone at a time when pressed Pressing both Transpose buttons at the same time will reset the transpose setting to 0 only if transpose is assigned You can transpose the keyboard 12 semi to...

Page 6: ...ttons can be used as generic MIDI buttons when no Nektar DAW integration is present There are 7 buttons each with a transport function icon and each able to send a MIDI message when pressed Pressing t...

Page 7: ...9 and GX61 but value entry using the keyboard is one octave higher on GX61 Refer to the screen printing on the unit to see which keys to press to enter values The functions are separated in to two gro...

Page 8: ...e buttons can be programmed to send MIDI Program change messages when not used for DAW integration Press the Setup button The LED button is illuminated blue to indicate setup is active Press the low D...

Page 9: ...ou want entering 0 first for negative transpose settings i e 01 for 1 and regular values for positive settings i e 1 for 1 You enter the values using the white number keys spanning G3 B4 G4 B5 on GX61...

Page 10: ...anspose Button Function The transpose buttons can be assigned to control Transpose Global MIDI Channel and Program change The process of assigning a function to the transpose buttons is the same for a...

Page 11: ...rovided your DAW is set up to receive MMC you can now control transport functions from the GX49 The buttons are assigned as follows MMC is supported by DAWs such as Pro Tools FL Studio and many more P...

Page 12: ...12 Nektar Impact GX49 GX61 User Guide www nektartech com Designed by Nektar Technology Inc California Made in China www nektartech com...

Reviews: