background image

37

Ασφάλεια


για


παιδιά

Η


βάση


εστιών


μπορεί


να


διασφαλιστεί


ενάντια


μιας


ακούσιας


σύνδεσης


στο


ηλεκτρικό


ρεύμα


για


να


εμποδίζει


τα


παιδιά


να


ανάβουν


τις


εστίες

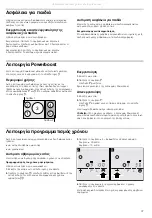
Ενεργοποίηση


και


απενεργοποίηση


της


ασφάλειας


για


παιδιά

Η


βάση


εστιών


πρέπει


να


είναι


σβησμένη

.

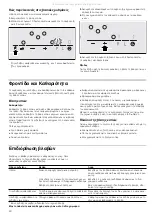
Ενεργοποίηση

Πατήστε


το


σύμβολο


για


περίπου

 4 

δευτερόλεπτα

Η


ένδειξη


φωτίζεται


για

 10 

δευτερόλεπτα

Η


βάση


εστιών


κλειδώνει

.

Απενεργοποίηση

πατήστε


το


σύμβολο


για


περίπου


δευτερόλεπτα

Το


κλείδωμα


έχει


απενεργοποιηθεί

.

Αυτόματη


ασφάλεια


για


παιδιά

Με


αυτήν


τη


λειτουργία

η


ασφάλεια


για


παιδιά


ενεργοποιείται


αυτόματα


όταν


σβήνει


η


βάση


εστιών

.

Ενεργοποίηση


και


απενεργοποίηση

Στο


κεφάλαιο


Βασικές


ρυθμίσεις


παρουσιάζονται


οι


σχετικές


με


τη


σύνδεση


αυτόματης


ασφάλεια


για


τα


παιδιά


πληροφορίες

Λειτουργία

 Powerboost

Με


τη


λειτουργία

 Powerboost 

μπορείτε


να


ζεσταίνετε


μεγάλες


ποσότητες


νερού


πιο


γρήγορα


από


το


επίπεδο


ισχύς


Š

.

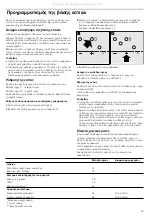
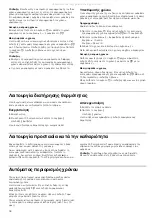
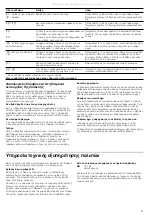
Περιορισμοί


χρήσης

Αυτή


η


λειτουργία


είναι


διαθέσιμη


σε


όλες


τις


εστίες


με


την


προϋπόθεση


ότι


η


άλλη


εστία


της


ίδιας


ομάδας


δεν


λειτουργεί

(

βλέπε


εικόνα

). 

Διαφορετικά

στην


οπτική


ένδειξη


της


επιλεγόμενης


εστίας


αναβοσβήνουν


˜


και


Š

Στη


συνέχεια


ρυθμίζεται


αυτόματα


το


επίπεδο


ισχύος


Š

.

Ενεργοποίηση

1.

Επιλέξτε


μια


εστία

.

2.

Πατήστε


το


σύμβολο


˜

Η


ένδειξη


˜


φωτίζεται

.

Έχει


γίνει


ενεργοποίηση


της


λειτουργίας

 Powerboost.

Απενεργοποίηση

1.

Επιλέξτε


μια


εστία

.

2.

Πατήστε


το


σύμβολο


˜

.

Η


ένδειξη


˜


θα


χαθεί


και


η


εστία


θα


επιστρέψει


στο


επίπεδο


ισχύος


Š

.

Η


λειτουργία

 Powerboost 

έχει


απενεργοποιηθεί

.

Υπόδειξη

Υπό


ορισμένες


συνθήκες

η


λειτουργία

 Powerboost 

μπορεί


να


αποσυνδεθεί


αυτόματα


για


να


προστατέψει


το


ηλεκτρικό


υλικό


που


βρίσκεται


στο


εσωτερικό


της


βάσης


εστιών

.

Λειτουργία


προγραμματισμός


χρόνου

Αυτή


η


λειτουργία


μπορεί


να


χρησιμοποιηθεί


με


δυο


διαφορετικούς


τρόπους

:

για


αυτόματο


σβήσιμο


μια


εστίας

.

για


χρονόμετρο

.

Αυτόματο


σβήσιμο


μιας


εστίας

Η


εστία


σβήνει


αυτόματα


μόλις


παρέλθει


ο


χρόνος


που


επιλέξατε

.

Προγραμματισμός


του


χρόνου


μαγειρέματος

.

Η


βάση


εστιών


πρέπει


να


είναι


αναμμένη

:

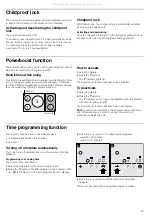
1.

Επιλέξτε


την


εστία


και


το


επίπεδο


ισχύος


που


θέλετε

.

2.

Πατήστε


το


σύμβολο


3

Η


ένδειξη


x


της


εστίας


φωτίζεται

Στην


οπτική


ένδειξη


της


λειτουργίας


προγραμματισμός


χρόνου


εμφανίζεται


‹‹

.

3.

Πατήστε


το


σύμβολο


+


ή


-

Εμφανίζεται


η


βασική


ρύθμιση

:

Σύμβολο


+

: 30 

λεπτά

.

Σύμβολο


-

: 10 

λεπτά

.

4.

Πατήστε


το


σύμβολο


+


ή


-


μέχρι


να


εμφανιστεί


ο


χρόνος


μαγειρέματος


που


θέλετε

.

Μετά


από


μερικά


δευτερόλεπτα

ο


χρόνος


μαγειρέματος


αρχίζει


να


παρέρχεται

.

ƅơƑƙƖ

ƅơƑƙƖ

All manuals and user guides at all-guides.com

Summary of Contents for T D82 Series

Page 1: ...es Instrucciones de uso 3 en Instruction manual 17 el 30 T D82 Placa de cocci n Hob All manuals and user guides at all guides com...

Page 2: ...2 cm T D82 All manuals and user guides at all guides com...

Page 3: ...y montaje as como la tarjeta del aparato para un uso posterior o para posibles compradores en un futuro Comprobar el aparato tras sacarlo del embalaje En caso de que haya sufrido da os durante el tra...

Page 4: ...ci n con el interruptor principal No esperar a que la placa de cocci n se apague autom ticamente por falta de recipiente Peligro de descarga el ctrica Las reparaciones inadecuadas son peligrosas Las r...

Page 5: ...or que el di metro de la base del recipiente Utilizar un recipiente peque o para cantidades peque as Un recipiente grande y poco lleno requiere mucha energ a Al cocer utilizar poca agua De este modo s...

Page 6: ...ionada o ste no es del material o tama o adecuado el nivel de cocci n que se visualiza en el indicador de la zona de cocci n parpadear Colocar el recipiente adecuado para que deje de parpadear Si se t...

Page 7: ...ona de cocci n est caliente Al retirar el recipiente antes de haber apagado la zona de cocci n aparecer n alternativamente el indicador o y el nivel de potencia seleccionado Superficies de mando Inter...

Page 8: ...l s mbolo Se muestra el ajuste b sico S mbolo nivel de potencia 9 S mbolo nivel de potencia 4 El nivel de potencia se ha ajustado Modificar el nivel de potencia Seleccionar la zona de cocci n y pulsar...

Page 9: ...as 6 7 8 12 min Bistec 3 cm de grosor 7 8 8 12 min Pechuga 2 cm de grosor 5 6 10 20 min Pechuga ultracongelada 5 6 10 30 min Hamburguesas alb ndigas de carne 3 cm de grosor 4 5 30 40 min Pescado y fil...

Page 10: ...ticamente el nivel de potencia As se activa 1 Seleccionar una zona de cocci n 2 Pulsar el s mbolo El indicador se ilumina La funci n Powerboost se habr activado As se desactiva 1 Seleccionar una zona...

Page 11: ...mbolos Una vez transcurrido el tiempo Suena una se al de aviso En la indicaci n visual de la funci n programaci n del tiempo se muestra Tras 10 segundos los indicadores se apagan Al pulsar el s mbolo...

Page 12: ...Se al de confirmaci n y se al de error desactivadas S lo se al de error activada S lo se al de confirmaci n activada Todas las se ales activadas Visualizar el consumo de energ a Desactivada Activada P...

Page 13: ...limpieza a vapor La mejor manera de eliminar la suciedad resistente es utilizando un rascador para vidrio Observar las indicaciones del fabricante Se puede adquirir rascadores adecuados para vidrio a...

Page 14: ...ido s lo se presenta cuando est n en funcionamiento las 3 zonas de cocci n izquierdas y desaparece o se reduce cuando se apaga alguna zona de cocci n Los ruidos que se han descrito son normales forman...

Page 15: ...chulte Ufer bater a de cocina de 4 piezas para placa de inducci n Z9442X0 con las siguientes dimensiones Cazo 16 cm 1 2 l para zonas de cocci n de 14 5 cm Olla 16 cm 1 7 l para zonas de cocci n de 14...

Page 16: ...m 9 aprox 2 30 S 2 S Ingredientes 250 g de arroz de grano redondo 600 g de agua y una pizca de sal 18 cm 9 aprox 2 30 S 2 S Fre r solomillo de cerdo Recipiente Sart n 18 cm 9 1 30 No 7 No Temperatura...

Page 17: ...mage in transport do not connect the appliance contact the Technical Assistance Service and provide written notification of the damage caused otherwise you will lose your right to any type of compensa...

Page 18: ...t the after sales service Risk of electric shock Do not use any high pressure cleaners or steam cleaners which can result in an electric shock Risk of electric shock A defective appliance may cause el...

Page 19: ...from enamelled steel cast iron special stainless steel induction pans To determine whether a pan is suitable check to see if a magnet will stick to its base There are other types of cookware for indu...

Page 20: ...r detecting pans which varies depending on the material of the pan being used You should therefore use the hotplate that is most suitable for the diameter of your pan Getting to know your appliance On...

Page 21: ...tting 9 symbol Heat setting 4 The heat setting is set Changing the power level Select the hotplate and press the or symbol until the required power level comes on To switch off the hotplate Select the...

Page 22: ...ak 3 cm thick 7 8 8 12 min Chicken breast 2 cm thick 5 6 10 20 min Frozen chicken breast 5 6 10 30 min Hamburgers meatballs 3 cm thick 4 5 30 40 min Plain fish and fish fillet 5 6 8 20 min Breaded fis...

Page 23: ...power level will be automatically set How to activate 1 Select a hotplate 2 Press the symbol The indicator lights up The Powerboost function will have been activated To deactivate 1 Select a hotplate...

Page 24: ...the time or set it to with the or symbols Once the time has elapsed A warning signal sounds is displayed on the time program function display After 10 seconds the indicators turn off Pressing the 3 sy...

Page 25: ...nals Confirmation and error signals deactivated Only error signal activated Only confirmation signal activated All signals activated Display energy consumption Deactivated Activated Automatic programm...

Page 26: ...llow the manufacturer s instructions Suitable glass scrapers can be obtained through the Technical Assistance Service or from our online shop Hob frame In order to avoid damage to the hob frame follow...

Page 27: ...t E number and FD number Please quote the E number product number and the FD number production number of your appliance when contacting the after sales service The rating plate bearing these numbers c...

Page 28: ...bechamel sauce Cookware Saucepan Milk temperature 7 C Ingredients 40 g of butter 40 g of flour 0 5 l of milk 3 5 fat and a pinch of salt 14 5 cm 1 Melt butter mix in flour and salt and heat everything...

Page 29: ...pe batter Frying frozen potato chips Cookware Pot 18 cm 9 Until the tempera ture of the oil reaches 180 C No 9 No Ingredients 1 8 kg of sunflower oil for cooking 200 g of frozen potato chips e g McCa...

Page 30: ...4 34 34 35 35 35 35 37 37 37 Powerboost 37 37 37 37 37 37 38 38 38 38 38 38 39 39 40 40 40 40 40 41 41 42 Produktinfo Internet www neff international com online shop www neff eshop com 8 8 All manuals...

Page 31: ...31 8 2 cm All manuals and user guides at all guides com...

Page 32: ...32 2012 19 E waste electrical and electronic equipment WEEE All manuals and user guides at all guides com...

Page 33: ...33 sandwich 90 All manuals and user guides at all guides com...

Page 34: ...34 2 A Powerboost 3 Powerboost x S All manuals and user guides at all guides com...

Page 35: ...35 20 4 1 9 1 2 10 9 4 20 20 9 1 1 1 2 1 2 1 2 3 4 3 4 15 25 3 4 30 40 All manuals and user guides at all guides com...

Page 36: ...4 15 60 2 3 10 20 3 4 7 20 4 5 4 5 50 60 4 5 60 100 3 4 50 60 6 7 6 10 6 7 8 12 6 7 8 12 3 7 8 8 12 2 5 6 10 20 5 6 10 30 Hamburger 3 4 5 30 40 5 6 8 20 6 7 8 20 6 7 8 12 7 8 4 10 6 7 6 10 6 7 3 4 5...

Page 37: ...37 4 10 4 Powerboost Powerboost 1 2 Powerboost 1 2 Powerboost Powerboost 1 2 3 x 3 30 10 4 All manuals and user guides at all guides com...

Page 38: ...38 3 10 x 3 99 99 1 3 W 2 10 05 3 3 W 10 3 1 2 10 1 2 35 1 10 All manuals and user guides at all guides com...

Page 39: ...39 kwh 10 kwh N K 10 30 1 Power Management 1000 W 1500 W 2000 W 10 All manuals and user guides at all guides com...

Page 40: ...40 1 2 10 4 3 4 5 4 All manuals and user guides at all guides com...

Page 41: ...41 3 E FD E FD 30 30 GR 18 182 All manuals and user guides at all guides com...

Page 42: ...4 5 cm 9 1 30 1 800 g 18 cm 9 2 30 1 Erasco 500 g 14 5 cm 9 1 30 1 00 1 1 kg 18 cm 9 2 30 1 00 1 bechamel 7 C 40 g 40 g 0 5 l 3 5 14 5 cm 1 1 3 00 2 7 5 20 3 bechamel 2 1 7 C 190 g 23 g 750 ml 3 5 14...

Page 43: ...5 cm 9 2 30 2 250 g 600 g 18 cm 9 2 30 2 18 cm 9 1 30 7 7 C 2 200 g 1 cm 18 cm 9 1 30 7 55 ml 18 cm 9 180 C 9 1 8 kg 200 g McCain 123 Frites Original DIN 44550 DIN EN 60350 2 All manuals and user gui...

Page 44: ...00 930924 9000925328 9000925328 Constructa Neff Vertriebs GmbH Carl Wery Stra e 34 D 81739 M nchen All manuals and user guides at all guides com...
Reviews: