background image

Cleaning and servicing

 en

19

Note: 

Please note that the Home Connect functions

can only be utilised with the Home Connect app. In-

formation on data protection can be retrieved in the

Home Connect app.

16  Cleaning and servicing

To keep your appliance working efficiently for a long

time, it is important to clean and maintain it carefully.

16.1 Cleaning products

In order to avoid damaging the various oven surfaces

on the appliance, do not use unsuitable cleaning

products.

WARNING ‒ Risk of electric shock!

An ingress of moisture can cause an electric shock.

Do not use steam- or high-pressure cleaners to

clean the appliance.

ATTENTION!

Unsuitable cleaning agents damage the surfaces of the

appliance.

Do not use harsh or abrasive cleaning products.

Do not use cleaning products with a high alcohol

content.

Do not use hard scouring pads or cleaning

sponges.

Do not use any special cleaners for cleaning the ap-

pliance while it is hot.

Using oven cleaner in a hot cooking compartment

damages the enamel.

Never use oven cleaner in the cooking compartment

when it is still warm.

Remove all food remnants from the cooking com-

partment and the appliance door before you next

heat up the appliance.

If different cleaning agents are mixed together, there

may be a chemical reaction between these.

Do not mix cleaning agents.

Completely remove any cleaning agent residue.

Salt contained in new sponge cloths may damage sur-

faces.

Wash new sponge cloths thoroughly before use.

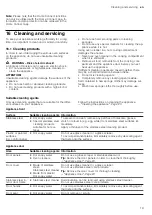
Suitable cleaning agents

Only use cleaning agents that are suitable for the differ-

ent surfaces on your appliance.

Follow the instructions on cleaning the appliance. 

→ 

"Cleaning the appliance", Page 20

Appliance front

Surface

Suitable cleaning agents Information

Stainless steel

¡

Hot soapy water

¡

Special stainless steel

cleaning products

suitable for hot sur-

faces

To prevent corrosion, remove any patches of limescale, grease,

starch or albumin (e.g. egg white) from stainless steel surfaces im-

mediately.

Apply a thin layer of the stainless steel cleaning product.

Plastic or painted

surfaces

E.g. control panel

¡

Hot soapy water

Do not use glass cleaner or a glass scraper.

To avoid permanent stains, immediately remove any descaling agent

that gets onto the surface.

Appliance door

Area

Suitable cleaning agents Information

Door panels

¡

Hot soapy water

¡

Oven cleaners

Do not use a glass scraper or stainless steel wool.

Tip: 

Remove the door panels in order to clean them thoroughly. 

→ 

"Appliance door", Page 23

Door cover

¡

Made of stainless

steel:

Stainless steel cleaner

¡

Made from plastic:

Hot soapy water

Do not use glass cleaner or a glass scraper.

Do not use stainless steel care products.

Tip: 

Remove the door cover for thorough cleaning. 

→ 

"Appliance door", Page 23

Stainless steel in-

terior door frame

¡

Stainless steel cleaner Discolouration can be removed using stainless steel cleaner.

Do not use stainless steel care products.

Door handle

¡

Hot soapy water

To avoid permanent stains, immediately remove any descaling agent

that gets onto the surface.

Door seal

¡

Hot soapy water

Do not remove or scrub.

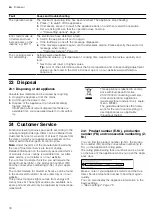
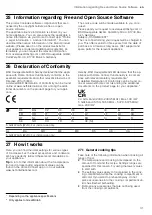
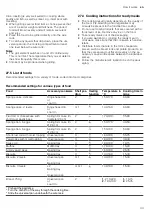
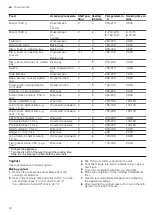
Summary of Contents for B64CS71 0B Series

Page 1: ...Oven User manual and installation instructions B64CS71 0B ...

Page 2: ...ully Keep the instruction manual and the product information safe for future refer ence or for the next owner Do not connect the appliance if it has been damaged in transit 1 2 Intended use This appliance is designed only to be built into kitchen units Read the special installation instructions Only a licensed professional may connect ap pliances without plugs Damage caused by in correct connectio...

Page 3: ...its 15 vol when undi luted e g for marinating or pouring over food Open the appliance door carefully WARNING Risk of scalding The accessible parts of the appliance become hot during operation Never touch these hot parts Keep children at a safe distance Hot steam may escape when you open the appliance door Steam may not be visible de pending on the temperature Open the appliance door carefully Keep...

Page 4: ...ever hang combustible objects e g tea towels on the door handle Leave the front of the appliance clear Keep children at a safe distance If the door seal is damaged a large amount of heat is generated around the door Do not scrub or remove the seal Never operate the appliance if the seal is damaged or missing WARNING Risk of serious harm to health The appliance gets very hot when the clean ing func...

Page 5: ... baking very juicy fruit flans do not pack too much on the baking tray If possible use the deeper universal pan Using oven cleaner in a hot cooking compartment damages the enamel Never use oven cleaner in the cooking compartment when it is still warm Remove all food remnants from the cooking com partment and the appliance door before you next heat up the appliance If the seal is very dirty the app...

Page 6: ...ay switched off 4 Familiarising yourself with your appliance 4 1 Control panel You can use the control panel to configure all functions of your appliance and to obtain information about the operat ing status On certain models specific details such as colour and shape may differ from those pictured 1 2 2 1 Display Display Page 6 2 Buttons Buttons Page 7 4 2 Display You can configure all the functio...

Page 7: ...emains open for longer than 15 minutes the light switches off again For most functions the lighting is switched on during operation The lighting switches off again when the op eration ends Cooling fan The cooling fan switches on and off depending on the appliance s temperature The hot air escapes above the door ATTENTION Covering the ventilation slots will cause the appliance to overheat Do not co...

Page 8: ...gy efficiency class Top bottom heat gentle 150 250 C For gently cooking selected types of food without preheating Heat is emitted from above and below This type of heating is used to determine the energy consump tion in the conventional mode Circo roasting 30 275 C Roast poultry whole fish or larger pieces of meat The grill element and the fan switch on and off alternately The fan circulates the h...

Page 9: ...trength of the home network Home Connect Page 17 Home network Home network not connected Home Connect Page 17 Home Connect server Home Connect server not connected Home Connect Page 17 Remote diagnostics Remote diagnostics activated Home Connect Page 17 New function A new function is available if a red symbol is displayed in the main menu Home Connect Page 17 6 Accessories Use original accessories...

Page 10: ...doing the wire rack is on top of the upper guide rod Wire rack on univer sal pan 6 3 Other accessories You can purchase other accessories from our after sales service specialist retailers or online You will find a comprehensive range of products for your appliance in our brochures and online www neff international com Accessories vary from one appliance to another When purchasing accessories alway...

Page 11: ...emperatures above 120 C this will damage the enamel Do not use the appliance if there is water on the cooking compartment floor Wipe away any water on the cooking compartment floor before operation Press to switch the appliance on Notes In the basic settings you can specify whether the display shows the main menu or another function when the appliance is switched on Basic settings Page 16 If you d...

Page 12: ...ng Cooking time Page 13 4 Use Ready at to set the time at which the opera tion should end Delayed start Ready at time Page 13 5 Place the food in the cooking compartment before the appliance starts to heat 6 Press to start the operation a The display shows the start time The appliance is in standby mode a Once the start time has been reached the appli ance starts heating and the cooking time start...

Page 13: ...he setting 10 Press to confirm the delayed start a The appliance will start at the appropriate time a When the time has elapsed a signal sounds 11 Press any button to end the audible signal Changing the Ready at time for delayed starts 1 Press 2 Press Ready at 3 Use or to change the end time 4 Press to confirm the setting 5 Press to confirm the delayed start Cancelling the Ready at time for delaye...

Page 14: ...vidual moulds Yorkshire pudding Poultry Chicken Duck goose Turkey Meat Pork Beef Veal Lamb Game Meat dishes Category Food Fish Fish whole Fish fillets Frozen products Pizza Bakes Potato products Poultry fish Bread rolls Side dishes vegetables Potatoes Vegetables 10 4 Setting a dish 1 Press Dishes 2 Press the required category 3 Press the required food 4 Press the required dish Note The setting opt...

Page 15: ...n from accidentally switching it on or changing the set tings 12 1 Activating the childproof lock The childproof lock disables the control panel to pre vent children from accidentally switching on the appli ance To switch on the appliance deactivate the child proof lock Notes When you activate the childproof lock the appliance will immediately disable the control panel The button is the exception ...

Page 16: ...ly 1 Factory setting may vary according to model Sound Selection Button tone On1 Off Signal tone Very short duration Short duration Medium duration1 Long duration 1 Factory setting may vary according to model Appliance set tings Selection Fan run on time Minimum Recommended1 Long Very long Pull out system Retrofitted if 2 or 3 sets of pull out rails are fitted Not retrofitted if shelf supports and...

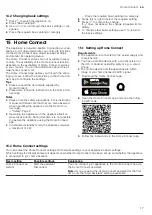
Page 17: ...e safety precautions in this instruction manual and make sure that they are also observed when operating the appliance via the Home Con nect app Safety Page 2 Operating the appliance on the appliance itself al ways takes priority During this time it is not possible to operate the appliance using the Home Connect app In networked standby mode the appliance requires a maximum of 2 W 15 1 Setting up ...

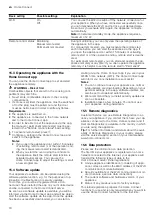
Page 18: ...the Home Connect app to adjust the settings or start a new programme 15 4 Software update Your appliance s software can be updated using the software update function e g for the purposes of op timisation troubleshooting or security updates To do this you must be a registered Home Con nect user have installed the app on your mobile device and be connected to the Home Connect server As soon as a sof...

Page 19: ... new sponge cloths thoroughly before use Suitable cleaning agents Only use cleaning agents that are suitable for the differ ent surfaces on your appliance Follow the instructions on cleaning the appliance Cleaning the appliance Page 20 Appliance front Surface Suitable cleaning agents Information Stainless steel Hot soapy water Special stainless steel cleaning products suitable for hot sur faces To...

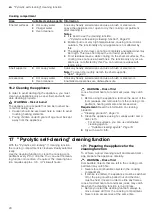
Page 20: ...here in order to avoid touching heating elements Young children under 8 years of age must be kept away from the appliance WARNING Risk of fire Loose food remnants fat and meat juices may catch fire Before using the appliance remove the worst of the food residues and remnants from the cooking com partment heating elements and accessories Requirement Read the information on cleaning products Cleanin...

Page 21: ...on Page 20 1 Press Cleaning 2 Press Pyrolytic self cleaning 3 Press Level to set the cleaning setting Cleaning set ting Cleaning level Duration in hours 1 Low Approx 2 15 2 High Approx 2 30 Select the higher cleaning setting if the cooking compartment is particularly dirty or has not been cleaned for a while You cannot change the duration of the cleaning function Once the cleaning function is in p...

Page 22: ...TION The prolonged presence of moisture in the cooking compartment leads to corrosion After using the cleaning aid wipe the cooking com partment clean and allow it to dry fully Requirement The cooking compartment must have cooled down 1 Open the appliance door and remove the remaining water with an absorbent sponge cloth 2 Clean the smooth surfaces in the cooking compart ment with a dish cloth or ...

Page 23: ...eaning products Page 19 20 2 Attaching the rails Notes The rails only fit on the right or left For both rails ensure that the curved rods are at the front 1 First push the rail into the middle of the rear socket until the rail rests against the cooking compartment wall and then push this back 2 Push the rail into the front socket until the rail also rests against the cooking compartment wall and t...

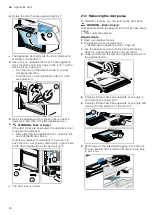
Page 24: ... appliance door approx 45 wide 4 Insert the coin in the gap in the lock and rotate as far as it will go Turn the lock on the left hand side in a clockwise direction Turn the lock on the right hand side in an anti clockwise direction Left hand lock not se cured The arrows do not point to each other Left hand lock secured The arrows point to each other Left hand lock released a The lock audibly enga...

Page 25: ...d carefully Handle the appliance door carefully The door handle is not suitable for carrying the ap pliance door The door handle may break off Never carry the appliance door by the door handle Grab hold of the appliance door with both hands on the left and right to carry it Take hold of the appliance door with both hands one on the left and one on the right and slightly ro tate the door handle upw...

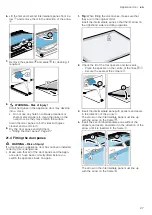
Page 26: ...horizontally and use it to push the door lock black component on each side of the door downwards as far as it will go a The door lock is closed 21 3 Removing the door panes To facilitate cleaning you can remove the door pane WARNING Risk of injury Components inside the appliance door may have sharp edges Wear protective gloves Requirements Have a screwdriver ready The appliance door is detached De...

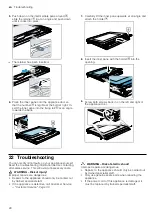
Page 27: ...alled correctly this is dangerous Make sure that all of the door panes and the appli ance door have been correctly fitted before you switch the appliance back on again 1 Tip When fitting the door panes make sure that they are in the original order Insert the intermediate pane so that the arrow on the right hand side is pointing upwards 2 Check the fit of the four spacers and two seals Place the sp...

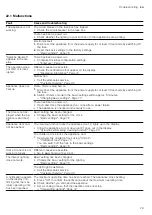
Page 28: ...d right of the appliance door 22 Troubleshooting You can rectify minor faults on your appliance yourself Read the troubleshooting information before contacting after sales service This will avoid unnecessary costs WARNING Risk of injury Improper repairs are dangerous Repairs to the appliance should only be carried out by trained specialist staff If the appliance is defective call Customer Service ...

Page 29: ...se the appliance door once after a power failure a The appliance is checked and is ready to use The time is not dis played when the ap pliance is switched off Basic setting has been changed Change the basic setting for the clock Basic settings Page 16 Appliance door can not be opened The cleaning function locks the appliance door lights up in the display Allow the appliance to cool down until goes...

Page 30: ...l and electronic appliances waste electrical and electronic equip ment WEEE The guideline determines the frame work for the return and recycling of used appliances as applicable throughout the EU 24 Customer Service Function relevant genuine spare parts according to the corresponding Ecodesign Order can be obtained from Customer Service for a period of at least 10 years from the date on which your...

Page 31: ...cuments on the product page for your appli ance Hereby BSH Hausgeräte GmbH declares that the ap pliance with Home Connect functionality is in compli ance with relevant statutory requirements 2 A detailed Declaration of Conformity can be found on line at www neff home com uk among the additional documents on the product page for your appliance 2 2 4 GHz band 2400 2483 5 MHz Max 100 mW 5 GHz band 51...

Page 32: ...e wire rack will become very crispy on all sides You can roast large poultry for example or multiple individual pieces at the same time Roast pieces of a similar weight and thickness The grilled food will brown evenly and will remain succu lent and juicy Place the food to be roasted directly on the wire rack To catch any liquids that drip down place the uni versal pan with the wire rack inside it ...

Page 33: ...at they are spread out flat and evenly on the ac cessory Leave a little space between the individual pieces Follow the manufacturer s instructions on the pack aging 27 5 List of foods Recommended settings for a variety of foods sorted into food categories Recommended settings for various types of food Food Accessory cookware Shelf pos ition Heating function Temperature in C Cooking time in mins Sp...

Page 34: ...without rind e g neck 1 5 kg Uncovered cookware 2 190 200 120 140 Fillet of beef medium 1 kg Wire rack 2 210 220 40 50 Pot roasted beef 1 5 kg Covered cookware 2 200 220 130 160 Pot roasted beef 1 5 kg Covered cookware 2 200 220 140 160 Sirloin medium 1 5 kg Wire rack 2 220 230 60 70 Burger 3 4 cm thick Wire rack 4 290 25 30 2 Leg of lamb boned medium 1 5 kg Uncovered cookware 2 170 190 50 80 Fish...

Page 35: ...he cooking com partment door closed during slow cooking Tips for slow cooking Here you will find tips for achieving good results when slow cooking food Issue Tip You want to slow cook a duck breast Place the cold duck breast into a pan Sear the skin side first Slow cook the duck breast After slow cooking grill the duck breast for 3 to 5 minutes until crispy You want to serve your slow cooked meat ...

Page 36: ...n 1 x 900 g or 2 x 450 g 2 190 200 40 50 Scones Baking sheet on wire rack 3 180 1901 10 14 Biscuits Baking sheet on wire rack 3 140 1601 10 25 Small cakes 12 cup tin 3 140 1602 20 30 Pavlova Baking sheet on wire rack 3 90 1001 120 180 Yorkshire pudding 12 cup tin 3 200 2201 15 25 1 Preheat the appliance 2 Preheat the appliance for five minutes Do not use the rapid heating function Recommended sett...

Page 37: ...oasting and braising Follow this information when frying or braising poultry or meat Calculating the cooking time e g 20 35 To calculate the cooking time assume 20 minutes per 500 g of meat Then add an extra 35 minutes to that figure For 1 5 kg the cooking time would therefore be 95 minutes Cooking time range e g 10 15 Your food will be ready within the specified range of time in minutes Recommend...

Page 38: ...or in baking tins dishes at the same time will not necessarily be ready at the same time Shelf positions when baking on 2 levels Universal pan Shelf position 3 Baking tray Shelf position 1 Baking tins on the wire rack First wire rack Shelf position 3 Second wire rack Shelf position 1 Shelf positions when baking on 3 levels Baking tray Shelf position 4 Universal pan Shelf position 3 Baking tray She...

Page 39: ...guaranteed if it has been installed to a professional standard in accordance with these installation instructions The in staller shall be liable for damages incurred as a result of incorrect installation Do not use the door handle for the trans port or installation Check the appliance for damage after un packing it Do not connect the appliance if it has been damaged in transit Before starting up t...

Page 40: ...uld break it The door handle cannot sup port the weight of the appliance Do not carry or hold the appliance by the door handle 28 2 Appliance dimensions You will find the dimensions of the appliance here 28 3 Installation below a worktop Observe the installation dimensions and the installation instructions when installing below a worktop To ventilate the appliance the intermediate floor must have ...

Page 41: ...tilation cut out To ensure sufficient ventilation of the two appli ances there must be a ventilation opening of at least 200 cm in the base area To do this trim the base panel or fit a ventilation grille Ensure that air exchange is guaranteed in accord ance with the diagram Only fit appliances up to a height that allows ac cessories to be easily removed 28 7 Corner installation Observe the install...

Page 42: ...ve contact plug Note Only licensed specialists may connect the appli ance Damage caused by incorrect connection is not covered under the warranty An isolating switch must be integrated into the perman ent electrical installation according to the installation regulations 1 Identify the phase and neutral conductors in the socket The appliance may be damaged if it is not connec ted correctly 2 Connec...

Page 43: ...pliance must not be closed by additional battens Thermal insulation strips must not be fitted to the side panels of the surround unit 28 10 For handleless kitchens with vertical bar handle strips 1 Attach a suitable filling piece in order to cover any sharp edges and to guarantee a safe installation 2 Pre drill aluminium profiles to establish a screw con nection 3 Secure the appliance using a suit...

Page 44: ...sgeräte GmbH Carl Wery Straße 34 81739 München GERMANY 9001696288 9001696288 030411 en Valid within Great Britain Imported to Great Britain by BSH Home Appliances Ltd Grand Union House Old Wolverton Road Wolverton Milton Keynes MK12 5PT United Kingdom ...

Reviews: