background image

4

Focusing the binoculars

1.  Hold the product up to your face and look with both eyes through 

the lenses.

2.  Close your right eye.
3.  Focus on a fixed object using your left eye.
4.  Turn the focus wheel 

A

3

 until the image is sharp.

5.  Open your right eye.
6.  Close your left eye.
7.  Focus on the same object using your right eye.
8.  Turn the diopter ring 

A

q

 until the image is sharp.

The binoculars are now balanced for your eyes.


4

After focusing the binoculars, only use 

A

3

 to focus on objects.

c

 Kurzanleitung

Fernglas

SCBI5000BK

Weitere Informationen finden Sie in der erweiterten 
Anleitung online: 

ned.is/scbi5000bk

Bestimmungsgemäße Verwendung

Dieses Produkt ist zum Betrachten entfernter Objekte und 
Umgebungen bestimmt.
Jegliche Modifikation des Produkts kann Folgen für die Sicherheit, 
Garantie und ordnungsgemäße Funktionalität haben.

Hauptbestandteile 

(Abbildung 

A

)

1

 Objektivabdeckungen

2

 Halsband

3

 Fokussierrad

4

  Linker Handgriff

5

 Objektivtuch

6

 Gummi-Augenmuscheln

7

 Aufbewahrungstasche

8

  Rechter Handgriff

9

 Dioptrienindex

q

 Dioptrienring

w

 Okularlinsen

Sicherheitshinweise


-

WARNUNG

• 

Vergewissern Sie sich, dass Sie die Anweisungen in diesem 
Dokument vollständig gelesen und verstanden haben, bevor Sie 
das Produkt installieren oder verwenden. Heben Sie die 
Verpackung und dieses Dokument zum späteren Nachschlagen 
auf.

• 

Verwenden Sie das Produkt nur wie in diesem Dokument 
beschrieben.

• 

Verwenden Sie das Produkt nicht, wenn ein Teil beschädigt ist 
oder es einen Mangel aufweist. Ersetzen Sie ein beschädigtes oder 
defektes Produkt unverzüglich.

a

 Quick start guide

Binoculars

SCBI5000BK

For more information see the extended manual online: 

ned.is/scbi5000bk

Intended use

This product is intended for viewing distant objects and surroundings.
Any modification of the product may have consequences for safety, 
warranty and proper functioning.

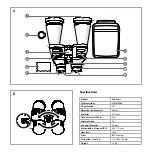
Main parts 

(image 

A

)

1

  Lens covers

2

 Neckband

3

  Focus wheel

4

  Left hand grip

5

  Lens cloth

6

  Rubber eye cups

7

  Storage pouch

8

  Right hand grip

9

  Diopter index

q

  Diopter ring

w

  Oculair lenses

Safety instructions


-

WARNING

• 

Ensure you have fully read and understood the instructions in this 
document before you install or use the product. Keep the 
packaging and this document for future reference.

• 

Only use the product as described in this document.

• 

Do not use the product if a part is damaged or defective. Replace a 
damaged or defective product immediately.

• 

Do not drop the product and avoid bumping.

• 

Do not expose the product to water or moisture.

• 

Do not look into direct sunlight or any other bright light source. 
This can cause permanent damage to your eyesight.

• 

Always hold the product firmly with two hands, to avoid dropping.

• 

Do not attempt to dismantle the product.

• 

Do not clean the inside of the product.

• 

Protect the product from excessive lighting. Do not point the 
product at a bright light source. This can cause damage of your 
product.

Adjusting the interpupillary distance

 (image 

B

)

1.  Hold the product with both hands on the hand grips 

A

48

.

2.  Hold the product up to your face and look with both eyes through 

the lenses.

3.  Hinge the binoculars until a single circular field is visible.

Summary of Contents for SCBI5000BK

Page 1: ...ned is scbi5000bk Binoculars 10 60 mm SCBI5000BK ...

Page 2: ...ll avvio 6 hGuía de inicio rápido 7 iGuia de iniciação rápida 8 eSnabbstartsguide 8 gPika aloitusopas 9 fHurtigguide 10 2Vejledning til hurtig start 10 kGyors beüzemelési útmutató 11 nPrzewodnik Szybki start 12 xΟδηγός γρήγορης εκκίνησης 12 1Rýchly návod 13 lRychlý návod 14 yGhid rapid de inițiere 15 ...

Page 3: ...I5000BK Magnification 10 x Objective lens diameter 60 mm Eye relief 22 7 mm Field of view at 1000 m 92 m Angle of vision 5 3 Exit pupil diameter 6 0 mm Interpupillary distance IPD 46 5 73 mm Near focus 10 m Prism BK 7 blue lens Dimensions l x w x h 77 x 200 x 230 mm Weight 1 0 kg ...

Page 4: ...n Mangel aufweist Ersetzen Sie ein beschädigtes oder defektes Produkt unverzüglich aQuick start guide Binoculars SCBI5000BK For more information see the extended manual online ned is scbi5000bk Intended use This product is intended for viewing distant objects and surroundings Any modification of the product may have consequences for safety warranty and proper functioning Main parts image A 1 Lens ...

Page 5: ...molette de mise au point A3 jusqu à ce que l image soit nette 5 Ouvrez votre œil droit 6 Fermez votre œil gauche Lassen Sie das Produkt nicht herunterfallen und vermeiden Sie Kollisionen Setzen Sie das Produkt keinem Wasser oder Feuchtigkeit aus Schauen Sie nicht in direktes Sonnenlicht oder eine andere helle Lichtquelle Dies kann Ihr Sehvermögen dauerhaft schädigen Halten Sie das Produkt immer mi...

Page 6: ...e que l image soit nette Les jumelles sont maintenant équilibrées pour vos yeux 4Après avoir mis les jumelles au point n utilisez que A3 pour effectuer une mise au point sur des objets dSnelstartgids Verrekijker SCBI5000BK Zie voor meer informatie de uitgebreide handleiding online ned is scbi5000bk Bedoeld gebruik Dit product is bedoeld om objecten en de omgeving op verre afstand te bekijken Elke ...

Page 7: ...ENZIONE Assicurarsi di aver letto e compreso pienamente le istruzioni presenti nel documento prima di installare o utilizzare il prodotto Conservare la confezione e il presente documento per farvi riferimento in futuro Utilizzare il prodotto solo come descritto nel presente documento Non utilizzare il prodotto se una parte è danneggiata o difettosa Sostituire immediatamente un prodotto danneggiato...

Page 8: ...dukten kan medföra konsekvenser för säkerhet garanti och korrekt funktion Ajustar la distancia entre pupilas image B 1 Sujete el producto con ambas manos por sus agarres A48 2 Coloque el producto a la altura de los ojos y mire con ambos ojos a través de las lentes 3 Pliegue el binocular hasta que vea únicamente un campo circular Enfocar el binocular 1 Coloque el producto a la altura de los ojos y ...

Page 9: ... Säädä kiikareita kunnes näet yhden pyöreän kentän Huvuddelar bild A 1 Linsskydd 2 Halsrem 3 Fokushjul 4 Handgrepp för vänster hand 5 Linsduk 6 Ögonmussla av gummi 7 Förvaringspåse 8 Handgrepp för höger hand 9 Dioptriindex q Dioptriring w Okularlinser Säkerhetsanvisningar VARNING Säkerställ att du har läst och förstått alla instruktioner i detta dokument innan du installerar och använder produkten...

Page 10: ...lla ja katso linssien läpi molemmilla silmillä 2 Sulje oikea silmäsi 3 Tarkenna kiinteään kohteeseen vasemmalla silmälläsi 4 Käännä tarkennuspyörää A3 kunnes kuva on terävä 5 Avaa oikea silmäsi 6 Sulje vasen silmäsi 7 Tarkenna samaan kohteeseen oikealla silmälläsi 8 Käännä diopterirengasta Aq kunnes kuva on terävä Kiikarit on nyt säädetty silmiisi sopiviksi 4Kiikarien tarkennuksen jälkeen voit tar...

Page 11: ...e 3 Addig hajlítsa össze a távcsövet amíg egyetlen kör alakú mező nem válik láthatóvá Hoveddele billede A 1 Linsedæksler 2 Halsrem 3 Fokuseringshjul 4 Venstrehåndsgreb 5 Linseklud 6 Øjestykker af gummi 7 Opbevaringsetui 8 Højrehåndsgreb 9 Diopterindeks q Dioptriring w Okulare linser Sikkerhedsinstruktioner ADVARSEL Sørg for at du har læst og forstået instruktionerne i dette dokument fuldt ud før d...

Page 12: ...όντος μπορεί να έχει επιπτώσεις στην ασφάλεια την εγγύηση και τη σωστή λειτουργία A távcső fókuszálása 1 Tartsa a terméket az arcához és nézzen bele mindkét szemével az objektívekbe 2 Csukja be a jobb szemét 3 Fókuszáljon egy fix tárgyra a bal szemével 4 Forgassa el a fókuszáló tárcsát A3 amíg a kép ki nem élesedik 5 Nyissa ki a jobb szemét 6 Csukja be a bal szemét 7 Fókuszáljon ugyanarra a tárgyr...

Page 13: ...ασης 4 Κράτημα αριστερού χεριού 5 Πανάκι για τους φακούς 6 Ελαστικά καλύμματα ματιών 7 Θήκη αποθήκευσης 8 Κράτημα δεξιού χεριού 9 Δείκτης διοπτρίας q Κρίκος διοπτρίας w Φακοί ματιών Οδηγίες ασφάλειας ΠΡΟΕΙΔΟΠΟΙΗΣΗ Βεβαιωθείτε ότι έχετε διαβάσει και κατανοήσει αυτές τις οδηγίες πριν εγκαταστήσετε ή χρησιμοποιήσετε το προϊόν Κρατήστε τη συσκευασία και το κείμενο για μελλοντική αναφορά Χρησιμοποιείτε...

Page 14: ...A3 dokud nebude obraz ostrý 5 Otevřete pravé oko 6 Zavřete levé oko 7 Pravým okem se zaměřte na stejný objekt 8 Otáčejte kroužkem dioptru Aq dokud nebude obraz ostrý Dalekohled je nyní nastaven vyváženě pro vaše oči 4Jakmile dalekohled takto zaostříte používejte k ostření na objekty už pouze A3 Nastavenie medzipupilárnej vzdialenosti obrázok B 1 Držte výrobok obomi rukami za plochy na uchopenie A4...

Page 15: ...c 7 Husă de depozitare 8 Zonă de prindere manuală dreapta 9 Index dioptric q Inel dioptric w Lentile optice Instrucțiuni de siguranță AVERTISMENT Asigurați vă că ați citit complet și că ați înțeles instrucțiunile din acest document înainte de a instala sau utiliza produsul Păstrați ambalajul și acest document pentru a le consulta ulterior Folosiți produsul exclusiv conform descrierii din acest doc...

Page 16: ...Nedis BV De Tweeling 28 5215 MC s Hertogenbosch The Netherlands 12 21 ...

Reviews: