background image

4

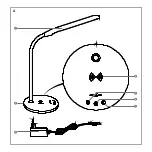
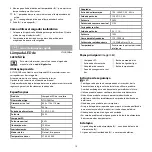
Main parts 

(image 

A

)

1

  LED lamp

2

  Power input

3

  Power adapter

4

  Wireless charging area

5

  Light mode button

6

  Power button

7

  Timer button

Safety instructions


-

WARNING

• 

Ensure you have fully read and understood the instructions in this 
document before you install or use the product. Keep the 
packaging and this document for future reference.

• 

Only use the product as described in this document.

• 

Do not use the product if a part is damaged or defective. Replace a 
damaged or defective product immediately.

• 

Do not drop the product and avoid bumping.

• 

This product may only be serviced by a qualified technician for 
maintenance to reduce the risk of electric shock.

• 

Do not expose the product to water or moisture.

• 

Disconnect the product from the power source and other 
equipment if problems occur.

Installation

1.  Plug the power adapter 

A

3

 into the power input 

A

2

.

2.  Plug the other end of 

A

3

 into a power outlet.

Using the lamp

1.  Press the power button 

A

6

 to switch on the LED lamp 

A

1

.

2.  Press and hold 

A

6

 to change the brightness of 

A

1

.

3.  Press the light mode button 

A

5

 to cycle through the different 

light modes.


4

The light modes are Natural, Cool and Warm.

4.  Press and hold the timer button 

A

7

 to set a timer for 40 minutes.


4

A

1

 flashes twice to indicate the timer is active.


4

A

1

 switches off after the timer runs out.

5. Press 

A

6

 to switch off 

A

1

.

Using the wireless charger

1.  Place your QI wireless charging enabled device onto the wireless 

charging area 

A

4

.

2.  Check the charging indication on your device to ensure your 

device is charging.

a

 Quick start guide

Desktop LED lamp

LTLGQ3M2xx

For more information see the extended manual online: 

ned.is/ltlgq3m2xx

Intended use

The Nedis LTLGQ3M2xx is a desktop LED lamp with a built-in wireless 
charger.
This product is intended for indoor use only.
The product is not intended for professional use.
Any modification of the product may have consequences for safety, 
warranty and proper functioning.

Specifications

Product

Desktop LED lamp

Article number

LTLGQ3M2xx

Dimensions (l x w x h)

600 x 170 x 170 mm

Weight

402 g

Power input

12 VDC ; 2.0 A

Power

24 W

LED lamp
Rated power

5.5 W

Max. illumination

1000 Lux

Max. luminance

350 lm

Light modes

Natural, cool, warm

Color temperature

2700 - 6500 K

Adapter
Power input

100 - 240 VAC; 50 - 60 Hz

Power output

12.0 VDC ; 2.0 A

Power

24 W

Rated consumption power

21 W

Wireless charger
Power output

9 V / 1.1 A

Power

10 W

Radio frequency range

110 - 205 KHz

Radio frequency power

- 10.99 dBuA/m @ 10 m

Timer

Smart timer shutdown

Summary of Contents for LTLGQ3M2 Series

Page 1: ...ned is ltlgq3m2wt ned is ltlgq3m2bk Des k t opLED l a m p Supports 10W Qi wireless charging LTLGQ3M2xx...

Page 2: ...ida rapida all avvio 8 hGu a de inicio r pido 9 iGuia de inicia o r pida 10 eSnabbstartsguide 11 gPika aloitusopas 12 fHurtigguide 13 2Vejledning til hurtig start 14 kGyors be zemel si tmutat 15 nPrze...

Page 3: ...1 4 5 6 7 2 3 A...

Page 4: ...arm 4 Press and hold the timer button A7 to set a timer for 40 minutes 4 A1 flashes twice to indicate the timer is active 4 A1 switches off after the timer runs out 5 Press A6 to switch off A1 Using t...

Page 5: ...t von A1 zu ndern 3 Dr cken Sie die Lichtmodus Taste A5 um durch die verschiedenen Lichtmodi zu schalten 4 Die Lichtmodi sind Nat rlich K hl und Warm 4 Halten Sie die Timer Taste A7 gedr ckt um den Ti...

Page 6: ...la lampe LED A1 2 Appuyez et maintenez A6 pour modifier la luminosit de A1 3 Appuyez sur le bouton du mode clairage A5 pour parcourir les diff rents modes d clairage 4 Les modes d clairage sont Natur...

Page 7: ...deren 3 Druk op de lichtmodus knop A5 om de verschillende lichtmodi te selecteren 4 De lichtmodi zijn natuurlijk koel en warm 4 Houd de timerknop A7 ingedrukt om een timer in te stellen voor 40 minute...

Page 8: ...la lampada 1 Premere il pulsante di accensione A6 per accendere la lampada LED A1 2 Tenere premuto A6 per modificare la luminosit di A1 3 Premere il pulsante della modalit luminosa A5 per scorrere tra...

Page 9: ...Pulse el bot n de encendido A6 para encender la l mpara LED A1 2 Mantenga pulsado A6 para cambiar el brillo de A1 3 Pulse el bot n de modo de luz A5 para pasar por los diferentes modos de luz 4 Los mo...

Page 10: ...ipamentos Instala o 1 Ligue o adaptador de alimenta o A3 na entrada da fonte de alimenta o A2 2 Ligue a outra extremidade de A3 a uma tomada el trica 4 Mantenga pulsado el bot n del temporizador A7 pa...

Page 11: ...da LED lampan A1 2 Tryck p och h ll A6 intryckt f r att ndra A1 ljusstyrka Utiliza o da l mpada 1 Prima o bot o de ligar desligar A6 para ligar a l mpada LED A1 2 Pressione e mantenha A6 para alterar...

Page 12: ...ttaaksesi LED valaisimen A1 kirkkautta 3 Selaa valotiloja painamalla valotilapainiketta A5 4 Valotilat ovat luonnollinen viile ja l mmin 4 Aseta 40 minuutin ajastin painamalla ajastinpainiketta A7 3 T...

Page 13: ...pen A1 2 Trykk og hold inne A6 for endre lysstyrken p A1 3 Trykk p lysmodus knappen A5 for veksle mellom ulike lysmoduser 4 De tilgjengelige lysmodusene er naturlig kald og varm 4 Trykk p og hold inne...

Page 14: ...orskellige lysfunktioner 4 Lysfunktionerne er naturlig kold og varm 4 Tryk p og hold timerknappen A7 for at s tte timeren til 40 minutter 4 A1 blinker to gange for at vise at timeren er aktiv 4 A1 slu...

Page 15: ...nyomva az A6 gombot az A1 f nyerej nek m dos t s hoz 3 A k l nb z vil g t si m dok k z tti tv lt shoz nyomja meg a vil g t s zemm d gombj t A5 4 A vil g t si zemm dok a Natural Term szetes a Cool Hide...

Page 16: ...Korzystanie z lampy 1 Naci nij przycisk zasilania A6 aby w czy lamp LED A1 2 Naci nij i przytrzymaj A6 aby zmieni jasno A1 3 Naci nij przycisk trybu wiecenia A5 aby przej przez r ne tryby 4 Tryby wiec...

Page 17: ...y cza si po up ywie ustawionego czasu 5 Naci nij A6 aby wy czy A1 Korzystanie z adowarki bezprzewodowej 1 Umie obs uguj ce adowanie bezprzewodowe QI w obszarze adowania bezprzewodowego A4 2 Sprawd wsk...

Page 18: ...e te D vajte pozor aby v m v robok nepadol a zabr te n razom Servis tohto v robku m e vykon va len kvalifikovan technik aby sa zn ilo nebezpe enstvo poranenia elektrick m pr dom V robok nevystavujte v...

Page 19: ...n Instalace 1 Nap jec adapt r A3 zapojte do nap jec ho vstupu A2 2 Druh konec A3 zapojte do z suvky Pou vanie svietidla 1 Stla en m hlavn ho vyp na a A6 zapnete LED svietidlo A1 2 Stla te a podr te A6...

Page 20: ...re Nu expune i produsul la ap sau umezeal Deconecta i produsul de la sursa electric i de la alte echipamente n cazul n care apar probleme Pou it lampy 1 Stiskem tla tka zapnut vypnut A6 LED lampu A1 z...

Page 21: ...rsele moduri de iluminat 4 Modurile de iluminat sunt Natural Rece i Cald 4 ine i ap sat butonul temporizatorului A7 pentru setarea unui temporizator la 40 de minute 4 A1 clipe te de dou ori pentru a a...

Page 22: ......

Page 23: ......

Page 24: ...Nedis BV De Tweeling 28 5215 MC s Hertogenbosch The Netherlands 01 21...

Reviews: