E-9
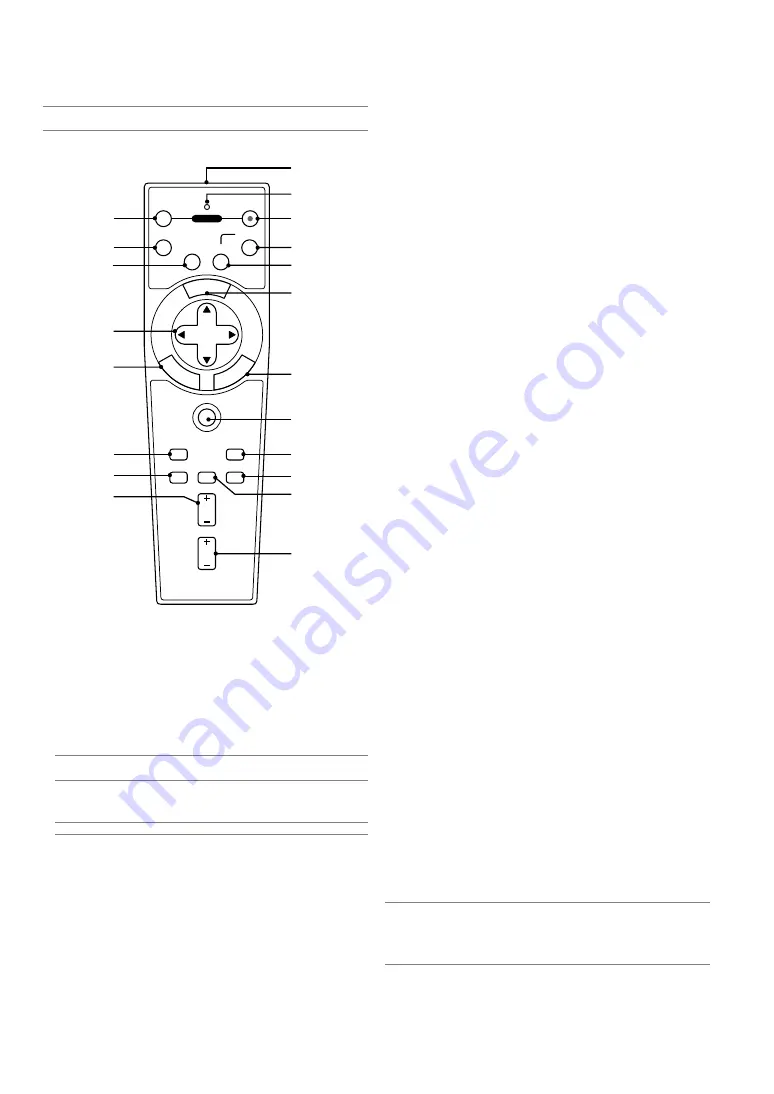
Part Names of the Remote Control
NOTE:
If you are using a Macintosh computer, you can click either the CANCEL
(right-click) or ENTER (left-click) button to activate the mouse.
1. Infrared Transmitter
Direct the remote control toward the remote sensor on the projector
cabinet.
2. LED
Flashes when any button is pressed.
3. POWER ON Button
When the main power is on, you can use this button to turn your
projector on.
NOTE:
To turn on the projector, press and hold the POWER ON button for a
minimum of two seconds.
4. POWER OFF Button
You can use this button to turn your projector off.
NOTE:
To turn off the projector, press the POWER OFF button twice.
5. VIDEO Button
Press this button to select a video source from a VCR, DVD player,
laser disc player or document camera.
6. S-VIDEO Button
Press this button to select an S-Video source from a VCR.
7. RGB Button
Press this button to select RGB input.
8. AUTO ADJ. Button
Use this button to adjust an RGB source for an optimal picture.
See page E-20.
9. MENU Button
Displays the menu for various settings and adjustments.
10. SELECT
GHFE
(Mouse) Button
When you are in the Computer mode, these buttons work as a com-
puter mouse.
When you are in the Projector mode, which is indicated by lighting
the PJ button. See page E-21.
GH
: Use these buttons to select the menu of the item you wish
to adjust.
FE
: Use these buttons to change the level of a selected menu
item. A press of the
E
button executes the selection. When
no menus appear, these buttons work as a volume control.
When an image is magnified, the SELECT
GHFE
button moves the
image.
11. ENTER (Left Click) Button
When you are in the Computer mode, this button works as the mouse
left button. When this button is pressed and held for a minimum of 2
seconds, the drag mode is set. When you are in the Projector mode,
which is indicated by lighting the PJ button: Use this button to enter
your menu selection. It works the same way as the ENTER button on
the cabinet. See page E-7.
12. CANCEL (Right Click) Button
When you are in the Computer mode, this button works as the mouse
right button. When you are in the Projector mode, which is indicated
by lighting the PJ button: It works the same way as the CANCEL
button on the cabinet. See page E-7.
13. PJ Button
Press this button to switch the SELECT, CANCEL, and ENTER but-
tons between the Projector mode (lit red) and the Computer mode.
Press this button or any one of the POWER ON/OFF, MENU, AS-
PECT, HELP, MAGNIFY, buttons to switch to the Projector mode and
the PJ button lights red. To switch back to the Computer mode, press
the PJ button again. See page E-21.
14. PICTURE Button
Press this button to display the Picture adjustement screen such as
Brightness, Contrast, Sharpness, Color and Hue. See page E-26.
15. ASPECT Button
Press this button to display the Aspect Ratio select screen. See page
E-27.
16. HELP Button
Provides the set information.
17. FREEZE Button
This button will freeze a picture. Press again to resume motion.
18. PIC-MUTE Button
This button turns off the image and sound for a short period of time.
Press again to restore the image and sound.
19. MAGNIFY (+)(–) Button
Use this button to adjust the image size up to 400%.
The image is magnified about the center of the screen. See page E-
22.
20. VOLUME (+)(–) Button
Press (+) to increase the volume and (–) to decrease it.
NOTE:
The default is the Computer mode, which allows you to use the SELECT,
CANCEL, and ENTER buttons as your computer mouse. When the POWER ON/
OFF, MENU, ASPECT, HELP, or MAGNIFY button is pressed, the PJ button lights
red to indicate that you are in the Projector mode. If no buttons are pressed
within 60 seconds, the light goes out and the Projector mode is canceled.
OFF
ON
VIDEO
S-VIDEO
RGB
PJ
MAGNIFY
SELECT
E
M NU
TER
N
E
NC
E
A
C
L
1
3
4
5
8
7
11
16
9
10
19
12
13
6
2
18
17
20
AUTO ADJ.
FREEZE PIC-MUTE
PICTURE
15
14
VOLUME
HELP
ASPECT
POWER


