background image


NEC Versa S800 Disassembly Manual 


Page 9

small flat cable that might damage if you do not operate carefully. 

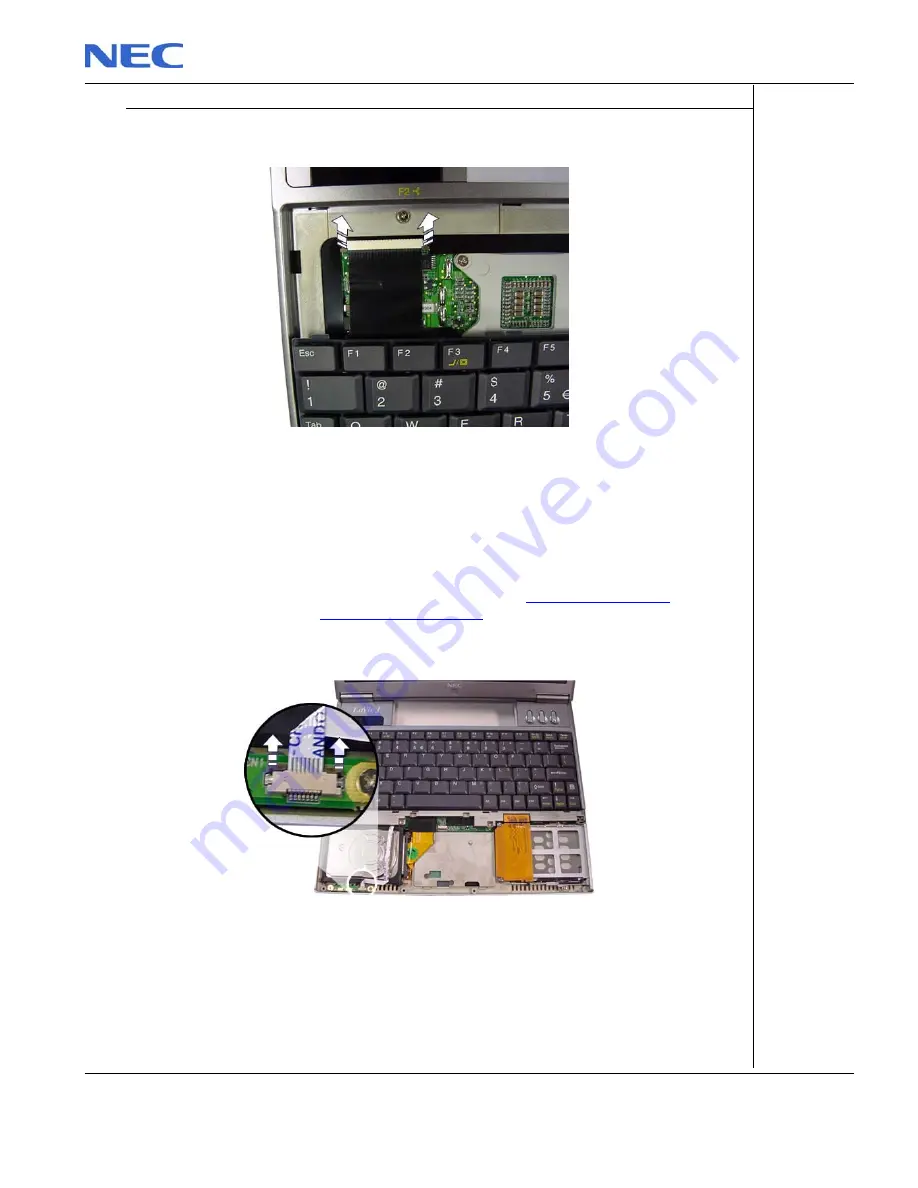
5.  Free the keyboard cable by pulling up the connector as shown in Fig. 9:  


Fig. 9:  

Disconnecting the Keyboard cable 

6.  Take the keyboard away of the system. 

Removing the Hard Disk Drive 

To remove the hard disk drive, first remove the battery (see 

Removing the Battery

), remove 

the touchpad assembly (see 

Removing the Touchpad

), then perform the following steps: 

1.  Disconnect the front LED board cable for a better access to the hard disk drive. 


Fig. 10:  

Disconnecting the front LED board cable 

2.  Disconnect the hard disk drive cable by releasing the connector shown in Fig. 11:  


Summary of Contents for Versa S800

Page 1: ...NEC Versa S800 Disassembly Manual ...

Page 2: ...Battery 5 Removing the Memory Module 5 Removing the Wireless Mini PCI Card 6 Removing the Touchpad 6 Removing the Keyboard 8 Removing the Hard Disk Drive 9 Removing the LED Board 10 Removing the LCD Display 10 Disassembling the LCD Display 12 Removing the Lid Switch 14 Removing the Top Cover 14 Removing the PCMCIA Bay 15 Removing the System Fan 15 Removing the Main Board 16 Removing the Speaker Se...

Page 3: ...ny printed wiring board Improper repairs can create a safety hazard Any indication of component replacement or printed wiring board modifications may void any warranty or exchange allowances Disassembly Instructions When disassembling the system unit follow these general rules Do not disassemble the system into parts that are smaller than those specified in the instructions Label all removed conne...

Page 4: ...il it is un installed in the computer Power Supply Unit Under no circumstances should you attempt to disassemble the power supply The power supply contains no user serviceable parts Inside the power supply are hazardous voltages that can cause serious personal injury Always return a defective power supply to your dealer WARNING Ensure that the computer is disconnected from its power source and fro...

Page 5: ...f its place as shown here Fig 1 Removing the battery Removing the Memory Module To remove the memory module first remove the battery see Removing the Battery then perform the following steps 1 Unscrew the three screws shown in the picture to open the cover assy Fig 2 Removing the memory mini PCI card slot cover 2 Pull apart the retaining clips in order to release the memory module 3 Take the memor...

Page 6: ...open the cover assy 2 Flap open the plastic sheet covering the mini PCI card 3 Carefully disconnect the two antenna wires connected to the wireless mini PCI card Fig 3 Removing the wireless mini PCI antenna wires 4 Pull apart the retaining clips in order to release the wireless mini PCI card as shown in Fig 4 Fig 4 Removing the wireless mini PCI card 5 Take the wireless mini PCI card out of the sy...

Page 7: ...sembly screws 3 Carefully lift and tilt the touchpad assembly and lay it face down on the system Note Observe care when performing this operation The touchpad is still connected to the system via a small flat cable that might damage if you do not operate carefully 4 Disconnect the flat cable of the touchpad from the system as shown below in Fig 6 Fig 6 Removing the touchpad cable 6 Take the touchp...

Page 8: ...oard screws 3 Carefully move the touchpad assembly slightly aside Note Observe care when performing this operation The touchpad is still connected to the system via a small flat cable that might damage if you do not operate carefully If you wish you can completely disconnect the touchpad as shown in Fig 6 and put it aside 4 To access the keyboard connector carefully slide the keyboard from its ori...

Page 9: ...yboard away of the system Removing the Hard Disk Drive To remove the hard disk drive first remove the battery see Removing the Battery remove the touchpad assembly see Removing the Touchpad then perform the following steps 1 Disconnect the front LED board cable for a better access to the hard disk drive Fig 10 Disconnecting the front LED board cable 2 Disconnect the hard disk drive cable by releas...

Page 10: ...erform the next steps 1 Disconnect the front LED board cable as shown in Fig 10 2 Remove the one screw holding the front LED board in place Fig 12 Removing the front LED board screw Removing the LCD Display To remove the LCD display first remove the battery see Removing the Battery remove the wireless mini PCI card see Removing the Wireless Mini PCI Card remove the touchpad assembly see Removing t...

Page 11: ...on cover 3 Using a plastic flatbed screwdriver carefully remove the LCD hinge covers 4 Carefully pull out the antenna wires of the wireless mini PCI card from their location Note Pay attention while extracting the antenna wires Notice that they are firmly maintained in position by adhesive tape that will have to be removed as well 5 Disconnect the LCD cable shown in Fig 15 Fig 15 Disconnecting the...

Page 12: ...tickers that cover the screws in the marked location of Fig 16 Fig 16 Removing Rubber bumpers and stickers covering the screws 2 Remove the screws uncovered in Fig 16 3 Carefully unclip the LCD cover and put it aside 4 Remove the 2 screws holding the inverter board in place Fig 17 Fig 17 Removing the inverter board screws 5 Remove on both sides of the LCD assembly the two screws marked in Fig 18 F...

Page 13: ...e connectors of the inverter board Fig 19 Fig 19 Removing the inverter board 8 Remove the two screws on each side of the LCD assembly to remove the hinges from the bare LCD Fig 20 and put the hinges aside Fig 20 Removing the LCD hinges 9 Flip the bare LCD and disconnect the LCD cable on its back Fig 21 Fig 21 Removing the LCD cable from the bare LCD M2x3 ...

Page 14: ...2 Removing the lid switch 2 Carefully unclick the switch from its location sliding it as shown in Fig 22 Removing the Top Cover To remove the top cover first remove the LCD display see Removing the LCD Display remove the lid switch see Removing the Lid Switch then perform the following steps 1 Remove the screws marked in Fig 23 Fig 23 Removing the top cover screws 2 Carefully lift the top cover fr...

Page 15: ...Fig 24 Fig 24 Removing the PCMCIA screws 2 Disconnect the PCMCIA cable as shown in Fig 25 Fig 25 Disconnecting the PCMCIA cable 3 Take the PCMCIA bay out of the system and put it aside Removing the System Fan To remove the system fan first remove the top cover see Removing the Top Cover then perform the following steps 1 Remove the two screws shown in Fig 26 2 Disconnect the connector marked in Fi...

Page 16: ... Cover remove the PCMCIA bay see Removing the PCMCIA Bay remove the system fan see Removing the System Fan then perform the following steps 1 Remove the screws holding the USB plate and the RJ45 RJ11plate in place Fig 27 Fig 27 Removing the USB plate and the RJ45 RJ11plate 2 Take the USB plate and the RJ45 RJ11plate out of the system and put them aside 3 Disconnect the speaker set from the main bo...

Page 17: ...nnectors that may be stuck in the casing openings Fig 29 Removing the main board Removing the Speaker Set To remove the speaker set first remove the main board see Removing the Main Board then perform the following steps 1 Remove the tape holding the speaker cables in position 2 Click the speakers out of their location and remove them from the case Removing the Modem To remove the modem first remo...

Page 18: ...odem 3 Carefully remove the tape holding the modem cable on the main board 4 Disconnect the modem cable from the main board Fig 30 5 Take the modem with the cable away from the main board and put them aside Screws M2 5x3 mm M2 5x3 5 mm M2 5x4 mm black M2 5x5 mm M2x2 5 mm M2x3 mm M2x3 mm black M2x4 mm M2x7 mm M2 5x3 5 ...

Page 19: ...EDITORIAL ERRORS OR OMISSIONS CONTAINED HEREIN NOR FOR INCIDENTAL OR CONSEQUENTIAL DAMAGES RESULTING FROM THE FURNISHING PERFORMANCE OR USE OF THIS MATERIAL Copyright 2003 NEC Computers International BV All rights reserved NEC is a trademark of NEC Computers International BV The names of actual companies and products mentioned herein may be trademarks and or registered trademarks of their respecti...

Reviews: