background image

22 

Chapter 2: Sever Installation 


Removing the Chassis from the Rack 

Caution! 

It is dangerous for a single person to off-load the heavy chassis from the rack without 

assistance. Be sure to have sufficient assistance supporting the chassis when removing it from 

the rack. Use a lift. 


2


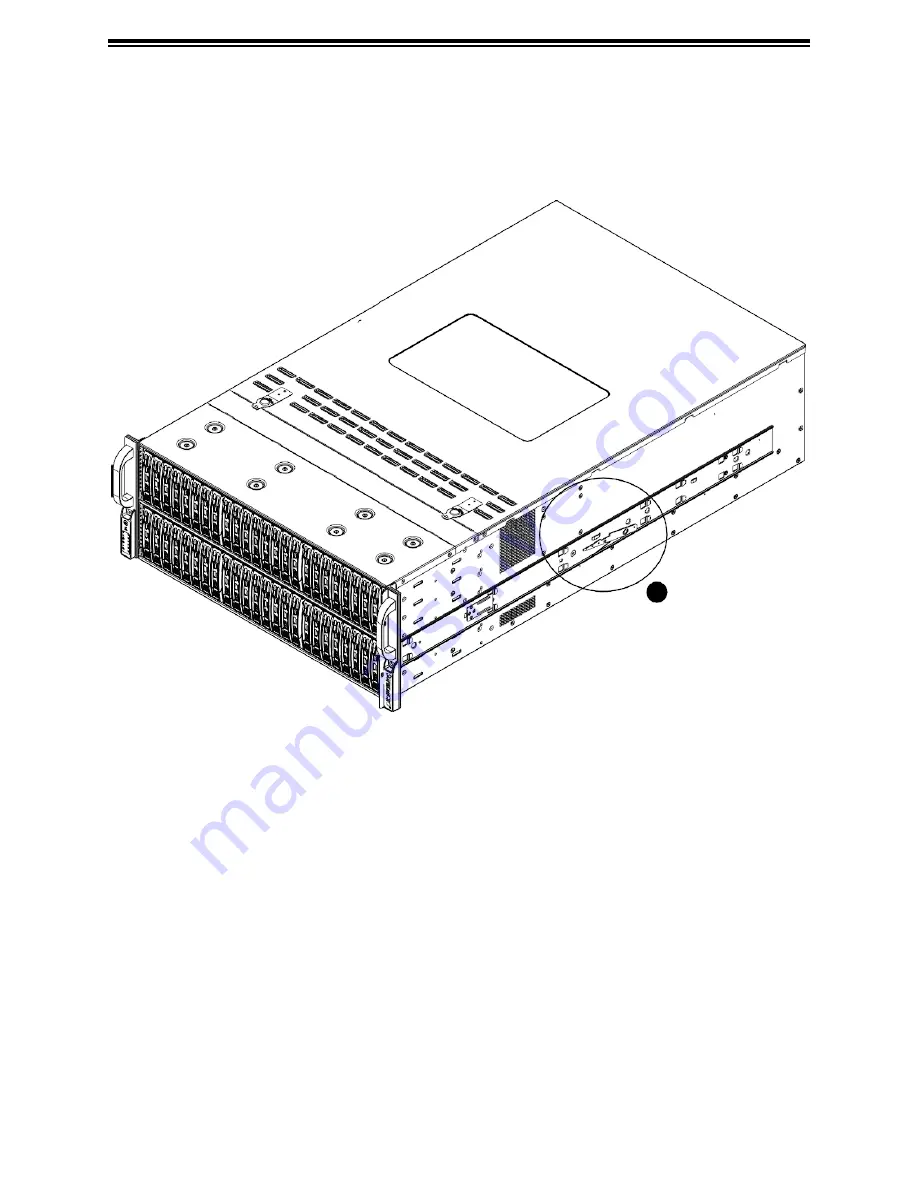
Figure 2-5. Removing the Chassis From the Rack 

Removing the Chassis from the Rack 

1.  Pull the chassis forward out the front of the rack until it stops. 


2.  Press the release latches on each of the inner rails downward simultaneously and move 

the chassis forward in the rack. 

Summary of Contents for SX-Aurora TSUBA300-8ASA

Page 1: ...SX Aurora TSUBASA A300 8 USER S GUIDE Revision 1 0 SX Aurora TSUBASA NEC ...

Page 2: ...L NOT HAVE LIABILITY FOR ANY HARDWARE SOFTWARE OR DATA STORED OR USED WITH THE PRODUCT INCLUDING THE COSTS OF REPAIRING REPLACING INTEGRATING INSTALLING OR RECOVERING SUCH HARDWARE SOFTWARE OR DATA The products sold by NEC are not intended for and will not be used in life support systems medical equipment nuclear facilities or systems aircraft aircraft devices aircraft emergency communication devi...

Page 3: ...your system to work properly please follow the links below to download all necessary drivers utilities and the user s guide for your server NEC product manuals http www nec com en global prod hpc aurora document Product safety info http www nec com en global prod hpc aurora document safety_information pdf This guide may be periodically updated without notice Please check the NEC website for possib...

Page 4: ...view 15 2 2 Preparing for Setup 15 Choosing a Setup Location 15 Rack Precautions 15 Server Precautions 16 Rack Mounting Considerations 16 2 3 Procedure for Rack Mounting 18 Identifying the Inner Rack Rails 18 Installing the Inner Rails on the Chassis 19 Installing the Outer Rails onto the Rack 20 Installing the Chassis into a Rack 21 Removing the Chassis from the Rack 22 Chapter 3 Maintenance and ...

Page 5: ... was damaged in any way If any equipment appears damaged please file a damage claim with the carrier who delivered it Decide on a suitable location for the rack unit that will hold the server It should be situated in a clean dust free area that is well ventilated Avoid areas where heat electrical noise and electromagnetic fields are generated It will also require a grounded AC power outlet nearby ...

Page 6: ...00BP CPU Supports dual Intel Xeon 6148 6126 4108 series Socket P0 LGA3647 processors Socket Type Socket P0 LGA3647 Memory 96GB or 192GB Chipset Intel PCH C622 chipset PCIe Cards Up to Eight Vector Engine 1 0 cards Up to two InfiniBand HCA cards Hard Drives one fixed 2 5 internal drive Power Four 2000W power supplies Form Factor 4U Rack mount server Dimensions WxHxD 17 2 x 1 7 x 23 5 in 437 x 43 x ...

Page 7: ...ower supply to the server but maintains standby power To perform most maintenance tasks unplug the system to remove all power 2 Reset Button The reset button is used to reboot the system 3 Power LED Indicates power is being supplied to the system power supply units This LED is illuminated when the system is operating normally 4 HDD LED Indicates IDE channel activity SAS2 SATA drive and or DVD ROM ...

Page 8: ...ongestion Blinking red 1 Hz Fan failure check for an inoperative fan Blinking red 0 25 Hz Power failure check for an inoperative power supply Solid blue Local UID has been activated Use this function to locate the server in a rack environment Blinking blue 300 msec Remote UID has been activated Use this function to activate the server from a remote location ...

Page 9: ...uded on the front of the chassis 1 1 1 1 1 2 1 1 1 1 1 1 1 1 1 1 1 1 1 1 1 1 1 1 1 Figure 1 2 Chassis Front View Front Chassis Features Item Feature Description 1 Hot swap drive bays 24 Drive bays for hot swap 2 5 drive carriers 2 Control Panel Control panel for the server See the Control Panel section above for details SX Aurora TSUBASA NEC ...

Page 10: ...View Rear Chassis Features Item Feature Description 1 Power Supplies Two hot swappable redundant power supplies are available for use 2 Rear I O ports See Motherboard Layout below for details on the rear I O ports Up to twelve 12 slots are provided in the chassis rear for accessing PCI E 3 Rear PCI E Expansion Slot Expansion cards using four riser cards ...

Page 11: ...SPI USB 2 0 Rear x4 Internal Type A PCI E X4 G2 USB 3 0 SPI Figure 1 4 System Block Diagram Note This is a general block diagram and may not exactly represent the features on your motherboard M 1 1 1 RJ45 10G SuperDOM DDR4 SYSTEM POWER TPM HEADER Debug Card BIOS CLOCK BUFFER DB1900 FRONT PANEL FAN SPEED CTRL ESPI BMC Boot Flash USB 2 0 BMC AST2500 LAN3 RTL8211E VB CG LAN 10G X557 AT2 OCULINK G 1 G...

Page 12: ...0 UID LED on the motherboard Ethernet Ports Two Ethernet ports LAN1 LAN2 that support 10 GbE LAN connections are located on the I O backplane Additionally an IPMI dedicated LAN supported by the ACT2500 Baseboard Controller BMC is located above USB 1 2 ports on the backplane The IPMI LAN supports 1 GbE Connection All these Ethernet LAN ports accept RJ45 type cables Please refer to the LED Indicator...

Page 13: ...ntial Pair 7 GND_DRAIN 16 Ground for Signal Return 8 StdA_SSTX 17 SuperSpeed Transmitter 9 StdA_SSTX 18 Differential Pair USB 2 0 Pin Definitions Pin Definition 1 Vcc 2 Data 3 Data 4 Ground Unit Identifier Switch UID LED Indicator A Unit Identifier UID switch and a rear UID LED LE1 are located on the I O back panel A front UID switch is located on pins 7 8 of the front panel control JF1 When you p...

Page 14: ... Yellow Flashing Active LAN Link Indicator LED Settings LED Color Definition Off No Connection 10 or 100 Mbps Green 10 Gbps Amber 1 Gbps LAN 1 2 Link LED Activity LED Dedicated IPMI LAN LEDs In addition to LAN 1 LAN 2 a dedicated IPMI LAN is located on the I O Backplane of the motherboard The amber LED on the right indicates activity while the green LED on the left indicates the speed of the conne...

Page 15: ...tuated in a clean dust free area that is well ventilated Avoid areas where heat electrical noise and electromagnetic fields are generated Leave enough clearance in front of the rack so that you can open the front door completely 25 inches and approximately 30 inches of clearance in the back of the rack to allow sufficient space for airflow and access when servicing This product should be installed...

Page 16: ...from power surges and voltage spikes and to keep your system operating in case of a power failure Allow any drives and power supply modules to cool before touching them When not servicing always keep the front door of the rack and all covers panels on the servers closed to maintain proper cooling Rack Mounting Considerations Ambient Operating Temperature If installed in a closed or multi unit rack...

Page 17: ...ttention should be given to power supply connections other than the direct connections to the branch circuit i e the use of power strips etc To prevent bodily injury when mounting or servicing this unit in a rack you must take special precautions to ensure that the system remains stable The following guidelines are provided to ensure your safety This unit should be mounted at the bottom of the rac...

Page 18: ...to the installation instructions for your rack unit Note This rail will fit a rack between 26 5 and 36 4 deep Identifying the Inner Rack Rails The chassis package includes one pair of rack rail assemblies in the rack mounting kit Each assembly consists of an inner rail that secures to the chassis and an outer rail that is attached directly to the rack The inner rails are etched with L Left side an...

Page 19: ...nner Rails on the Chassis Installing the Inner Rails 1 Identify the left and right side inner rails Place the correct inner rail on the side of the chassis aligning the hooks of the chassis with the inner rail holes Make sure the rail faces outward so that it will fit with the rack s mounting bracket 2 Slide the rail toward the front of the chassis to hook the inner rail onto the side of the chass...

Page 20: ...to the outer rail 3 Hang the hooks on the front of the outer rail onto the square holes on the front of the rack If desired use screws to secure the outer rails to the rack 4 Pull out the rear of the outer rail adjusting the length until it just fits within the posts of the rack 5 Hang the hooks of the rear section of the outer rail onto the square holes on the rear of the rack Take care that the ...

Page 21: ...e chassis rails A with the front of the rack rails B 2 Slide the chassis rails into the rack rails keeping the pressure even on both sides You may have to depress the locking tabs while inserting When the server has been pushed completely into the rack the locking tabs should click into the locked position 3 If screws are used tighten the screws on the front and rear of the outer rails 4 Optional ...

Page 22: ... Be sure to have sufficient assistance supporting the chassis when removing it from the rack Use a lift 2 Figure 2 5 Removing the Chassis From the Rack Removing the Chassis from the Rack 1 Pull the chassis forward out the front of the rack until it stops 2 Press the release latches on each of the inner rails downward simultaneously and move the chassis forward in the rack ...

Page 23: ...00 8 User s Guide 23 Chapter 3 Maintenance and BIOS Setting 3 1 Overview About maintenance and BIOS setting only trained and qualified personnel of NEC system should be allowed to install replace or service this equipment ...

Page 24: ...ccurs you should consult with your system manufacturer for possible repairs These fatal errors are usually communicated through a series of audible beeps The numbers on the fatal error list on the following page correspond to the number of beeps for the corresponding error All errors listed with the exception of Beep Code 8 are fatal errors BIOS Beep POST Codes Beep Code Error Message Description ...

Page 25: ...circuitry and be familiar with standard practices for preventingaccidents 警告の定義 この警告サインは危険を意味します 人身事故につながる可能性がありますので いずれの機器でも動作させる前に 電気回路に含まれる 危険性に注意して 標準的な事故防止策に精通して下さい Warnung WICHTIGE SICHERHEITSHINWEISE Dieses Warnsymbol bedeutet Gefahr Sie befinden sich in einer Situation die zu Verletzungen führen kann Machen Sie sich vor der Arbeit mit Geräten mit den Gefahren elektrischer Schaltungen und d...

Page 26: ...Attention Avant de brancher le système sur la source d alimentation consulter les directives d installation Circuit Breaker Warning This product relies on the building s installation for short circuit overcurrent protection Ensure that the protective device is rated not greater than 250 V 20 A サーキット ブレーカー この製品は 短絡 過電流 保護装置がある建物での設置を前提としています 保護装置の定格が 250 V 20 Aを超えないことをご確認下さい Warnung Dieses Produkt ...

Page 27: ...m zurückgreift um Systemsbestandteile anzubringen oder zu entfernen Attention Le système doit être débranché de toutes les sources de puissance ainsi que de son cordon d alimentation secteur avant d accéder à l intérieur du chassis pour installer ou enlever des composants de systéme Equipment Installation Warning Only trained and qualified personnel should be allowed to install replace or service ...

Page 28: ...lich Attention Cet appareil doit être installée dans des zones d accès réservés L accès à une zone d accès réservé n est possible qu en utilisant un outil spécial un mécanisme de verrouillage et une clé ou tout autre moyen de sécurité Battery Handling Warning There is the danger of explosion if the battery is replaced incorrectly Replace the battery only with the same or equivalent type recommende...

Page 29: ... der Einheit kein trom zugeführt wird müssen alle Verbindungen entfernt werden Attention Cette unité peut avoir plus d une connexion d alimentation Pour supprimer toute tension et tout courant électrique de l unité toutes les connexions d alimentation doivent être débranchées Backplane Voltage Warning Hazardous voltage or energy is present on the backplane when the system is operating Use caution ...

Page 30: ...ent doit être installé conformément aux normes électriques nationales et locales Product Disposal Warning Ultimate disposal of this product should be handled according to all national laws and regulations 製品の廃棄 この製品を廃棄処分する場合 国の関係する全ての法律 条例に従い処理する必要があり ます Warnung Die Entsorgung dieses Produkts sollte gemäß allen Bestimmungen und Gesetzen des Landes erfolgen Attention La mise au rebut ou le recyclag...

Page 31: ...n Pieces mobiles dangereuses Se tenir a l ecart des lames du ventilateur Il est possible que les ventilateurs soient toujours en rotation lorsque vous retirerez le bloc ventilateur du châssis Prenez garde à ce que doigts tournevis et autres objets soient éloignés du logement du bloc ventilateur Power Cable and AC Adapter Warning When installing the product use the provided or designated connection...

Page 32: ... Produkten die nicht mit NEC gekennzeichnet sind Attention Lors de l installation du produit utilisez les cables de connection fournis ou désigné ou achetez des cables cables de puissance et adaptateurs respectant les normes locales et les conditions de securite y compris les tailles de cables et les prises electriques appropries L utilisation d autres cables et adaptateurs peut provoquer un dysfo...

Reviews: