background image

7

English

5

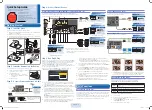
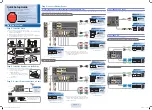
Tighten the loosely inserted screws in 4 locations fully into place.

Push the speakers lightly onto the plasma monitor when tightening the screws.

Check to make sure that the screws at all 4 locations have been firmly screwed into place.

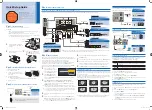
 Connecting speaker cords

Be sure to turn off the power to the plasma monitor before connecting the speakers.

Use the provided speaker cords to connect the R/L speaker jacks of the plasma monitor to the speaker jacks of the speakers.

Once the cords have been connected, pull on the cords lightly to make sure that they have been connected firmly to the speaker
jacks. An improper connection might result in the sound being interrupted or the appearance of noise in the output sound.

Cord clampers

Remove the protective tape from the rear of the cord clampers, attach
the clampers in the desired position, and clamp the cords into place.

Note that the speaker cords have positive
and negative ends, and that you should be
sure to insert them correctly.

Press the button of the speaker jack and
keep it pressed down as you insert the wire
of the speaker cord and then release the
button.

Red

Black

Warning

Never hold the speakers when speakers are
attached to the plasma monitor to move the
plasma monitor. Doing so might result in the
plasma monitor falling, and this in turn might
result in bodily injury.

Be sure to screw the screws firmly into place.
Failing to do so might result in the speakers
falling, and this in turn might result in bodily injury.

Summary of Contents for PX-42XR5A

Page 1: ...ecking materials included in package Please be sure to check that all of the following items are included in the package with your product If for any reason there are any items missing or items which fail to work properly please contact NEC or the retailer at which you purchased the product immediately for assistance Attachment plates Attachment plates Monitor attachment screws M8 18 mm 4 Attachme...

Page 2: ... monitor in a location where they would be subjected to excessive levels of dust or humidity or in a location subject to steam or smoke from oil e g next to a stove or heating plate as doing so might result in fires occurring Instructions for use Avoid using over long periods of time when significant levels of sound distortion occur as doing so might cause the speakers to heat up excessively and t...

Page 3: ... purchased None of the other plates or screws are to be used Always be sure to use only the plates and screws designed for use with your own plasma monitor Using any other plates and or screws could result in the speakers falling and this in turn might result in bodily injury If attaching speakers to a 42 inch or 50 inch plasma monitor See page If attaching speakers to a 60 inch plasma monitor See...

Page 4: ...h the label marked R Place the attachment plates onto the speakers so that the guide pins are inserted into the holes in the attachment plates as indicated below and fix the plates tightly into position using the M4 x 10 mm screws 8 screws 3 Screw the M8 x 18 mm screws loosely into the screw holes at the upper end of the plasma monitor 2 locations 4 1 Place the attachment plates at the upper part ...

Page 5: ...nterrupted or the appearance of noise in the output sound Cord clampers Remove the protective tape from the rear of the cord clampers attach the clampers in the desired position and clamp the cords into place Note that the speaker cords have positive and negative ends and that you should be sure to insert them correctly Press the button of the speaker jack and keep it pressed down as you insert th...

Page 6: ...es marked TR to the speaker with the label marked R Place the attachment plates onto the speakers so that the guide pins are inserted into the holes in the attachment plates as indicated below and fix the plates tightly into position using the M4 x 10 mm screws 8 screws 3 Screw the M5 x 12 mm screws loosely into the screw holes at the upper end of the plasma monitor 2 locations 4 1 Place the attac...

Page 7: ...sult in the sound being interrupted or the appearance of noise in the output sound Cord clampers Remove the protective tape from the rear of the cord clampers attach the clampers in the desired position and clamp the cords into place Note that the speaker cords have positive and negative ends and that you should be sure to insert them correctly Press the button of the speaker jack and keep it pres...

Page 8: ...ons Description 2 way 3 speaker system Bass reflex speaker system Qty 1 Impedance 6 Ω Rated input 15 W Maximum input 40 W External dimensions 80 mm W x 592 mm H x 92 mm D 3 1 in W x 23 in H x 3 6 in D Not including attachment plates Qty 1 Weight 3 8 kg 8 4 lbs 2 speakers When attachment plates for 42 inch and 50 inch monitors are installed 4 0 kg 8 8 lbs 2 speakers When attachment plates for 60 in...

Page 9: ... éléments ci dessous sont inclus dans la boîte du produit que vous avez acheté Si pour quelque raison que ce soit il manque des pièces ou certaines pièces ne fonctionnent pas correctement contactez NEC ou votre revendeur pour obtenir immédiatement de l aide Pièces de fixation Pièces de fixation Vis de fixation de l écran M8 18 mm x 4 Vis des pièces de fixation Vis de fixation de l écran Pièces de ...

Page 10: ... écran pendant l utilisation Lorsque vous déplacez l écran à plasma ne le prenez jamais par les enceintes L écran pourrait tomber et blesser quelqu un Lorsque vous déplacez l écran à plasma tenez le toujours par le dessous Veillez à ce que tous les écrous boulons et vis soient bien serrés pour un maximum de sécurité Si tel n était pas le cas les enceintes risqueraient de tomber et de blesser quelq...

Page 11: ...eté Il est impératif de ne pas utiliser d autres pièces et vis Veillez à n utiliser que les pièces et les vis qui sont prévues pour votre écran plasma L utilisation d autres pièces vis pourrait entraîner une chute des enceintes qui risqueraient de blesser quelqu un Pour fixer les enceintes sur un écran à plasma 42 ou 50 pouces Voir par Pour fixer les enceintes sur un écran à plasma 60 pouces Voir ...

Page 12: ...ur les enceintes de sorte que les tiges de guidage s insèrent dans les trous des pièces de fixation comme indiqué ci dessus puis maintenez les pièces de fixation en place en les vissant fermement à l aide de vis M4 x 10 mm 8 vis 3 Vissez légèrement les vis M8 x 18 mm dans les trous des vis situés en haut de l écran à plasma 2 endroits 4 1 Placez les pièces de fixation situées en haut des enceintes...

Page 13: ...rition de bruit dans le son de sortie Colliers de cordon Retirez la bande protectrice située au dos des colliers de cordon fixez les colliers à l endroit souhaité puis mettez les cordons en place Il est à noter que les cordons des enceintes ont des polarités négative et positive Vous devez donc les mettre en place correctement Appuyez sur le bouton de la prise d enceinte et tenez le enfoncé pendan...

Page 14: ...uée R Placez les pièces de fixation sur les enceintes de sorte que les tiges de guidage s insèrent dans les trous des pièces de fixation comme indiqué ci dessus puis maintenez les pièces de fixation en place en les vissant fermement à l aide de vis M4 x 10 mm 8 vis 3 Vissez légèrement les vis M5 x 12 mm dans les trous des vis situés en haut de l écran à plasma 2 endroits 4 1 Placez les pièces de f...

Page 15: ... le bouton Rouge Noir Une fois que les enceintes ont été fixées sur l écran ne déplacez jamais l écran en le prenant par les enceintes L écran risquerait de tomber et de blesser quelqu un Veillez à bien serrer les vis Si tel n était pas le cas les enceintes risqueraient de tomber et de blesser quelqu un Avertissement Raccorder les cordons des enceintes Veillez à mettre l écran hors tension avant d...

Page 16: ...ystème 2 voies 3 hauts parleurs système d enceintes basse reflex Qté 1 Impédance 6 Ω Puissance absorbée normale 15 W Puissance absorbée maximale 40 W Dimensions extérieures 80 mm L x 592 mm H x 92 mm P 3 1 pouces L x 23 pouces H x 3 6 pouces P hors plaques de fixation Qté 1 Poids 3 8 kg 8 4 lbs 2 enceintes lorsque les pièces de fixation pour écran 42 ou 50 pouces sont installées 4 0 kg 8 8 lbs 2 e...

Reviews: