background image


- 9 - 

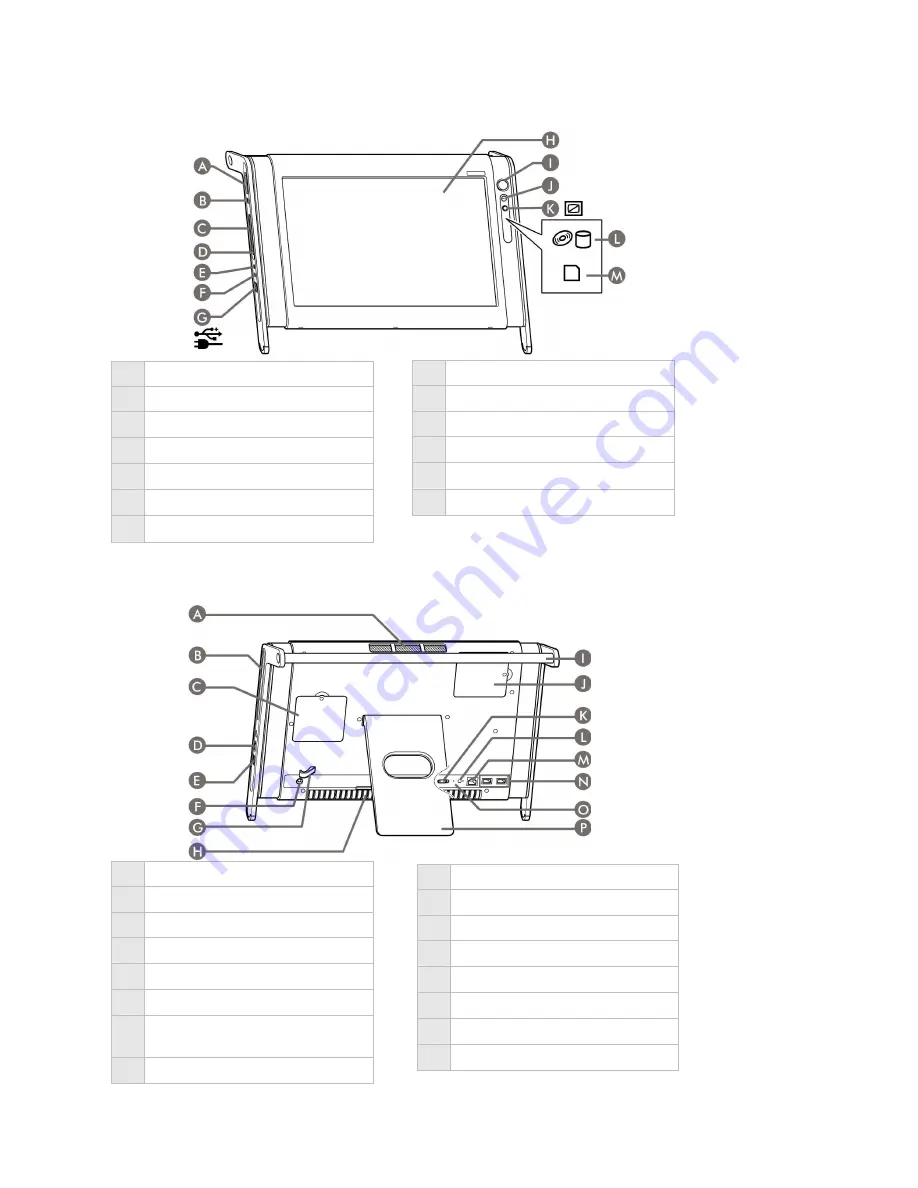
System


Memory Slot 

IEEE 1394 Port 

PC Card Slot 

PC Card Eject Button 

Microphone In 

Headphone Out 

USB Port with Charger * 


* This USB Port allows you to charge your USB compatible devices e.g. Mobile Phone, MP3 player without  
   turning on your PC. 


Vent 

Optical Drive 

B-CAS Slot 

Brightness Controller 

USB Port 

DC Connector 

Hook (to organize cable loops 
and stabilize power connection) 

Vent 


* This Connect Button allows you to connect wireless RF Keyboard and Mouse.


LCD Display 

Power Button 

One Touch Multi Button 

Night Mode LED 

Hard disk & ODD Access LED 

Memory Access LED 


Flex Bar 

Memory Slot 

Wireless On / Off Switch 

Connect Button * 

LAN Port 

USB Port 

Wireless LED 

Stand 


Summary of Contents for POWERMATE - VERSION 2008

Page 1: ...1 Electronic User s Guide Electronic User s Guide Electronic User s Guide Electronic User s Guide April 2008...

Page 2: ...including but not limited to loss of business profits or any other commercial damages arising out of the use of this product Trademarks POWERMATE is a registered trademark of NEC Corporation Celeron...

Page 3: ...life Such people may have a seizure while watching television images or playing certain games This may happen even if the person has no medical history of epilepsy or has never had any epileptic seizu...

Page 4: ...your computer Always save your work and make regular backup copies of your documents on rewritable media e g CDRW disc In the event of a major computer failure you could lose all your personal data u...

Page 5: ...at the item is not applicable to the system you purchased hence it is not included for you in the system To synchronize the wireless mouse and keyboard with your POWERMATE P 1 Insert batteries into th...

Page 6: ...til the battery indicator RED LED on the keyboard flashes once iv Wait for 1 minute until the connection is done 5 Synchronize the mouse with your POWERMATE P Step 3 i Press the connect button about 6...

Page 7: ...he first time you are required to choose either one of the operating system language you prefer Please refer to the picture below Please select the language you prefer carefully as this can only be do...

Page 8: ...backgrounds are provided by Windows on the left hand side 3 backgrounds are provided by NEC on the right hand side Click the Next button 5 Help protect Windows automatically screen There are 3 options...

Page 9: ...Vent B Optical Drive C B CAS Slot D Brightness Controller E USB Port F DC Connector G Hook to organize cable loops and stabilize power connection H Vent This Connect Button allows you to connect wirel...

Page 10: ...on and follow the steps stated to install the gadget pocket Left gadget pocket The guide track is located on left side of gadget pocket Right gadget pocket The guide track is located on right side of...

Page 11: ...ra Web Camera Web Camera Web Camera For selected models only For selected models only For selected models only For selected models only Web Camera Web Camera Stand Installation To turn on the web came...

Page 12: ...computer Step 2 Use the tools included on your computer Windows and NEC have included powerful tools on your computer Before you contact NEC please try the following Use NEC Smart Restore to reinstall...

Page 13: ...canner joystick etc is not a complicated task Each type of device has its own installation specifications and process Check the documentation provided with your hardware device for details about insta...

Page 14: ...h current wiring regulations in your country Changes or modifications to this unit not expressly approved by the party responsible for compliance could void the user s authority to operate the equipme...

Page 15: ...oided Battery Replacing batteries A lithium battery in some computers maintains system configuration information In the event that the battery fails to maintain system configuration information we rec...

Page 16: ...ectronic products and therefore do not comply with the appropriate requirements of Code of Federal Regulation Sec 1040 10 and Sec 1040 11 for COMPLETE laser products WARNING WARNING WARNING WARNING HA...

Page 17: ...ur Chair Your chair should adjust up and down backward and forward for maximum comfort Your knees and hips should be at right angles to your chair s seat with your thighs parallel to the floor and bot...

Page 18: ...ful Accessories Here are some accessories which can help you work more comfortably Keyboard drawer If your desktop is too high to allow comfortable typing a keyboard drawer can help by letting you pos...

Page 19: ...e UPC Label varies according to the model Recommended Environment Operation Temperature 5 C to 35 C Relative Humidity 20 to 80 Non condensing Do provide sufficient ventilation to ensure effective cool...

Page 20: ...backup data is stored on your computer s hard disk If you wish to restore your computer using Recovery DVD please see note below This backup partition is hidden Due to the wide range of reasons for w...

Page 21: ...onal data Before using the NEC Recovery Program it is recommended that you FIRST try fixing your computer with Windows Vista System Restore System Restore can be used to restore your computer to a pre...

Page 22: ...n a CD writer you can backup larger amounts of data and create your own archives Return your computer to its original configuration 1 Remove any additional hardware components e g sound card video car...

Page 23: ...ame Password if available Then click OK button 5 At System Recovery Options choose NEC Recovery Tools 6 Click Next button to continue 7 Select either Partial Recovery or Full Recovery Then click Next...

Page 24: ...very process 10 The NEC Recovery tools application will close automatically after the recovery is completed 11 Finally you have to restart your computer by clicking the Restart button at System Recove...

Page 25: ...at comes with your system NOTE The illustrations colours and pictures shown are for illustration purposes They may vary slightly from country to country and the unit you purchase CAUTION Before you co...

Page 26: ...ss damage or expense directly or indirectly arising from customers use or inability to use the equipment or for personal injury or loss or destruction of any other property NEC shall not be liable for...

Page 27: ...description of the problem The Product model number and serial number may be found on a label located at the back or bottom of the Product The Customer Service Technician will attempt to resolve your...

Page 28: ...software or BIOS 3 Costs involved in configuration of other products or software installed into the Product 4 Payment of any shipping charges incurred in obtaining warranty service 5 Payment of any ch...

Page 29: ...embaca point 4 untuk keterangan lebih lanjut untuk tata cara pendaftaran produk yang telah anda beli NEC tidak berkewajiban untuk segala kerusakaan yang diakibatkan oleh modifikasi yang tidak resmi sa...

Page 30: ...saksi pembelian di distributor resmi NEC Harap baca point 4 untuk tata cara melakukan pendaftaran Produk anda Dukungan alternatif juga tersedia untuk produk yang mendapatkan jaminan untuk sistemnya ta...

Page 31: ...mungkin akan memperlukan format hard disk Format hard disk akan menghapus SEMUA files atau perangkat lunak yang ada di dalam unit Sebelum pengiriman atau sebelum jasa apapun dilakukan terhadap produk...

Page 32: ...ingapore Tel 1800 888 2200 NEC Computers Australia Pty Ltd Australia Tel 02 9313 0055 Sydney 1300 780 103 Outside Sydney Untuk menjamin agar anda mendapatkan tanggapan sesegera mungkin untuk permintaa...

Reviews: