background image

English-8

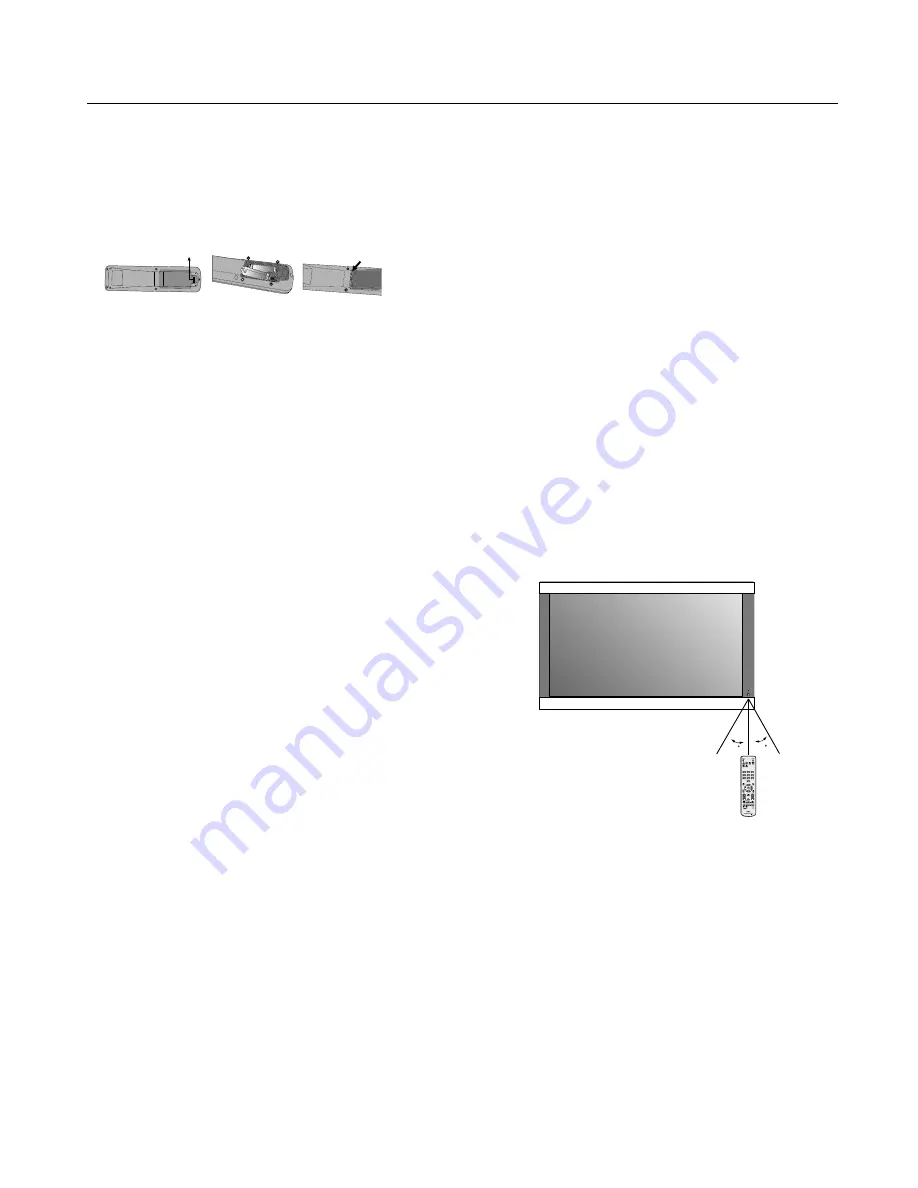
Using the Remote: 

Install the remote control batteries.

Th

  e remote control is powered by AA batteries. To install or 

replace batteries:


A.  Press and slide to open the cover.


B.  Align the batteries according to the (+)  


and (–) indications inside the case.


C.  Replace the cover.

CAUTION: Incorrect usage of batteries can result in leaks or 
bursting. NEC recommends the following battery use:

Place “AA” size batteries matching the (+) and (-) signs 
on each battery to the (+) and (-) signs of  the battery 
compartment.

Do not mix battery brands.

Do not combine new and old batteries, or mix brands. 
Th

  is can shorten battery life or cause liquid leakage of 

batteries.

Remove dead batteries immediately to prevent battery 
acid from leaking into the battery compartment.

Do not touch exposed battery acid, it may injure skin.

Do not drop or mishandle the remote.

Do not get the remote control wet. If the remote does get 
wet, wipe dry immediately.

Avoid excessive heat and humidity.

Do not dispose of batteries in fi re.

Please follow government regulations or public 
environmental rules that apply in your country/area 
when disposing of used batteries.

When replacing, use only conventional non-
rechargeable alkaline or manganese batteries.

Th

  ere is a risk of explosion if batteries are replaced 

incorrectly.

Operating Range for the Remote Control

Point the top of the remote control toward the monitor’s 
remote sensor while pressing buttons. Th

  e remote control 

can be used from the front of the monitor at a maximum 
distance of 7 m/23 ft . from the front of the Plasma monitor’s 
remote control sensor. Th

  e maximum horizontal and vertical 

angle for use of the remote is 30 degree within a distance of 
3.5 m/11.5 ft .

CAUTION

Th

  e remote control may not function when direct sunlight 

or strong illumination strikes the remote control sensor of 
the Plasma monitor, or when there is an object in the path of 
the sensor.

Handling the Remote Control

Do not open the remote control other than to install 
batteries. Do not allow water or other liquid to splash onto 
the remote control. If the remote control gets wet, wipe it dry 
immediately. 
Avoid exposure to heat and steam. 

NOTE: If you do not intend to use the Remote Control for a 

long period of time, remove the batteries.

Installation


- continued

30

30

Summary of Contents for PlasmaSync 42XC10

Page 1: ...PlasmaSync 42XC10 PlasmaSync 50XC10 PlasmaSync 60XC10 English User s Manual...

Page 2: ...Package Contents Plasma Monitor Remote control and AA Batteries Power cord Users Manual CD ROM Start Up Guide Paper CD ROM Main Power Switch cover and screw Cable clamps...

Page 3: ...ish 10 Remote Control English 11 Power Display Digital Zoom Pointer Main Power Switch Cover English 12 Remote Control ID English 13 On Screen Display OSD Using the OSD English 14 OSD English 15 Operat...

Page 4: ...ic Industries Alliance www eiae org 16 Damage Requiring Service The appliance should be serviced by qualified service personnel when A The power supply cord or the plug has been damaged or B Objects h...

Page 5: ...gy and if not installed and used in accordance with the instructions may cause harmful interference to radio communications However there is no guarantee that interference will not occur in a particul...

Page 6: ...he prongs can be inserted fully The power supply cord you use must have been approved by and comply with the safety standards of your country Type H05VV F 3G 1mm2 should be used in Europe In UK use a...

Page 7: ...tandard for Human Factors Engineering of Visual Display Terminal Workstations ANSI HFS Standard No 100 1988 Published by The Human Factors and Ergonomics Society P O Box 1369 Santa Monica California 9...

Page 8: ...between light and dark areas Use complementary or pastel colors whenever possible Avoid displaying images with few colors and distinct sharply defined borders between colors Plasma monitor driving sou...

Page 9: ...nstructions included with the stand or mounting apparatus Use only those devices recommended by the manufacturer Make sure to install stand or mounting apparatus to the unit while on a surface that is...

Page 10: ...ed Fasten Force 1125 1375N cm NEC recommends mounting interfaces that comply with UL1678 standard in North America Orientation DO NOT use this monitor in the portrait position Doing so may cause failu...

Page 11: ...ic environmental rules that apply in your country area when disposing of used batteries When replacing use only conventional non rechargeable alkaline or manganese batteries There is a risk of explosi...

Page 12: ...nu when the OSD menu is off Exits from the current menu being displayed to the previous menu within the OSD 9 Remote control sensor and Power indicator Receives the signal when using the wireless remo...

Page 13: ...D Sub 15 pin Analog computer input 7 AUDIO2 Input the audio signal from external equipment such as a computer VCR or DVD player 8 DVD HD1 Connect equipment such as a DVD player HDTV device or set top...

Page 14: ...VOLUME Increases Decreases sound level 13 SPLIT SCREEN PIP Picture in Picture mode S BY S Side by side mode SINGLE Returns to normal mode SWAP Swaps the Split Screen images SELECT FREEZE Selects which...

Page 15: ...sition or enlarge the image on the screen 1 Be sure ZOOM NAV function is off Press the ZOOM button or to display the magnifying glass Press the ZOOM button to enlarge the image Press the ZOOM button t...

Page 16: ...ed to operate the monitor having that specific Monitor ID number When 0 is selected or when the remote control is in normal mode all monitors will be operated TO USE REMOTE CONTROL ID MODE ID Mode To...

Page 17: ...in the ADVANCED OSD menu Press UP or DOWN button to select sub menu Press SET Press UP DOWN PLUS or MINUS to select the function or setting to be adjusted Press MENU or EXIT Press UP or DOWN button to...

Page 18: ...e balance 50 YES GAIN GREEN 50 YES GAIN BLUE 50 YES RESET Resets the factory default settings Select ON then press the SET button to reset OFF YES FILM MODE Selects Film mode ON YES PICTURE MODE Selec...

Page 19: ...signal input only OFF YES SET UP Some functions available only when the Advanced OSD function in the FUNCTION menu is enabled The LANGUAGE and ALL RESET functions are always available LANGUAGE Select...

Page 20: ...on automatically detects no input signal of sub screen This feature is available only picture in picture mode SUB P DETECT Sets availability of automatic detecting of sub screen DISPLAY Sets the appea...

Page 21: ...o 2 35 1 Image is expanded at a 2 35 1 ratio to fill the entire screen The screen is filled vertically however some information will be lost on the left and right sides of the image Available for the...

Page 22: ...display the correct linearity Normal 4 3 images are horizontally expanded to fill the entire screen ZOOM Vertically and horizontally expands the picture while maintaining the correct aspect ratio Info...

Page 23: ...VGA is active S BY S button A A B VGA A VGA B S BY S button SINGLE button PIP button PIP button SINGLE button B A VGA A B VGA A B VGA B A VGA A B VGA A B VGA Side by Side4 R Side by Side3 Side by Sid...

Page 24: ...EO DVD HD or RGB button The input selection may also be changed by pressing the INPUT button on the front of the unit Adjusting the OSD controls 1 To make the desired picture active press the SELECT F...

Page 25: ...t There are 6 to choose from independent of inputs SETTING THE MEMORY Use the p and q buttons to select the desired memory slot from MEMORY1 to MEMORY6 Use the t and u buttons to select SET then press...

Page 26: ...he Monitor ID number can be set within a range from 1 to 26 or set to ALL No two monitors should share the same Monitor ID number It is recommended to number each monitor in a daisy chain sequentially...

Page 27: ...IT NONE STOP BIT 1 bit FLOW CONTROL NONE 2 Control command diagram The command is structured by the address code function code data code and end code The length of the command is different for each fu...

Page 28: ...monitor s current activity changing of the input signal etc Example Turn the power ON is for ASCII code Sending commands from the PC etc Status code from Plasma monitor Meaning 30 30 21 0D 0 0 Command...

Page 29: ...ture Mode STANDARD vM p2 76h 4Dh 70h 32h Picture Mode CINEMA1 vM p3 76h 4Dh 70h 33h Picture Mode CINEMA2 vM p4 76h 4Dh 70h 34h Picture Mode DEFAULT vM p5 76h 4Dh 70h 35h 5 Read command Host computer s...

Page 30: ...e Plasma monitor computer or other input device Use the OSD screen controls to focus and adjust display by increasing or decreasing the clock phase total When the display mode is changed the OSD Image...

Page 31: ...5ohm PAL SECAM NTSC PAL B G M N SECAM 4 43NTSC PAL60 Audio AUDIO Input RCA L R X3 Analog Audio Stereo L R 0 5Vrms HDMI Type A DIGITAL Audio PCM 32 44 1 48Khz 16bit Speaker Output External Speaker Jack...

Page 32: ...p 75ohm PAL SECAM NTSC PAL B G M N SECAM 4 43NTSC PAL60 Audio AUDIO Input RCA L R X3 Analog Audio Stereo L R 0 5Vrms HDMI Type A DIGITAL Audio PCM 32 44 1 48Khz 16bit Speaker Output External Speaker J...

Page 33: ...m PAL SECAM NTSC PAL B G M N SECAM 4 43NTSC PAL60 Audio AUDIO Input RCA L R X3 Analog Audio Stereo L R 0 5Vrms HDMI Type A DIGITAL Audio PCM 32 44 1 48Khz 16bit Speaker Output External Speaker Jack 8W...

Page 34: ...280X768 35 1280 X 800 Wide XGA 0 0 8 X 0 8 2 1 4 s e Y s o P g e N s e Y s e Y 7 9 4 8 9 5 36 1280 X 854 Wide XGA s e Y g e N g e N s e Y s e Y 1 3 5 0 6 37 1280 X 960 Wide XGA s e Y s o P s o P s e Y...

Page 35: ...SCART1 2 Yes Yes Yes Yes Yes Yes Yes 3 133 480P P 0 8 4 2 3 s e Y s e Y s e Y s e Y s e Y s e Y s e Y 5 1 3 9 9 5 134 576P 3 s e Y s e Y s e Y s e Y s e Y s e Y s e Y 3 1 3 0 5 HD 135 720P 3 s e Y s...

Page 36: ...2 1 5 s e Y s o P g e N s e Y s e Y 6 5 8 9 6 34 72 57 8 Yes Yes Neg Pos Yes 6 1280X768 35 1280 X 800 Wide XGA 59 8 49 7 Yes Yes Neg Pos Yes 4 1280X800 36 1280 X 854 Wide XGA 60 53 1 Yes Yes Neg Neg...

Page 37: ...I 4 50 15 6 SCART1 2 Yes Yes Yes Yes Yes Yes Yes 3 133 480P P 0 8 4 2 3 s e Y s e Y s e Y s e Y s e Y s e Y s e Y 5 1 3 9 9 5 134 576P 50 31 3 Yes Yes Yes Yes Yes Yes Yes 3 HD 135 720P 3 s e Y s e Y s...

Page 38: ...6 7 X 0 8 2 1 5 s e Y s o P g e N s e Y s e Y 6 5 8 9 6 3 3 8 6 7 X 0 8 2 1 6 s e Y s o P g e N s e Y s e Y 8 7 5 2 7 4 3 35 1280 X 800 Wide XGA 59 8 49 7 Yes Yes Neg Pos Yes 4 1280X800 36 1280 X 854...

Page 39: ...SCART1 2 Yes Yes Yes Yes Yes Yes Yes 3 133 480P P 0 8 4 2 3 s e Y s e Y s e Y s e Y s e Y s e Y s e Y 5 1 3 9 9 5 134 576P 3 s e Y s e Y s e Y s e Y s e Y s e Y s e Y 3 1 3 0 5 HD 135 720P 3 s e Y s e...

Page 40: ...B Input DVI D DVI 1 TX2 9 TX1 17 TX0 2 TX2 10 TX1 18 TX0 3 Shield TX2 TX4 11 Shield TX1 TX3 19 Shield TXP TX5 4 NC 12 NC 20 NC 5 NC 13 NC 21 NC 6 DDC Serial Clock 14 5 power 22 Shield TXC 7 DDC Serial...

Page 41: ...reby certify that the color monitor P426Y3 P506Y4 or P606Y5 is in compliance with Council Directive 73 23 EEC EN 60065 Council Directive 89 336 EEC EN 55022 EN 61000 3 2 EN 61000 3 3 EN 55024 and mark...

Reviews: