background image

NOTE:
When you connect a computer to this monitor, attach
the supplied ferrite cores. If you do not do this, this
monitor will not comform to mandatory FCC standards.
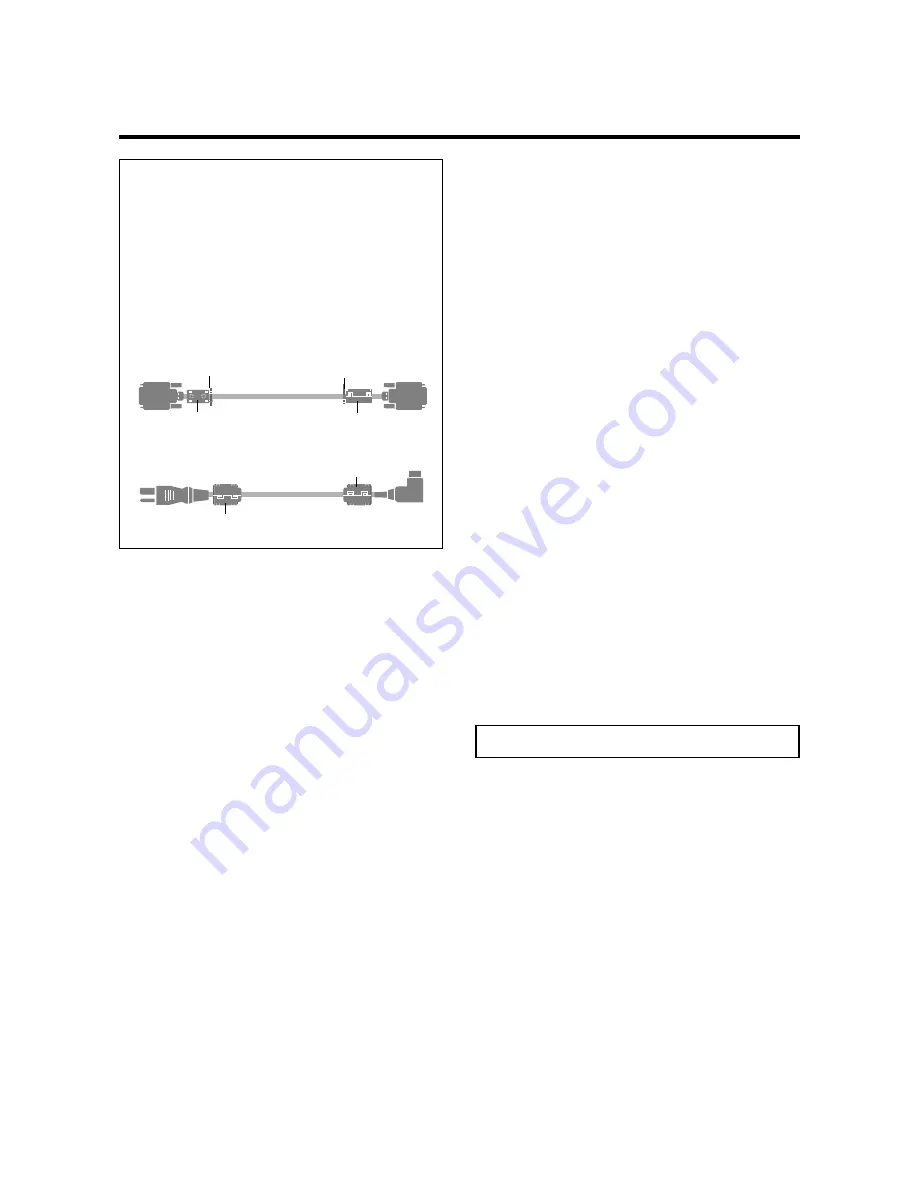
Attaching the ferrite cores:
Set the ferrite cores on both ends of the DVI cable (not
supplied), and both ends of the power cable (supplied).
Close the lid tightly until the clamps click.
Use the band to fasten the ferrite core (supplied) to the
DVI cable.

DVI cable (not supplied)

core (small)

core (small)

Connector

band

band

Power cable (supplied)

core (large)

core (large)

To avoid damage and prolong operating life:

1. Use only with 120V 50/60Hz AC power supply.

Continued operation at line voltages greater than 120 Volts
AC will shorten the life of the unit, and might even cause
a fire hazard.

2. Handle the unit carefully when installing it and do not

drop.

3. Set the unit away from heat, excessive dust, and direct

sunlight.

4. Protect the inside of the unit from liquids and small

metal objects. In case of accident, unplug the power
cord and have it serviced by an authorized Service
Center.

5. Do not hit or scratch the panel surface as this causes

flaws on the surface of the screen.

6. For correct installation and mounting it is strongly

recommended to use a trained, authorized dealer.

7. As is the case with any phosphor-based display (like a

CRT monitor, for example) light output will gradually
decrease over the life of a Plasma Display Panel.

Recommendations to avoid or minimize phosphor burn-in

Like all phosphor-based display devices and all other gas
plasma displays, plasma monitors can be susceptible to
phosphor burn under certain circumstances. Certain
operating conditions, such as the continuous display of a
static image over a prolonged period of time, can result in
phosphor burn if proper precautions are not taken. To protect
your investment in this plasma monitor, please adhere to the
following guidelines and recommendations for minimizing
the occurrence of image burn:

* Always enable and use your computer’s screen saver

function during use with a computer input source.

* Display a moving image whenever possible.
* Change the position of the menu display from time to time.
* Always power down the monitor when you are finished

using it.

If the plasma monitor is in long term use or continuous
operation take the following measures to reduce the
likelihood of phosphor burn:

* Lower the Brightness and Contrast levels as much as

possible without impairing image readability.

* Display an image with many colors and color gradations

(i.e. photographic or photo-realistic images).

* Create image content with minimal contrast between light

and dark areas, for example white characters on black
backgrounds. Use complementary or pastel color whenever
possible.

* Avoid displaying images with few colors and distinct,

sharply defined borders between colors.

* Burn-in is not covered by the warranty.

Contact your dealer for other recommended procedures that
will best suit your particular application needs.

Summary of Contents for PlasmaSync 42MP3

Page 1: ...USER S MANUAL 3 1 ...

Page 2: ...PlasmaSync Plasma Monitor User s Manual NEC Solutions ...

Page 3: ...mpatibility PCs VCRs Laser Disc and DVD player source compatibility AccuBlendscanconversionautomaticallyconvertsSVGA XGA SXGA and UXGA signals to the panel s native resolution 42MP4 VGA SVGA SXGA UXGA Advanced MassArea Sampling Progressive Scan method is employed RGB input 3 Video input 3 DVD HD input 2 Audio input 3 External Control input 1 AccuColor control system provides user selectable on scr...

Page 4: ... designed and manufactured to provide long trouble free service No maintenance other than cleaning is required Use a soft dry cloth to clean the panel Never use solvents such as alcohol or thinner to clean the panel surface The plasma display panel consists of fine picture elements cells with more than 99 99 percent active cells There may be some cells that do not produce light or remain lit For o...

Page 5: ...lasma Display Panel Recommendations to avoid or minimize phosphor burn in Like all phosphor based display devices and all other gas plasma displays plasma monitors can be susceptible to phosphor burn under certain circumstances Certain operating conditions such as the continuous display of a static image over a prolonged period of time can result in phosphor burn if proper precautions are not take...

Page 6: ...plus de 99 99 sont actives Certaines d entre elles ne produisent pas de lumière ou restent allumées Pour des raisons de sécurité et pour éviter d endommager l appareil lire attentivement les instructions suivantes Pour éviter les risques d éléctrocution et d incendie 1 Laisser suffisament d espace autour de l appareil pour la ventilation et éviter toute augmentation excessive de la température int...

Page 7: ...e la vie du Panneau d Affichage à Plasma Pour éviter les risques de brûlage du luminophore les mesures suivantes sont recommandées Commetouslespériphériquesd affichageàbaseluminophore et tous les autres affichages gaz plasma les moniteurs plasma peuvent être sujets au brûlage du luminophore dans certaines circonstances Certaines conditions d utilisation telles que l affichage continu d une image s...

Page 8: ...rations 15 Picture Settings Menu 17 Adjusting the picture 17 Setting the picture mode according to the brightness of the room 18 Setting the color temperature 19 Adjusting the color to the desired quality 20 Reducing noise in the picture 21 Sound Settings Menu 22 Adjusting the treble bass and left right balance 22 Screen Settings Menu 23 Adjusting the Position Size Fine Picture Picture Adj 23 Func...

Page 9: ... of a cover For correct installation and mounting it is strongly recommended to use a trained authorized dealer Failure to follow correct mounting procedures could result in damage to the equipment or injury to the installer Product warranty does not cover damage caused by improper installation Ventilation Requirements for enclosure mounting To allow heat to disperse leave space between surroundin...

Page 10: ... Front View Part Names and Function POWER STANDBY PROCEED INPUT SELECT DOWN UP LEFT RIGHT EXIT VOLUME PROCEED INPUT SELECT DOWN UP LEFT RIGHT EXIT VOLUME POWER STANDBY 7 6 5 4 1 3 2 t LEFT and RIGHT Enlarges or reduces the image Functions as the CURSOR buttons in the On Screen Menu OSM mode y VOLUME DOWN and UP Adjusts the volume Functions as the CURSOR buttons in the On Screen Menu OSM mode u PRO...

Page 11: ...en CONTROL LOCK is set ON the buttons on the set s control panel do not function J REMOTE CONTROL Connect the supplied remote cable here K EXTERNAL CONTROL This terminal is used when power ON OFF input selection and AUDIO MUTE and other controls are operated externally by external control See also page 38 for external control AC IN RGB 3 Digital RGB SPEAKERS MUST HAVE MORE THAN 7WATT RATING IMPEDA...

Page 12: ...s button to select VIDEO as the source The available sources depend on the setting of BNC SELECT VIDEO RGB or COMP VIDEO can also be selected using the INPUT SELECT button on the monitor t PROCEED Press this button to access the OSM controls Press this button during the display of the main menu to go to the sub menu y CURSOR Use these buttons to select items or settings and to adjust settings or s...

Page 13: ... signal transmitter Transmits the remote control signals 6 Remote Jack Insert the plug of the supplied remote cable here when using the supplied remote control in the wired condition Battery Installation and Replacement Insert the 2 AAA batteries making sure to set them in with the proper polarity 1 Press and open the cover 2 Align the batteries according to the and indication inside the case 3 Re...

Page 14: ...trong artificial light or if there is an obstacle between the sensor and the remote control Handling the remote control Do not drop or mishandle the remote control Do not get the remote control wet If the remote control gets wet wipe it dry immediately Avoid heat and humidity When not using the remote control for a long period remove the batteries Do not use new and old batteries together or use d...

Page 15: ... EXTERNAL CONTROL AUDIO 2 DVD1 HD1 AUDIO 3 AUDIO 1 RGB2 DVD2 HD2 VCR or Laser Disc Player Document Camera DVD Player IBM VGA or Compatibles Signal cable supplied To Mini D Sub 15 pin connector on the plasma monitor To video inputs on the plasma monitor Monitor adapter for Macintosh Macintosh or Compatibles Desk top type Personal computer with a digital RGB output ...

Page 16: ...nstotheRGB3IN DVI connector of the main unit Note that the RGB3 IN DVI terminal does not support analog RGB input source Note 1 Input TMDS signals conforming to DVI standards The TMDS input corresponds to 1 link 2 To maintain display quality use a cable with a quality prescribedbyDVIstandardsthatiswithin5metersinlength Connecting Your Document Camera You can connect your plasma monitor to a docume...

Page 17: ...WATT RATING IMPEDANCE 6 OHM RIGHT LEFT VIDEO 1 VIDEO 2 REMOTE CONTROL RGB 1 L MONO L MONO G Y VIDEO 3 HD VD R R Y L MONO R EXTERNAL CONTROL CONTROL LOCK ON OFF R CR PR B CB PB CB PB CR PR AUDIO 2 DVD1 HD1 AUDIO 3 AUDIO 1 RGB2 DVD2 HD2 RIGHT LEFT To connect attachable speakers directly to the plasma monitor 1 Strip the ends of the speaker wires 2 Press up the tabs below the SPEAKERS terminals inser...

Page 18: ...VI Connector The unit is equipped with a type of connector commonly used for both analog and digital Functionally this cannot be used for an analog input TMDS can be used for one link only Pin No 1 2 3 4 5 6 7 8 9 10 11 12 13 14 15 16 17 18 19 20 21 22 23 24 25 26 27 28 29 Signal Digital T M D S Data 2 T M D S Data 2 T M D S Data 2 Shield No connection No connection DDC Clock DDC Data No connectio...

Page 19: ...e remote control or the unit to decrease to the desired level MUTE To cancel the sound Press the MUTE button on the remote control to cancel the sound press again to restore DISPLAY To check the settings 1 The screen changes each time the DISPLAY button is pressed 2 If the button is not pressed for approximately three seconds the indication will disappear DIGITAL ZOOM Digital zoom specifies the pi...

Page 20: ...er has been set press the OFF TIMER button once 2 The remaining time is displayed then turns off after a few seconds 3 When five minutes remain the remaining time appears until it reaches zero OFF TIMER 28 To cancel the off timer 1 Press the OFF TIMER button twice in a row 2 The off timer is canceled OFF TIMER 0 Note After the power is turned off with the off timer A slight current is still suppli...

Page 21: ...he picture has the same size as video pictures with a 4 3 aspect ratio FULL size screen The image is expanded in the horizontal direction Images compressed in the horizontal direction squeezed images are expanded in the horizontal direction and displayed on the entire screen Normal images are expanded in the horizontal direction STADIUM size screen The picture is expanded in the horizontal and ver...

Page 22: ...FULL size screen The image is expanded in the horizontal direction When wide signals are input FULL size screen Information Supported resolution See page 51 for details on the display output of the various VESA signal standards supported by the monitor When 852 848 dot 480 line wide VGA signals with a vertical frequency of 60 Hz and horizontal frequency of 31 7 31 0 kHz are in put Select an approp...

Page 23: ...T PROCEED 2 Press the cursor buttons on the remote control to highlight the menu you wish to enter 3 Press the PROCEED button on the remote control to select a submenu or item P I C T U R E CONTRAST BRIGHTNESS SHARPNESS COLOR TINT PICTURE MODE COLOR TEMP NR MEMORY 2 OFF R G SEL ADJ RETURN EXIT 4 Adjust the level or change the setting of the selected item by using the cursor buttons on the remote c...

Page 24: ... to ON the on screen menu is displayed OSM ADJ Adjusts the vertical and horizontal positions of the menu display 1 Yes POWER MGT Sets the monitor for use as an energy saving display when used with a OFF Yes computer GRAY LEVEL In case of 4 3 sets the luminance of both sides 3 Yes CINEMA MODE Sets the picture to suit the movie ON Yes RGB3 ADJ Adjusts the picture when the picture input from the RGB3...

Page 25: ...rent setting is set and the previous screen reappears 4 Once the adjustment is completed Press the EXIT button to return to the main menu To delete the main menu press the EXIT button once more Note If CAN NOT ADJUST appears When trying to enter the PICTURE submenu make sure PICTURE MODE is set to MEMORY Information Picture adjustment screen CONTRAST Changes the picture s contrast BRIGHTNESS Chang...

Page 26: ...ollows when the and buttons are pressed MEMORY THEATER NORMAL RESET PICTURE MODE THEATER Ifneitherthe or buttonispressedwithin5seconds the current selection is set and the previous screen reappears 4 Once the adjustment is completed Press the EXIT button to return to the main menu To delete the main menu press the EXIT button once more Information Types of picture modes MEMORY The last picture adj...

Page 27: ... PICTURE MODE COLOR TEMP NR 3 Use the and buttons to select 1 The mode switches as follows when the and buttons are pressed 1 2 3 PRO See page 20 to set PRO COLOR TEMP 1 If neither the or button is pressed within 5 seconds thecurrentselectionissetandthepreviousscreenreappears 4 Once the setting is completed Press the EXIT button to return to the main menu To delete the main menu press the EXIT but...

Page 28: ...er the or button is pressed within 5 seconds thecurrentselectionissetandthepreviousscreenreappears 4 Press the PROCEED button The WHITE BALANCE screen appears 5 Use the and buttons to select RED GAIN W H I T E BA L A N CE SEL ADJ RETURN EXIT GAIN RED GREEN BLUE BIAS RED GREEN BLUE 6 Adjust the white balance using the and buttons RED If neither the or button is pressed within 5 seconds the current ...

Page 29: ...COLOR TEMP NR 3 Use the and buttons to select NR 3 The mode switches as follows when the and buttons are pressed OFF NR 1 NR 2 NR 3 NR NR 3 If neither the or button is pressed within 5 seconds the current selection is set and the previous screen reappears 4 Once the setting is completed Press the EXIT button to return to the main menu To delete the main menu press the EXIT button once more Informa...

Page 30: ...URN EXIT BASS TREBLE BALANCE If neither the or button is pressed within 5 seconds thecurrentselectionissetandthepreviousscreenreappears To continue adjusting the sound Repeat from step 2 4 Once the adjustment is completed Press the EXIT button to return to the main menu To delete the main menu press the EXIT button once more Note If CAN NOT ADJUST appears Set AUDIO INPUT on the OPTION menu correct...

Page 31: ...he image can be adjusted and flickering of the image can be corrected Example Adjusting the vertical position in the normal mode Press the PROCEED button on the remote control to display the MAIN MENU on the screen then 1 Use the and buttons to select SCREEN then press the PROCEED button The SCREEN menu appears Default settings when RGB PC is selected SCREEN SEL ADJ RETURN EXIT NORMAL OFF MODE V P...

Page 32: ... menu When using the monitor for presentations etc the monitor can be set so that the input source screen mode etc do not appear Example Turning the on screen menu mode off Press the PROCEED button on the remote control to display the MAIN MENU on the screen then 1 Use the and buttons to select FUNCTION then press the PROCEED button The FUNCTION screen appears 2 Use the and buttons to select OSM F...

Page 33: ...AY LEVEL CINEMA MODE RGB3 ADJ LONG LIFE RESET ON 1 OFF 3 ON 1 SEL ADJ RETURN EXIT 3 To adjust the position Adjust using the and buttons FUNCTION OSM OSM ADJ POWER MGT GRAY LEVEL CINEMA MODE RGB3 ADJ LONG LIFE RESET ON 2 OFF 3 ON 1 SEL ADJ RETURN EXIT FUNCTION OSM OSM ADJ POWER MGT GRAY LEVEL CINEMA MODE RGB3 ADJ LONG LIFE RESET ON 2 OFF 3 ON 1 SEL ADJ RETURN EXIT 4 Once all adjustments are complet...

Page 34: ...on to return to the main menu To delete the main menu press the EXIT button once more Information Power management function The power management function automatically reduces the monitor s power consumption if the computer s keyboard or mouse is not operated for a certain amount of time This function can be used when using the monitor with a computer conforming to the VESA DPMS format If the comp...

Page 35: ...sent from the computer No horizontal and vertical synchronizingsignalsaresentfromthe computer Turning the picture back on Picture already on Operate the keyboard or mouse The picture reappears immediately Operate the keyboard or mouse The picture reappears but more time is required than from the standby mode Operate the keyboard or mouse The picture reappears but more time is required than from th...

Page 36: ...er the function menu Note that this also restores other settings to the factory defaults Setting the picture to suit the movie The film image is automatically discriminated and projected in an image mode suited to the picture NTSC PAL PAL60 480I 60Hz 525I 60Hz 576I 50Hz 625I 50Hz 1035I 60Hz 1080I 60Hz only Example Setting the CINEMA MODE to OFF Press the PROCEED button on the remote control to dis...

Page 37: ...y will change In such a case be sure to adjust the position Restoring the factory default settings Select RESET under the function menu Note that this also restores other settings to the factory defaults Reducing burn in of the screen The brightness of the screen the position of the picture positive negative mode and screen wiper are adjusted to reduce burn in of the screen Example Setting PLE to ...

Page 38: ...tores other settings to the factory defaults Only the PLE and ORBITER can be adjusted when a RGB signal is connected Setting the time for INVERSE Set the INVERSE or WHITE display time and the WAITING TIME Example Setting so that the INVERSE mode starts in 30 minutes and proceeds for one and a half hours Perform Steps 1 2 on Page 29 then 3 Use the and buttons to select INVERSE then use the and butt...

Page 39: ...and the minutes to 0M ON will be displayed Setting the time for SCREEN WIPER Set the SCREEN WIPER operation time WAITING TIME and SPEED Example Setting so that the SCREEN WIPER mode starts in 30 minutes and proceeds for one and a half hours Perform Steps 1 2 on Page 29 then 3 Use the and buttons to select SCREEN WIPER then use the and buttons to select ON LONG LIFE AUTO OFF OFF ON RETURN EXIT PLE ...

Page 40: ...the settings are restored to the default values 4 Once the setting is completed Press the EXIT button To delete the main menu press the EXIT button once more The 2nd line of the WORKING TIME 0M 3M 6M 9M 57M The 1st line of the WAITING TIME 0H 1H 2H 3H 12H The 2nd line of the WAITING TIME 0M 3M 6M 9M 57M SPEED 1 2 3 4 5 6 Once the setting is completed Press the EXIT button several times to return t...

Page 41: ...ches as follows each time the or button is pressed The available sources depend on the setting of BNC SELECT RGB COMP VIDEO OPTIONS VIDEO2 HD DVD1 RGB1 RGB AUTO 1080B SEL ADJ RETURN EXIT AUDIO INPUT AUDIO1 AUDIO2 AUDIO3 BNC SELECT RGB SELECT HD SELECT 4 Once the setting is completed Press the EXIT button to return to the main menu To delete the main menu press the EXIT button once more Information...

Page 42: ...nformation BNC SELECT RGB Use the 5BNC terminal for RGB input COMP Use the 3BNC terminal for component input VIDEO Use the G Y VIDEO 3 terminal for video input Restoring the factory default settings Select RESET under the function menu Note that this also restores other settings to the factory defaults Setting the BNC connectors Select whether to set the input of the 5 BNC connectors to RGB compon...

Page 43: ...ct image automatically 1080B Standard digital broadcasts 1035I Japanese High Vision signal format 1080A Special Digital broadcasts for example DTC100 Information RGB SELECT modes One of these 6 modes must be selected in order to display the following signals correctly AUTO Select the suitable mode for the specifications of input signals as listed in the table Computer input signals supported by th...

Page 44: ...e menus The menu display can be set to one of seven languages Japanese English German French Swedish Italian or Spanish Example Setting the menu display to DEUTSCH Press the PROCEED button on the remote control to display the MAIN MENU on the screen then 1 Use the and buttons to select INFORMATION then press the PROCEED button The INFORMATION screen appears 2 Use the and buttons to select LANGUAGE...

Page 45: ...PAL60 PAL COLOR SYSTEM RETURN EXIT 3 58NTSC ADJ COLOR SYSTEM 4 Once the setting is completed Press the EXIT button to return to the main menu To delete the main menu press the EXIT button once more The color system is set to 3 58 NTSC Information Video signal formats Different countries use different formats for video signals Set to the color system used in your current country AUTO1 2 The color s...

Page 46: ...d 7FH this indicates that the commands and data of the supported equipment have been received When the lower order 4 bits is BH as in 3BH and 7BH this indicates that unsupported commands and data have been received Unit ID 1 and Unit ID 2 Unit ID 1 and unit ID 2 are numbers used to identify the equipment that is to be connected 60H is used for the plasma monitor and 80H is used for external contro...

Page 47: ...H 38 RESET 1FH 54H 00H 39 Audio Select Set DFH 70H 02H 40 BNC SELECT DFH 8CH 01H 41 RGB Select DFH 8BH 01H 42 HD Select DFH 8AH 01H 43 LANGUAGE Select DFH 5BH 01H 44 COLOR SYSTEM Select DFH 5CH 01H 45 FREQUENCY Request 1FH 26H 00H 46 Input MODE Request 1FH 41H 00H 47 VIDEO ADJ Request 1FH 45H 00H 48 Audio Select Request 1FH 6FH 00H 49 Failure Mode Request 1FH 3FH 00H 50 MODEL NAME Request 1FH 17H ...

Page 48: ...USER PICTURE Gain Flag 01H DATA01 CONTRAST Gain Flag 07H DATA02 CONTRAST Gain CCH 52 FFH 01 00H 0 01H 01 14H 20 ACK 7FH 60H 80H 7FH 02H DATA00 DATA01 CKS DATA00 USER PICTURE Gain Flag 01H DATA01 CONTRAST Gain Flag 07H 08 BRIGHT Gain Data Function The external control equipment changes the BRIGHT gain data of the plasma monitor Transmission Data DFH 80H 60H 7FH 03H DATA00 DATA01 DATA02 CKS DATA00 U...

Page 49: ...ICTURE MODE Select Function The external control equipment sets the picture mode of the plasma monitor Transmission Data DFH 80H 60H 0AH 01H DATA00 CKS DATA00 01H MEMORY 02H THEATER 03H NORMAL 04H RESET ACK 7FH 60H 80H 0AH 01H DATA00 CKS DATA00 01H MEMORY 02H THEATER 03H NORMAL 04H RESET 13 COLOR TEMP SELECT Function The external control equipment changes the COLOR TEMP of the plasma monitor Trans...

Page 50: ...3H 17 NR MODE Set Function The external control equipment sets the NR Noise Reduction mode of the plasma monitor Transmission Data DFH 80H 60H C0H 01H DATA00 CKS DATA00 01H NR OFF 02H NR 1 03H NR 2 04H NR 3 ACK 7FH 60H 80H C0H 01H DATA00 CKS DATA00 01H NR OFF 02H NR 1 03H NR 2 04H NR 3 18 BASS Gain Data Function The external control equipment changes the BASS gain data of the plasma monitor Transm...

Page 51: ...DATA00 USER PICTURE Gain Flag 03H DATA01 V POSITION Gain Flag 01H 23 H POSITION Gain Data Function The external control equipment changes the H POSITION gain data of the plasma monitor Transmission Data DFH 80H 60H 7FH 03H DATA00 DATA01 DATA02 CKS DATA00 USER PICTURE Gain Flag 03H DATA01 H POSITION Gain Flag 02H DATA02 H POSITION Gain 80H 128 FFH 01 00H 0 01H 01 7FH 127 ACK 7FH 60H 80H 7FH 02H DAT...

Page 52: ...ta ratiooffrequency division of the plasma monitor Transmission Data DFH 80H 60H 7FH 03H DATA00 DATA01 DATA02 CKS DATA00 USER PICTURE Gain Flag 03H DATA01 CLOCK Gain Flag 04H DATA02 CLOCK Gain C0H 64 FFH 01 00H 0 01H 01 40H 64 ACK 7FH 60H 80H 7FH 02H DATA00 DATA01 CKS DATA00 USER PICTURE Gain Flag 03H DATA01 CLOCK Gain Flag 04H 29 OSM Select Function The external control equipment switches on or o...

Page 53: ...EVEL 00H 0 0FH 15 33 CINEMA MODE Set Function The external control equipment switches on or off the CINEMA MODE of the plasma monitor Transmission Data DFH 80H 60H C1H 01H DATA00 CKS DATA00 CINEMA MODE Set 01H ON 02H OFF ACK 7FH 60H 80H C1H 01H DATA00 CKS DATA00 CINEMA MODE Set 01H ON 02H OFF 34 RGB3 ADJ Select Function TheexternalcontrolequipmentsetstheRGB3ADJUSToftheplasmamonitor Transmission Da...

Page 54: ...2H 06M minutes FFH 12H hours and 45M minutes DATA03 SPEED 01H 1 05H 5 ACK 3FH 60H 80H C8H 00H CKS NOTE The WORKING TIME and the WAITING TIME can be set in units of 3 minutes Example 03H 9 minutes 1EH 1 hour and 30 minutes 38 RESET Function The external control equipment resets the user adjustment of the plasma monitor Transmission Data 1FH 80H 60H 54H 00H CKS ACK 3FH 60H 80H 54H 00H CKS 39 Audio S...

Page 55: ...f the plasma monitor Transmission Data DFH 80H 60H 8AH 01H DATA00 CKS DATA00 01H 1035I 02H 1080A 03H 1080B ACK 7FH 60H 80H 8AH 01H DATA00 CKS DATA00 01H 1035I 02H 1080A 03H 1080B 43 LANGUAGE Select Function The external control equipment sets the LANGUAGE SELECT of the plasma monitor Transmission Data DFH 80H 60H 5BH 01H DATA00 CKS DATA00 01H ENGLISH 02H GERMAN 03H FRENCH 04H SPANISH 05H ITALIAN 0...

Page 56: ...E DATA06 00H No signal 01H to 80H RGB signal Identification number of PC mode 81H Video signal 3 58NTSC 82H 4 43NTSC 83H PAL 84H PAL M 85H PAL N 86H PAL60 87H SECAM 88H B W60 89H B W50 A0H HD DVD DTV signal 480I A1H 480P A2H 576I A3H 576P A4H 720P A5H 1035I A6H 1080I RESOLUTION DATA07 Dots Low order byte 00H 0 No signal 00H FFH 256 DATA08 Dots High order byte 00H 257 No signal 00H FFH DATA09 Lines...

Page 57: ...DATA03 COLOR Gain E0H 32 COLOR Gain is from 22 EAH to FFH 01 22 16H only during video 00H 0 01H 01 20H 32 DATA04 TINT Gain E0H 32 TINT Gain is from 22 EAH to FFH 01 22 16H only during video 00H 0 01H 01 20H 32 DATA05 SHARPNESS Gain F0H 16 FFH 01 00H 0 01H 01 10H 16 DATA06 CONTRAST Gain CCH 52 FFH 01 00H 0 01H 01 14H 20 DATA07 BRIGHT Gain E0H 32 FFH 01 00H 0 01H 01 20H 32 DATA08 RED Gain Drive D8H ...

Page 58: ... 2 Bit 0 7 1 fixed backup 50 MODEL NAME Request Function Theexternalcontrolequipmentinquirestheproductcodeoftheplasmamonitor Transmission Data 1FH 80H 60H 17H 00H CKS ACK The plasma monitor returns the following ACK 7FH 60H 80H 17H 0CH DATA00 to DATA11 CKS DATA00 1st character of the product code DATA01 2nd character of the product code DATA11 12th character of the product code NOTE Received data ...

Page 59: ...YES YES YES YES 5 YES 5 YES 5 YES YES YES 5 YES YES 5 YES 8 YES 8 FULL 16 9 YES YES YES YES YES YES YES YES 3 YES 3 YES YES YES YES YES YES YES YES 4 YES 4 YES 4 YES 4 YES 4 YES YES YES YES YES YES YES YES YES YES YES YES YES YES YES 4 YES YES YES YES YES YES YES YES 4 YES YES 8 YES 8 RGB select 6 STILL STILL WIDE2 WIDE1 STILL STILL STILL STILL STILL WIDE1 WIDE1 WIDE1 WIDE2 WIDE1 WIDE1 MOTION Appl...

Page 60: ...onitor adapter D Sub 15 pin to your computer s video port If your computer has a mini D Sub 15 pin connector you may have to use the supplied RGB cable 8 Other screen modes ZOOM and STADIUM are available as well NOTE While the input signals comply with the resolution listed in the table above you may have to adjust the position and size of the picture or the fine picture because of errors in synch...

Page 61: ...nside the main unit has become too high and has activated the protector Remedy Leave some space between the display and the connected components Replace both batteries with new ones Plug the monitor s power cord into a power outlet Press the power button on the monitor to turn on the power Replace both batteries with new ones Point the remote control at the monitor s remote control sensor when pre...

Page 62: ...ireless Wired remote control OSM Functions Picture Contrast Brightness Sharpness Color Tint Picture mode Color temperature Noise reductions Sound Bass Treble Balance Screen V Position H Position V Height H Width Auto Picture Fine picture Picture adjustment Function OSM OSM adjustment Power management Gray level Cinema mode RGB3Adjustment Long Life PLE Orbiter Inverse White ScreenWiper Reset Option...

Page 63: ... Off timer Wireless Wired remote control OSM Functions Picture Contrast Brightness Sharpness Color Tint Picture mode Color temperature Noise reductions Sound Bass Treble Balance Screen V Position H Position V Height H Width Auto Picture Fine picture Picture adjustment Function OSM OSM adjustment Power management Gray level Cinema mode RGB3Adjustment Long Life PLE Orbiter Inverse White ScreenWiper ...

Page 64: ...s set up including adjustment of user controls These costs are the responsibility of the NEC Solutions dealer from whom the product was purchased 3 Shipping charges HOW YOU CAN GET WARRANTY SERVICE 1 To obtain service on your product consult the dealer from whom you purchased the product 2 Whenever warranty service is required the original dated invoice or a copy must be presented as proof of warr...

Page 65: ...57 Printed on recycled paper Printed in Japan 7S800343 NEC Solutions Inc 1250 N Arlington Heights Road Suite 500 Itasca Illinois 60143 1248 ...

Page 66: ...PlasmaSync Plasma Monitor User s Manual Bedienungshandbuch Manuel de l utilisateur Manual del Usuario Manuale d uso Bruksanvisning PlasmaSync 42MP4 42XGA PX 42XM1G asmaSync 42MP3 42Wide VGA PX 42VM3G ...

Page 67: ...User s Manual Bedienungshandbuch Manuel de l utilisateur Manual del Usuario Manuale d uso Bruksanvisning ...

Page 68: ...l consists of fine picture elements cells with more than 99 99 percent active cells There may be some cells that do not produce light or remain lit For operating safety and to avoid damage to the unit read carefully and observe the following instructions To avoid shock and fire hazards 1 Provide adequate space for ventilation to avoid internal heat build up Do not cover rear vents or install the u...

Page 69: ... life of a Plasma Display Panel Recommendations to avoid or minimize phosphor burn in Like all phosphor based display devices and all other gas plasma displays plasma monitors can be susceptible to phosphor burn under certain circumstances Certain operating conditions such as the continuous display of a static image over a prolonged period of time can result in phosphor burn if proper precautions ...

Page 70: ...g computer images with a wide screen E 15 OSM Controls E 16 Menu Operations E 16 Picture Settings Menu E 18 Adjusting the picture E 18 Setting the picture mode according to the brightness of the room E 19 Setting the color temperature E 20 Adjusting the color to the desired quality E 21 Reducing noise in the picture E 22 Sound Settings Menu E 23 Adjusting the treble bass and left right balance E 2...

Page 71: ...g unit Wall mount unit Stand etc See page E 2 For correct installation and mounting it is strongly recommended to use a trained authorized dealer Failure to follow correct mounting procedures could result in damage to the equipment or injury to the installer Product warranty does not cover damage caused by improper installation Ventilation Requirements for enclosure mounting To allow heat to dispe...

Page 72: ...720P and HDTV signal compatibility PCs VCRs Laser Disc and DVD player source compatibility AccuBlend scan conversion automatically converts SVGA XGA SXGA and UXGA signals to the panel s native resolution 42XGA VGA SVGA SXGA UXGA Advanced Mass Area Sampling Progressive Scan method is employed RGB input 3 Video input 3 DVD HD input 2 Audio input 3 External Control input 1 AccuColor control system pr...

Page 73: ...in the following order The available inputs depend on the setting of BNC SELECT RGB COMP VIDEO SCART Functions as the EXIT buttons in the On Screen Menu OSM mode t LEFT and RIGHT Enlarges or reduces the image Functions as the CURSOR buttons in the On Screen Menu OSM mode y VOLUME DOWN and UP Adjusts the volume Functions as the CURSOR buttons in the On Screen Menu OSM mode u PROCEED Sets the On Scr...

Page 74: ...the correct polarity C RGB3 DVI 29pin Inputs a digital RGB signal TMDS D VIDEO1 2 Connect VCR s DVD s or Laser Discs etc here E AUDIO1 AUDIO2 AUDIO3 These are audio input terminals The input is selectable Set which video image to allot them to on the menu screen F DVD1 HD1 Connect DVD s High Definition or Laser Discs etc here G RGB1 Inputs the analog RGB signal of personal computer etc H RGB2 DVD2...

Page 75: ...ss this button to select VIDEO as the source The available sources depend on the setting of BNC SELECT VIDEO RGB or COMP or SCART VIDEO can also be selected using the INPUT SELECT button on the monitor t PROCEED Press this button to access the OSM controls Press this button during the display of the main menu to go to the sub menu y CURSOR Use these buttons to select items or settings and to adjus...

Page 76: ... the cover 1 MUTE Mutes the sound 2 WIDE The type of broadcast is detected automatically and the recommended wide screen is set 3 DISPLAY Displays the source settings on the screen 4 OFF TIMER Activates the off timer for the unit 5 Remote control signal transmitter Transmits the remote control signals 6 Remote Jack Insert the plug of the supplied remote cable here when using the supplied remote co...

Page 77: ...ontrol Handling the remote control Do not drop or mishandle the remote control Do not get the remote control wet If the remote control gets wet wipe it dry immediately Avoid heat and humidity When not using the remote control for a long period remove the batteries Do not use new and old batteries together or use different types together Do not take apart the batteries heat them or throw them into ...

Page 78: ...GB 3 Digital RGB VIDEO 1 VIDEO 2 REMOTE CONTROL RGB 1 L MONO L MONO G Y VIDEO 3 HD VD R R Y L MONO R EXTERNAL CONTROL AUDIO 2 DVD1 HD1 AUDIO 3 AUDIO 1 RGB2 DVD2 HD2 CONTROL LOCK ON OFF R CR PR B CB PB CB PB CR PR IBM VGA or Compatibles Monitor adapter for Macintosh Macintosh or Compatibles Desk top type VCR or Laser Disc Player Document Camera To video inputs on the plasma monitor DVD Player Signa...

Page 79: ...ionstotheRGB3IN DVI connector of the main unit Note that the RGB3 IN DVI terminal does not support analog RGB input source Note 1 Input TMDS signals conforming to DVI standards The TMDS input corresponds to 1 link 2 To maintain display quality use a cable with a quality prescribedbyDVIstandardsthatiswithin5metersinlength Connecting Your Document Camera You can connect your plasma monitor to a docu...

Page 80: ...7WATT RATING IMPEDANCE 6 OHM RIGHT LEFT VIDEO 1 VIDEO 2 REMOTE CONTROL RGB 1 L MONO L MONO G Y VIDEO 3 HD VD R R Y L MONO R EXTERNAL CONTROL CONTROL LOCK ON OFF R CR PR B CB PB CB PB CR PR AUDIO 2 DVD1 HD1 AUDIO 3 AUDIO 1 RGB2 DVD2 HD2 RIGHT LEFT To connect attachable speakers directly to the plasma monitor 1 Strip the ends of the speaker wires 2 Press up the tabs below the SPEAKERS terminals inse...

Page 81: ...DVI Connector The unit is equipped with a type of connector commonly used for both analog and digital Functionally this cannot be used for an analog input TMDS can be used for one link only Pin No 1 2 3 4 5 6 7 8 9 10 11 12 13 14 15 16 17 18 19 20 21 22 23 24 25 26 27 28 29 Signal Digital T M D S Data 2 T M D S Data 2 T M D S Data 2 Shield No connection No connection DDC Clock DDC Data No connecti...

Page 82: ...he remote control or the unit to decrease to the desired level MUTE To cancel the sound Press the MUTE button on the remote control to cancel the sound press again to restore DISPLAY To check the settings 1 The screen changes each time the DISPLAY button is pressed 2 If the button is not pressed for approximately three seconds the indication will disappear DIGITAL ZOOM Digital zoom specifies the p...

Page 83: ...mer has been set press the OFF TIMER button once 2 The remaining time is displayed then turns off after a few seconds 3 When five minutes remain the remaining time appears until it reaches zero OFF TIMER 28 To cancel the off timer 1 Press the OFF TIMER button twice in a row 2 The off timer is canceled OFF TIMER 0 Note After the power is turned off with the off timer A slight current is still suppl...

Page 84: ...The picture has the same size as video pictures with a 4 3 aspect ratio FULL size screen The image is expanded in the horizontal direction Images compressed in the horizontal direction squeezed images are expanded in the horizontal direction and displayed on the entire screen Normal images are expanded in the horizontal direction STADIUM size screen The picture is expanded in the horizontal and ve...

Page 85: ...ULL size screen The image is expanded in the horizontal direction When wide signals are input FULL size screen Information Supported resolution See page E 53 for details on the display output of the various VESA signal standards supported by the monitor When 852 848 dot 480 line wide VGA signals with a vertical frequency of 60 Hz and horizontal frequency of 31 7 31 0 kHz are in put Select an appro...

Page 86: ...IT PROCEED 2 Press the cursor buttons on the remote control to highlight the menu you wish to enter 3 Press the PROCEED button on the remote control to select a submenu or item P I C T U R E CONTRAST BRIGHTNESS SHARPNESS COLOR TINT PICTURE MODE COLOR TEMP NR MEMORY 2 OFF R G SEL ADJ RETURN EXIT 4 Adjust the level or change the setting of the selected item by using the cursor buttons on the remote ...

Page 87: ...t to ON the on screen menu is displayed OSM ADJ Adjusts the vertical and horizontal positions of the menu display 1 Yes POWER MGT Sets the monitor for use as an energy saving display when used with a OFF Yes computer GRAY LEVEL In case of 4 3 sets the luminance of both sides 3 Yes CINEMA MODE Sets the picture to suit the movie ON Yes RGB3 ADJ Adjusts the picture when the picture input from the RGB...

Page 88: ...rrent setting is set and the previous screen reappears 4 Once the adjustment is completed Press the EXIT button to return to the main menu To delete the main menu press the EXIT button once more Note If CAN NOT ADJUST appears When trying to enter the PICTURE submenu make sure PICTURE MODE is set to MEMORY Information Picture adjustment screen CONTRAST Changes the picture s contrast BRIGHTNESS Chan...

Page 89: ...follows when the and buttons are pressed MEMORY THEATER NORMAL RESET PICTURE MODE THEATER Ifneitherthe or buttonispressedwithin5seconds the current selection is set and the previous screen reappears 4 Once the adjustment is completed Press the EXIT button to return to the main menu To delete the main menu press the EXIT button once more Information Types of picture modes MEMORY The last picture ad...

Page 90: ... PICTURE MODE COLOR TEMP NR 3 Use the and buttons to select 1 The mode switches as follows when the and buttons are pressed 1 2 3 PRO See page E 21 to set PRO COLOR TEMP 1 If neither the or button is pressed within 5 seconds thecurrentselectionissetandthepreviousscreenreappears 4 Once the setting is completed Press the EXIT button to return to the main menu To delete the main menu press the EXIT b...

Page 91: ...her the or button is pressed within 5 seconds thecurrentselectionissetandthepreviousscreenreappears 4 Press the PROCEED button The WHITE BALANCE screen appears 5 Use the and buttons to select RED GAIN W H I T E BA L A N CE SEL ADJ RETURN EXIT GAIN RED GREEN BLUE BIAS RED GREEN BLUE 6 Adjust the white balance using the and buttons RED If neither the or button is pressed within 5 seconds the current...

Page 92: ... COLOR TEMP NR 3 Use the and buttons to select NR 3 The mode switches as follows when the and buttons are pressed OFF NR 1 NR 2 NR 3 NR NR 3 If neither the or button is pressed within 5 seconds the current selection is set and the previous screen reappears 4 Once the setting is completed Press the EXIT button to return to the main menu To delete the main menu press the EXIT button once more Inform...

Page 93: ...TURN EXIT BASS TREBLE BALANCE If neither the or button is pressed within 5 seconds thecurrentselectionissetandthepreviousscreenreappears To continue adjusting the sound Repeat from step 2 4 Once the adjustment is completed Press the EXIT button to return to the main menu To delete the main menu press the EXIT button once more Note If CAN NOT ADJUST appears Set AUDIO INPUT on the OPTION menu correc...

Page 94: ...the image can be adjusted and flickering of the image can be corrected Example Adjusting the vertical position in the normal mode Press the PROCEED button on the remote control to display the MAIN MENU on the screen then 1 Use the and buttons to select SCREEN then press the PROCEED button The SCREEN menu appears Default settings when RGB PC is selected SCREEN SEL ADJ RETURN EXIT NORMAL OFF MODE V ...

Page 95: ...n menu When using the monitor for presentations etc the monitor can be set so that the input source screen mode etc do not appear Example Turning the on screen menu mode off Press the PROCEED button on the remote control to display the MAIN MENU on the screen then 1 Use the and buttons to select FUNCTION then press the PROCEED button The FUNCTION screen appears 2 Use the and buttons to select OSM ...

Page 96: ...RAY LEVEL CINEMA MODE RGB3 ADJ LONG LIFE RESET ON 1 OFF 3 ON 1 SEL ADJ RETURN EXIT 3 To adjust the position Adjust using the and buttons FUNCTION OSM OSM ADJ POWER MGT GRAY LEVEL CINEMA MODE RGB3 ADJ LONG LIFE RESET ON 2 OFF 3 ON 1 SEL ADJ RETURN EXIT FUNCTION OSM OSM ADJ POWER MGT GRAY LEVEL CINEMA MODE RGB3 ADJ LONG LIFE RESET ON 2 OFF 3 ON 1 SEL ADJ RETURN EXIT 4 Once all adjustments are comple...

Page 97: ...on to return to the main menu To delete the main menu press the EXIT button once more Information Power management function The power management function automatically reduces the monitor s power consumption if the computer s keyboard or mouse is not operated for a certain amount of time This function can be used when using the monitor with a computer conforming to the VESA DPMS format If the comp...

Page 98: ... sent from the computer No horizontal and vertical synchronizingsignalsaresentfromthe computer Turning the picture back on Picture already on Operate the keyboard or mouse The picture reappears immediately Operate the keyboard or mouse The picture reappears but more time is required than from the standby mode Operate the keyboard or mouse The picture reappears but more time is required than from t...

Page 99: ...r the function menu Note that this also restores other settings to the factory defaults Setting the picture to suit the movie The film image is automatically discriminated and projected in an image mode suited to the picture NTSC PAL PAL60 480I 60Hz 525I 60Hz 576I 50Hz 625I 50Hz 1035I 50Hz 1080I 60Hz only Example Setting the CINEMA MODE to OFF Press the PROCEED button on the remote control unit to...

Page 100: ...ED Setting RGB3 ADJ When the picture input from the RGB3 input terminal is distorted select the most appropriate setting from among 1 2 and 3 Example Setting 2 Press the PROCEED button on the remote control to display MAIN MENU on the screen then 1 Use the and buttons to select FUNCTION then press the PROCEED button The FUNCTION screen appears 2 Use the and buttons to select RGB3 ADJ FUNCTION ON 1...

Page 101: ...g the PROCEED button while ON is set Restoring the factory default settings Select RESET from the function menu Note that this also restores other settings to the factory defaults Only the PLE and ORBITER can be adjusted when a RGB signal is connected Setting the time for INVERSE Set the INVERSE or WHITE display time and the WAITING TIME Example Setting so that the INVERSE mode starts in 30 minute...

Page 102: ...and the minutes to 0M ON will be displayed Setting the time for SCREEN WIPER Set the SCREEN WIPER operation time WAITING TIME and SPEED Example Setting so that the SCREEN WIPER mode starts in 30 minutes and proceeds for one and a half hours Perform Steps 1 2 on Page E 30 then 3 Use the and buttons to select SCREEN WIPER then use the and buttons to select ON LONG LIFE AUTO OFF OFF ON RETURN EXIT PL...

Page 103: ...l the settings are restored to the default values 4 Once the setting is completed Press the EXIT button To delete the main menu press the EXIT button once more The 2nd line of the WORKING TIME 0M 3M 6M 9M 57M The 1st line of the WAITING TIME 0H 1H 2H 3H 12H The 2nd line of the WAITING TIME 0M 3M 6M 9M 57M SPEED 1 2 3 4 5 6 Once the setting is completed Press the EXIT button several times to return...

Page 104: ... AUTO 1080B SEL ADJ RETURN EXIT AUDIO INPUT AUDIO1 AUDIO2 AUDIO3 BNC SELECT RGB SELECT HD SELECT 3 To set the AUDIO1 to VIDEO2 Use the and buttons to select VIDEO2 The mode switches as follows each time the or button is pressed The available sources depend on the setting of BNC SELECT RGB COMP VIDEO SCART OPTIONS VIDEO2 HD DVD1 RGB1 RGB AUTO 1080B SEL ADJ RETURN EXIT AUDIO INPUT AUDIO1 AUDIO2 AUDI...

Page 105: ...DEO 3 terminal for video input SCART Use the 4BNC terminal for RGB with composite sync input See page E 8 Restoring the factory default settings Select RESET under the function menu Note that this also restores other settings to the factory defaults Setting a computer image to the correct RGB select screen With the computer image select the RGB Select mode for a moving image such as video mode wid...

Page 106: ...t image automatically 1080B Standard digital broadcasts 1035I Japanese High Vision signal format 1080A Special Digital broadcasts for example DTC100 Information RGB SELECT modes One of these 6 modes must be selected in order to display the following signals correctly AUTO Select the suitable mode for the specifications of input signals as listed in the table Computer input signals supported by thi...

Page 107: ...he menus The menu display can be set to one of seven languages Japanese English German French Swedish Italian or Spanish Example Setting the menu display to DEUTSCH Press the PROCEED button on the remote control to display the MAIN MENU on the screen then 1 Use the and buttons to select INFORMATION then press the PROCEED button The INFORMATION screen appears 2 Use the and buttons to select LANGUAG...

Page 108: ... PAL60 PAL COLOR SYSTEM RETURN EXIT 3 58NTSC ADJ COLOR SYSTEM 4 Once the setting is completed Press the EXIT button to return to the main menu To delete the main menu press the EXIT button once more The color system is set to 3 58 NTSC Information Video signal formats Different countries use different formats for video signals Set to the color system used in your current country AUTO1 2 The color ...

Page 109: ...CTS Clear to send 9 No Connection 1 5 9 6 2 3 4 7 8 2 Connector on the external equipment side Serial port RS 232C connector See the specifications of the equipment that is to be connected for the type of connector and the pin assignment 3 Wiring Use a crossed reverse cable Wire the cable so that each pair of data lines cross between the two devices These data line pairs are RXD Receive data and T...

Page 110: ... the equipment sending the signal 2 Unit ID 2 Indicates the equipment receiving the signal Command 2 Command 2 along with command 1 is a number used to distinguish each command Check Sum CKS Error Processing and ACK 1 The check sum described below and RS 232C odd parity are used together for a check of the received data The check sum is the lower order 8 bits of one frame of sent or received data ...

Page 111: ...4H 38 RESET 1FH 54H 00H 39 Audio Select Set DFH 70H 02H 40 BNC SELECT DFH 8CH 01H 41 RGB Select DFH 8BH 01H 42 HD Select DFH 8AH 01H 43 LANGUAGE Select DFH 5BH 01H 44 COLOR SYSTEM Select DFH 5CH 01H 45 FREQUENCY Request 1FH 26H 00H 46 Input MODE Request 1FH 41H 00H 47 VIDEO ADJ Request 1FH 45H 00H 48 Audio Select Request 1FH 6FH 00H 49 Failure Mode Request 1FH 3FH 00H 50 MODEL NAME Request 1FH 17H...

Page 112: ... USER PICTURE Gain Flag 01H DATA01 CONTRAST Gain Flag 07H DATA02 CONTRAST Gain CCH 52 FFH 01 00H 0 01H 01 14H 20 ACK 7FH 60H 80H 7FH 02H DATA00 DATA01 CKS DATA00 USER PICTURE Gain Flag 01H DATA01 CONTRAST Gain Flag 07H 08 BRIGHT Gain Data Function The external control equipment changes the BRIGHT gain data of the plasma monitor Transmission Data DFH 80H 60H 7FH 03H DATA00 DATA01 DATA02 CKS DATA00 ...

Page 113: ...PICTURE MODE Select Function The external control equipment sets the picture mode of the plasma monitor Transmission Data DFH 80H 60H 0AH 01H DATA00 CKS DATA00 01H MEMORY 02H THEATER 03H NORMAL 04H RESET ACK 7FH 60H 80H 0AH 01H DATA00 CKS DATA00 01H MEMORY 02H THEATER 03H NORMAL 04H RESET 13 COLOR TEMP SELECT Function The external control equipment changes the COLOR TEMP of the plasma monitor Tran...

Page 114: ...03H 17 NR MODE Set Function The external control equipment sets the NR Noise Reduction mode of the plasma monitor Transmission Data DFH 80H 60H C0H 01H DATA00 CKS DATA00 01H NR OFF 02H NR 1 03H NR 2 04H NR 3 ACK 7FH 60H 80H C0H 01H DATA00 CKS DATA00 01H NR OFF 02H NR 1 03H NR 2 04H NR 3 18 BASS Gain Data Function The external control equipment changes the BASS gain data of the plasma monitor Trans...

Page 115: ... DATA00 USER PICTURE Gain Flag 03H DATA01 V POSITION Gain Flag 01H 23 H POSITION Gain Data Function The external control equipment changes the H POSITION gain data of the plasma monitor Transmission Data DFH 80H 60H 7FH 03H DATA00 DATA01 DATA02 CKS DATA00 USER PICTURE Gain Flag 03H DATA01 H POSITION Gain Flag 02H DATA02 H POSITION Gain 80H 128 FFH 01 00H 0 01H 01 7FH 127 ACK 7FH 60H 80H 7FH 02H DA...

Page 116: ...ata ratiooffrequency division of the plasma monitor Transmission Data DFH 80H 60H 7FH 03H DATA00 DATA01 DATA02 CKS DATA00 USER PICTURE Gain Flag 03H DATA01 CLOCK Gain Flag 04H DATA02 CLOCK Gain C0H 64 FFH 01 00H 0 01H 01 40H 64 ACK 7FH 60H 80H 7FH 02H DATA00 DATA01 CKS DATA00 USER PICTURE Gain Flag 03H DATA01 CLOCK Gain Flag 04H 29 OSM Select Function The external control equipment switches on or ...

Page 117: ...LEVEL 00H 0 0FH 15 33 CINEMA MODE Set Function The external control equipment switches on or off the CINEMA MODE of the plasma monitor Transmission Data DFH 80H 60H C1H 01H DATA00 CKS DATA00 CINEMA MODE Set 01H ON 02H OFF ACK 7FH 60H 80H C1H 01H DATA00 CKS DATA00 CINEMA MODE Set 01H ON 02H OFF 34 RGB3 ADJ Select Function TheexternalcontrolequipmentsetstheRGB3ADJUSToftheplasmamonitor Transmission D...

Page 118: ...02H 06M minutes FFH 12H hours and 45M minutes DATA03 SPEED 01H 1 05H 5 ACK 3FH 60H 80H C8H 00H CKS NOTE The WORKING TIME and the WAITING TIME can be set in units of 3 minutes Example 03H 9 minutes 1EH 1 hour and 30 minutes 38 RESET Function The external control equipment resets the user adjustment of the plasma monitor Transmission Data 1FH 80H 60H 54H 00H CKS ACK 3FH 60H 80H 54H 00H CKS 39 Audio ...

Page 119: ...HD SELECT of the plasma monitor Transmission Data DFH 80H 60H 8AH 01H DATA00 CKS DATA00 01H 1035I 02H 1080A 03H 1080B ACK 7FH 60H 80H 8AH 01H DATA00 CKS DATA00 01H 1035I 02H 1080A 03H 1080B 43 LANGUAGE Select Function The external control equipment sets the LANGUAGE SELECT of the plasma monitor Transmission Data DFH 80H 60H 5BH 01H DATA00 CKS DATA00 01H ENGLISH 02H GERMAN 03H FRENCH 04H SPANISH 05...

Page 120: ...DE DATA06 00H No signal 01H to 80H RGB signal Identification number of PC mode 81H Video signal 3 58NTSC 82H 4 43NTSC 83H PAL 84H PAL M 85H PAL N 86H PAL60 87H SECAM 88H B W60 89H B W50 A0H HD DVD DTV signal 480I A1H 480P A2H 576I A3H 576P A4H 720P A5H 1035I A6H 1080I RESOLUTION DATA07 Dots Low order byte 00H 0 No signal 00H FFH 256 DATA08 Dots High order byte 00H 257 No signal 00H FFH DATA09 Line...

Page 121: ... DATA03 COLOR Gain E0H 32 COLOR Gain is from 22 EAH to FFH 01 22 16H only during video 00H 0 01H 01 20H 32 DATA04 TINT Gain E0H 32 TINT Gain is from 22 EAH to FFH 01 22 16H only during video 00H 0 01H 01 20H 32 DATA05 SHARPNESS Gain F0H 16 FFH 01 00H 0 01H 01 10H 16 DATA06 CONTRAST Gain CCH 52 FFH 01 00H 0 01H 01 14H 20 DATA07 BRIGHT Gain E0H 32 FFH 01 00H 0 01H 01 20H 32 DATA08 RED Gain Drive D8H...

Page 122: ...E 2 Bit 0 7 1 fixed backup 50 MODEL NAME Request Function Theexternalcontrolequipmentinquirestheproductcodeoftheplasmamonitor Transmission Data 1FH 80H 60H 17H 00H CKS ACK The plasma monitor returns the following ACK 7FH 60H 80H 17H 0CH DATA00 to DATA11 CKS DATA00 1st character of the product code DATA01 2nd character of the product code DATA11 12th character of the product code NOTE Received data...

Page 123: ...3 YES YES YES YES 5 YES 5 YES 5 YES YES YES 5 YES YES 5 YES 8 YES 8 FULL 16 9 YES YES YES YES YES YES YES YES 3 YES 3 YES YES YES YES YES YES YES YES 4 YES 4 YES 4 YES 4 YES 4 YES YES YES YES YES YES YES YES YES YES YES YES YES YES YES 4 YES YES YES YES YES YES YES YES 4 YES YES 8 YES 8 RGB select 6 STILL STILL WIDE2 WIDE1 STILL STILL STILL STILL STILL WIDE1 WIDE1 WIDE1 WIDE2 WIDE1 WIDE1 MOTION Ap...

Page 124: ...ied monitor adapter D Sub 15 pin to your computer s video port If your computer has a mini D Sub 15 pin connector you may have to use the supplied RGB cable 8 Other screen modes ZOOM and STADIUM are available as well NOTE While the input signals comply with the resolution listed in the table above you may have to adjust the position and size of the picture or the fine picture because of errors in ...

Page 125: ...nside the main unit has become too high and has activated the protector Remedy Leave some space between the display and the connected components Replace both batteries with new ones Plug the monitor s power cord into a power outlet Press the power button on the monitor to turn on the power Replace both batteries with new ones Point the remote control at the monitor s remote control sensor when pre...

Page 126: ...ol OSM Functions Picture Contrast Brightness Sharpness Color Tint Picture mode Color temperature Noise reductions Sound Bass Treble Balance Screen V Position H Position V Height H Width Auto Picture Fine picture Picture adjustment Function OSM OSM adjustment Power management Gray level Cinema mode RGB3 adjustment Long Life PLE Orbiter Inverse White Screen wiper Reset Option Audio input BNC select ...

Page 127: ...emote control OSM Functions Picture Contrast Brightness Sharpness Color Tint Picture mode Color temperature Noise reductions Sound Bass Treble Balance Screen V Position H Position V Height H Width Auto Picture Fine picture Picture adjustment Function OSM OSM adjustment Power management Gray level Cinema mode RGB3 adjustment Long Life PLE Orbiter Inverse White Screen wiper Reset Option Audio input ...

Reviews: