background image

6

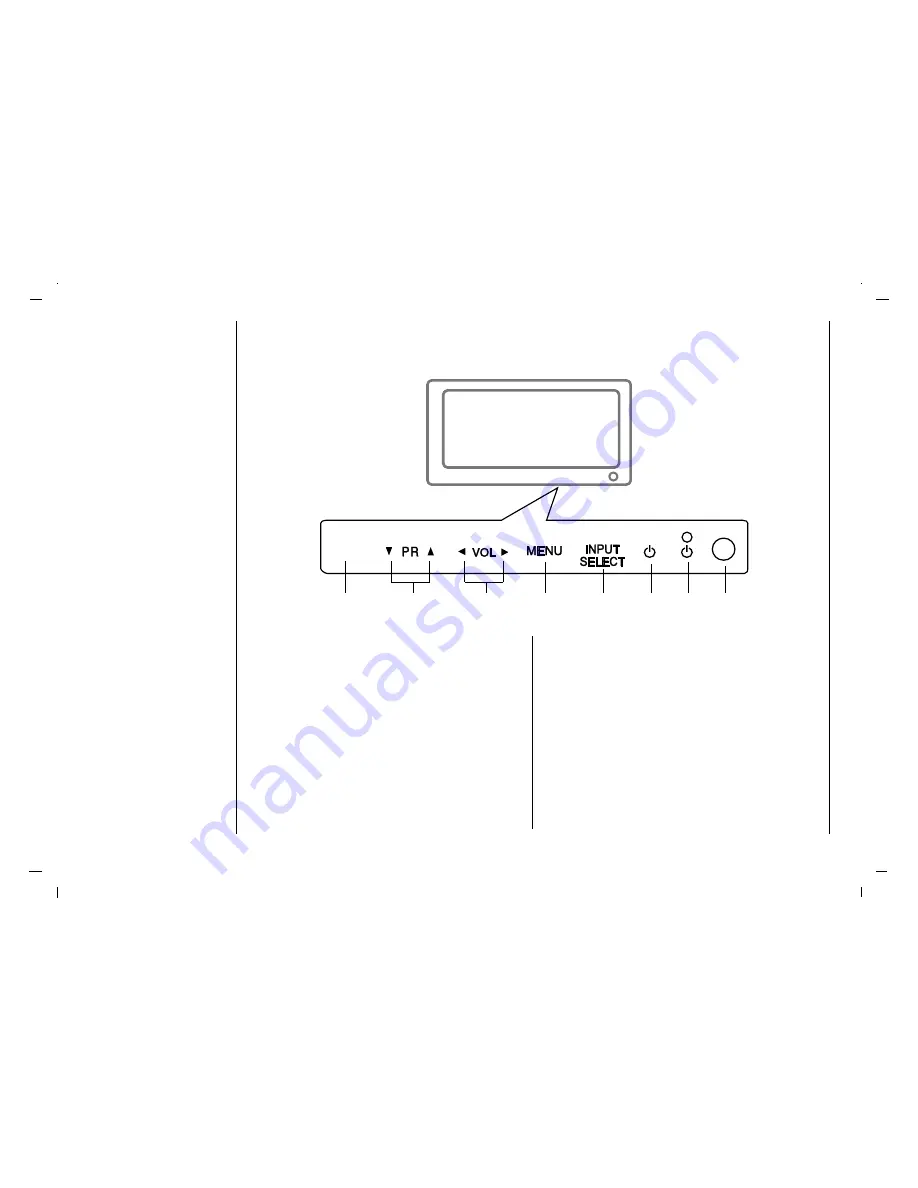
Location and function of controls

Front panel

6

1. MAIN POWER (ON/OFF)

Switches the set On or Off.

2.

E

(Programme Up/Down)

Selects a channel or a menu item.
Switches the set On from standby.

3.

(Volume Down/Up)

Adjusts the volume.
Adjusts menu settings.

4. MENU

Selects a menu.

5. INPUT SELECT

Select DTV, TV, AV1, AV2, S-VIDEO, COMPONENT,
PC-RGB, HDMI mode.

6. POWER (

r

r

)

Switches the set On from standby or On to standby.

7. POWER/STANDBY INDICATOR (

r

r

)

Illuminates red in standby mode.
Illuminates green when the set is switched on.

8. REMOTE CONTROL SENSOR

- Shown is a simplified representation of the set.
- Here shown may be somewhat different from your set.

ON/OFF

1

4

5

6

7

8

2

3

Summary of Contents for NLT-26HD1

Page 1: ...rating your set Retain it for future reference See the label attached on the back cover and quote this information to your dealer when you require service NLT 26HD1 NLT 32HD1 NLT 37HD1 NLT 42HD1 Colour Television Colour Television Owner s Manual ...

Page 2: ...menu options in digital mode only Set password in digital mode only Picture Menu 23 25 CSM Colour Status Memory PSM Picture Status Memory Manual Picture Control Picture Format Sound Menu 26 29 SSM Sound Status Memory Balance AVL Auto Volume Leveler SPDIF Format in digital mode only Stereo Dual NICAM reception Time Menu 30 33 Clock On Off Time Auto sleep Time Zone in digital mode only Daylight Savi...

Page 3: ...t does not operate properly unplug it and call your dealer Aerial Connect the aerial cable to the socket marked 75 Ω on the back cover For the best reception an outdoor aerial should be used Location Position your set so that no bright light or sunlight falls directly onto the screen Care should be taken not to expose the set to any unnecessary vibration moisture dust or heat Also ensure that the ...

Page 4: ...elects a favourite programme In Digital mode only INFO Displays information on top of the screen during watching TV In Digital mode only MUTE Switches the sound on or off SSM Sound Status Memory Recalls your preferred sound setting I II Selects the audio language during dual language broadcast In Digital mode only Selects the sound output INPUT SELECT Select DTV TV AV1 AV2 S VIDEO COMPO NENT PC RG...

Page 5: ...handset over and remove the battery cover 1 1 Put the two batteries into the compartment observing battery polarity 2 2 Replace the cover To avoid damage from possible battery leakage remove the batteries if you do not plan to use the remote control handset for an extended period time Do not use batteries of differing age or type Always discard of batteries safely 3 3 ...

Page 6: ...djusts menu settings 4 MENU Selects a menu 5 INPUT SELECT Select DTV TV AV1 AV2 S VIDEO COMPONENT PC RGB HDMI mode 6 POWER r r Switches the set On from standby or On to standby 7 POWER STANDBY INDICATOR r r Illuminates red in standby mode Illuminates green when the set is switched on 8 REMOTE CONTROL SENSOR Shown is a simplified representation of the set Here shown may be somewhat different from y...

Page 7: ...nnect the audio video out sockets of the VCR to AV sockets of the set 4 S VIDEO INPUT Connect video out from an S VIDEO VCR to the S VIDEO input 5 SERVICE ONLY SOCKET 6 Antenna INPUT 7 Digital Audio OPTICAL Connect digital audio from various types of equipment Note In standby mode these ports will not work HDMI DTV input 8 POWER CORD SOCKET This set operates on an AC power The voltage is indicated...

Page 8: ...ular VCR to the Video input To avoid picture noise interference leave an adequate distance between the VCR and set Use the INPUT SELECT button on the remote control to select AV1 or AV2 If connected to S VIDEO select the S Video external input source Insert a video tape into the VCR and press the PLAY button on the VCR See VCR owner s manual Watching VCR S VIDEO OUT IN R AUDIO L VIDEO 1 1 2 2 Back...

Page 9: ...ect AV1 or AV2 Tune to cable service provided channels using the cable box Cable TV R AUDIO L VIDEO VCR RF Cable TV R AUDIO L VIDEO VCR RF Watching Cable TV 3 3 When connecting the set to an external source match the colours of AUDIO VIDEO input jacks on the set with the output jacks on the audio video equipment Video yellow Audio Left white Audio Right red Use the INPUT SELECT button on the remot...

Page 10: ... and audio inputs to Audio sockets of AUDIO INPUT How to use Turn on the DVD player and insert a DVD Use INPUT SELECT button on the remote control to select Component Refer to the DVD player s manual for operating instructions Watching DVD B R R AUDIO L R AUDIO L S VIDEO 5 5 Back panel of the set Back panel of a DVD player or Component ports of the set Y PB PR Video output ports of DVD player Y Y ...

Page 11: ...elect HDMI Switch on the HDMI and the HDMI screen appears on the set HDMI input signal 480p 60Hz 576p 50Hz 720p 50Hz 720p 60Hz 1080i 50Hz 1080i 60Hz HDMI Interface with HDCP Copy Protection enables all digital rendering of video without the losses This TV SET can receive the High Definition Multimedia Interface HDMI or Input of Digital Visual Interface DVI Connecting HDMI HDMI OUTPUT HDMI OUTPUT R...

Page 12: ...50Hz 1080i 60Hz Connecting PC RGB OUTPUT RGB OUTPUT R R AUDIO L AUDIO L 7 7 Send the set s audio to external audio equipment stereo system via the Digital Audio Output Optical Caution Do not look into the optical output port Looking at the laser beam may damage your vision How to connect Connect one end of an optical cable to the TV Digital Audio Optical Output port Connect the other end of the op...

Page 13: ...mote control handset The set reverts to standby mode Press the main power button again to switch the set off ON GREEN LED Stand by RED LED During stand by to ON condition the LED will be flashing in ORANGE 1 1 On and Off 2 2 Programme selection 3 3 Volume adjustment Press the MENU button and then use D E button to select the SETUP menu Press the G button and then use D E button to select Language ...

Page 14: ...enu Change the setting of an item in the sub or pull down menu with F G or D E You can move to the higher level menu with F button and to move to the lower level menu press the G button Note Menus may vary according to input mode PICTURE OOOKOOMENU CSM PSM Contrast Brightness Colour Sharpness SETUP OOOKOOMENU Language PC Control WXGA VGA Input ARC Audio Mode SOUND OOOKOOMENU SSM Balance AVL SPDIF ...

Page 15: ...the D E button to select Storage From Select the beginning programme number with the F G button on the Storage From pull down menu 2 2 Press the D E button to select Search Press the G button to begin auto programming All receivable stations are stored To stop auto programming press the MENU button When auto programming is completed the Edit menu appears on the screen See the Edit section to edit ...

Page 16: ...ss the G button and then use D E button to select Manual Press the G button to display the Manual menu Press the D E button to select Storage Press the F G button to select the programme number 1 1 2 2 Press the D E button to select System Select a TV system with the F G button on the System pull down menu M NTSC M USA Korea Philippines BG PAL B G SECAM B G Europe East Europe Australia I PAL I U K...

Page 17: ...lect in the opposite direction Select the position by pressing the F G button and then take your choice of the second character and so on Press the OK button In some models BOOSTER is an optional function Only a set with BOOSTER can perform this function If the reception is poor at the fringe area of TV signal select BOOSTER to On Press the D E button to select BOOSTER Press the F G button to sele...

Page 18: ...wice The selected programme is deleted all the following programmes are shifted up one position 2 2 3 3 Deleting a programme Select a programme to be copied with the D E or F G button Press the GREEN button All the following programmes are shifted down one position 4 4 Copying a programme Select a programme to be moved with the D E or F G button Press the YELLOW button Move the programme to the de...

Page 19: ...k the programmes stored in the memory by displaying the programme table Press the LIST button to display the Programme table menu The programme table appears on the screen One programme table contains ten programmes as below You may find some blue programmes They have been set up to be skipped by auto programming or in the programme edit mode Some programmes with the channel number shown in the pr...

Page 20: ... to select Channel list Press the G button to display the Channel list menu Repeatedly press the MENU button to return to normal DTV viewing STATION OOOKOOMENU Auto Manual DTV Info Rating Set Password DTV Info CHANNEL LIST Ch 3 SBS DIGITAL 1 Ch 7 7 Digital Ch 9 SBS HD Ch 11 SBS EPG Ch 12 SBS DIGITAL 2 Ch 15 SBS RADIO1 Ch 7 7 Digital STATION OOOKOOMENU Channel list TV Guide Auto Manual DTV Info Rat...

Page 21: ...OMENU Auto Manual DTV Info Rating Set Password No Block All programs can be watched because there is no age limitation R Above Restricted 18 Programs are blocked for children under the age of 18 AV Above Adult Audience strong violence 15 This program contains the strong violent contents Therefore programs are blocked for children under the age of 15 MA Above Mature Adult Audience 15 Programs are b...

Page 22: ...er the password as requested The TV is set with the initial password 0 0 0 0 Press the G button and then enter a four digit password Enter it again when requested Repeatedly press the MENU button to return to normal DTV viewing STATION OOOKOOMENU New Confirm Auto Manual DTV Info Rating Set Password Set Password Setting up TV stations Set password in digital mode only ...

Page 23: ... to any colour temperature you prefer Press the MENU button and then use D E button to select the PICTURE menu Press the G button and then use D E button to select CSM Press the G button and then use D E button to select User Press the G button and then use D E button to make appropriate adjust ments Repeatedly press the MENU button to return to normal TV viewing PICTURE OOOKOOMENU CSM PSM Contras...

Page 24: ...at the factory and cannot be changed PSM Picture Status Memory 3 3 Manual Picture Control Press the MENU button and then use D E button to select the PICTURE menu Press the G button and then use D E button to select the desired picture option Press the G button and then use F G button to make appropriate adjustments You can adjust picture contrast brightness colour sharpness and tint NTSC input on...

Page 25: ...red picture format 1 Press the ARC button to select a desired picture format 16 9 14 9 ZOOM PANORAMA AUTO are available at TV AV1 AV2 S VIDEO COMPONENT 480i 576i input 16 9 H ZOOM V ZOOM HV ZOOM are available at DTV input 16 9 4 3 are available at COMPONENT 480p 576p 720p 1080i PC RGB HDMI input 4 4 Picture format 16 9 AUTO 14 9 4 3 PANORAMA ZOOM ...

Page 26: ... sound band by pressing the F G button c Make appropriate sound level with the D E button d Press the OK button to store it for the sound User You can also recall a desired sound Flat Music Movie Speech or User with SSM button on the remote control The sound Flat Music Movie and Speech are programmed for good sound reproduction at the factory and cannot be changed SSM Sound Status Memory SOUND OOO...

Page 27: ...l even if you change channels 3 3 AVL Auto Volume Leveler Press the MENU button and then use D E button to select the SOUND menu Press the G button and then use D E button to select the desired sound item Press the G button and then use F G button to make appropriate adjustments Repeatedly press the MENU button to return to normal TV viewing 2 2 Balance SOUND OOOKOOMENU SSM Balance AVL SPDIF Forma...

Page 28: ...utton to select AC 3 or PCM Repeatedly press the MENU button to return to normal DTV viewing SOUND OOOKOOMENU SSM Balance AVL SPDIF Format SOUND OOOKOOMENU AC 3 PCM SSM Balance AVL SPDIF Format SPDIF Format Note a It s available to use AC 3 or PCM in Dolby Digital Audio signal b When it doesn t apply the Dolby Digital Audio signal select the PCM function to output the dolby digital audio by SPDIF ...

Page 29: ...M stereo is received you can select NICAM STEREO or FM MONO If the stereo signal is weak switch to FM mono When NICAM dual is received you can select NICAM DUAL I NICAM DUAL II or NICAM DUAL I II or MONO When FM mono is selected the display MONO appears on the screen Mono sound selection In stereo reception if the stereo signal is weak you can switch to mono by pressing the I II button twice In mo...

Page 30: ...g Manual If current time setting is wrong reset the clock manually Press the MENU button and then D E button to select the TIME menu Press the G button and then D E button to select Clock Press the G button and then D E button to select Manual Press the G button and then D E button to adjust the hour Press the G button and then D E button to adjust the minute Repeatedly press the MENU button to re...

Page 31: ...el and programe number Repeatedly press the MENU button to return to normal TV viewing Note a In the event of power interruption disconnection or power failure the clock must be reset b Two hours after the set is switched on by the on time function it will automatically switch back to standby mode unless a button has been pressed c Once the on or off time is set these functions operate daily at th...

Page 32: ... Manual mode Press the MENU button and then D E button to select the TIME menu Press the G button and then D E button to select Time Zone Press the G button and then D E button to select your viewing area time zone NSW ACT VIC TAS QLD SA WA NT Auto Time Zone Repeatedly press the MENU button to return to normal DTV viewing TIME OOOKOOMENU Clock Off Time On Time Auto Sleep Time Zone D Saving TIME OO...

Page 33: ...e D Saving D Saving 5 5 Daylight Saving in digital mode only You don t have to remember to switch the set off before you go to sleep The sleep timer automatically switches the set to standby after the preset time has elapsed Press the SLEEP button to select the number of minutes The display will appear on the screen followed by 10 20 30 60 90 120 180 and 240 The timer begins to count down from the...

Page 34: ...e Setup menu Press the G button and then D E button to select Audio Mode Press the G button and then D E button to select Main or Sub Repeatedly press the MENU button to return to normal DTV viewing Note Depending on the broadcast the main or sub selection may not be available Audio Mode in digital mode only SETUP OOOKOOMENU Main Sub Language PC Control WXGA VGA Input ARC Audio Mode Audio Mode 1 1...

Page 35: ... shown the interactive programme guide Press the INFO button to twice The TV Guide appears on screen Press the INFO or MENU button to exit TV Guide In Digital mode only Ch 77 PG Seven Network 7 Guide NOW 18 00 18 30 SEVEN NEWS JENNIFER KEYTE presents to day s news with ROB GELL updating the weather Sport is with TIM WATSON Ws NOW 18 30 19 40 HEARTBEAT Three farm children are left orphaned leaving ...

Page 36: ...This function lets you select your favourite programmes add and delete directly Press the LIST button to display the Channel list menu Select a programme to be add delete with the D E button Press the FAV ADD DEL button The check mark will appear on the screen FAV ADD DEL In Digital mode only CHANNEL LIST Ch 3 SBS DIGITAL 1 Ch 7 7 Digital Ch 9 SBS HD Ch 11 SBS EPG Ch 12 SBS DIGITAL 2 Ch 15 SBS RAD...

Page 37: ...age will disappear for a few seconds while the Auto configuration is in progress Reset This function allows you to return to the good picture reproduction programmed at the factory and cannot be changed Note Some signal from some graphics boards may not function properly If the results are unsatisfactory adjust your monitor s position clock and phase manually Press the OK button to store it for th...

Page 38: ...ource will show a smaller inset image Off PIP DW2 POP DW1 Press the MENU button and then D E button to select the PIP menu Press the G button and then D E button to select Audio Input Press the G button and then D E button to select Main or Sub Repeatedly press the MENU button to return to normal TV viewing Note When main picture and sub picture are selected at the same input the sub picture selec...

Page 39: ...PIP PR button The selected programme number is displayed just below the programme number of main picture Programme selection for sub picture This function enables you to search all the stored stations on 4 or 16 sub pictures and see your favorite station by exchanging the main and sub pictures When main picture is TV pressing SCAN will give POP 16 When main picture is other inputs pressing SCAN wi...

Page 40: ...used to select the preced ing or following page Programming a colour button in LIST mode If the TV is in SIMPLE text TOP text or FASTEXT mode press the button to switch to LIST mode Four teletext page numbers of your choice can be colour coded and easily selected by pressing the corresponding coloured button on the remote control handset 1 Press a coloured button 2 Using the NUMBER buttons select ...

Page 41: ...ture on the screen while waiting for the new teletext page The display will appear at the top left hand corner of the screen When the updated page is available then display will change to the page num ber Press this button to view the updated teletext page HOLD Stops the automatic page change which will occur if a tele text page consists of 2 or more sub pages The number of sub pages and the sub p...

Page 42: ...n the screen e When the PC screen appears on the set a message may appear on the screen and the message will differ according to the Window system version Win98 2000 If a message appears click Next until the message finishes f If the message Out Of Range appears on the screen adjust the PC as in the Displayable Monitor Specification section RGB Mode DVI Mode Synchronization input form separate Res...

Page 43: ...ground Horizontal noise Signal Cable message appears The mains plug plugged in and switched on Is the TV switched on Try another channel weak signal Check aerial plugged into TV Check aerial broken lead Check aerial Check for local interference Adjust contrast Adjust brightness Adjust colour Adjust volume Check the batteries in remote control Check Audio Video sockets VCR only Auto configure or ad...

Page 44: ...41 26 wide TFT LCD panel WXGA 1366 X 768 140W Below 3W 75 Ω 15W 15W 100 240v 2 5A 1 5A 50 60Hz 18Kg 20Kg HDMI IN 1 PC IN 1 S VIDEO IN 1 AV IN 2 COMPONENT IN 1 ANTENNA IN 1 SERVICE IN 1 PC AUDIO IN 1 SPDIF OUT 1 Horizontal size 818 8 mm Height 457 508 6 mm Thickness 102 3 138 5 mm Note a Although LCD panel uses highly precise technology it may display blank pixels dark spots or lightning on the scr...

Page 45: ...output External IN OUT ports AC Power Net Weight Gross Weight PAL BG I DK SECAM BG DK NTSC M VHF 0 11 UHF 28 69 Cable S1 S41 32 wide TFT LCD panel WXGA 1366 X 768 160W Below 3W 75 Ω 15W 15W 100 240v 2 5A 1 5A 50 60Hz 19Kg 23Kg HDMI IN 1 PC IN 1 S VIDEO IN 1 AV IN 2 COMPONENT IN 1 ANTENNA IN 1 SERVICE IN 1 PC AUDIO IN 1 SPDIF OUT 1 Horizontal size 950 mm Height 515 569 9 mm Thickness 104 169 mm ...

Page 46: ...tput External IN OUT ports AC Power Net Weight Gross Weight PAL BG I DK SECAM BG DK NTSC M VHF 0 11 UHF 28 69 Cable S1 S41 37 wide TFT LCD panel WXGA 1366 X 768 200W Below 3W 75 Ω 15W 15W 100 240v 2 5A 1 5A 50 60Hz 37Kg 42Kg HDMI IN 1 PC IN 1 S VIDEO IN 1 AV IN 2 COMPONENT IN 1 ANTENNA IN 1 SERVICE IN 1 PC AUDIO IN 1 SPDIF OUT 1 Horizontal size 1094 mm Height 604 662 5 mm Thickness 130 235 mm ...

Page 47: ...dio output External IN OUT ports AC Power Net Weight Gross Weight PAL BG I DK SECAM BG DK NTSC M VHF 0 11 UHF 28 69 Cable S1 S41 42 wide TFT LCD panel WXGA 1366 X 768 240W Below 3W 75 Ω 15W 15W 100 240v 2 5A 1 5A 50 60Hz 39Kg 50Kg HDMI IN 1 PC IN 1 S VIDEO IN 1 AV IN 2 COMPONENT IN 1 ANTENNA IN 1 SERVICE IN 1 PC AUDIO IN 1 SPDIF OUT 1 Horizontal size 1242 mm Height 680 739 mm Thickness 119 235 mm ...

Page 48: ...Note 48 ...

Page 49: ...Note 49 EN ...

Page 50: ...Note 50 ...

Page 51: ...120 Parry Street Newcastle West 2302 131 632 Victoria Melbourne Unit 1 6 Garden Road Clayton 3168 131 632 Queensland Brisbane Unit 4 305 Montague Road West End 4101 131 632 Southport Shop 1 48 Ferry Road Southport 4215 131 632 South Australia Adelaide 84A Richmond Rd Keswick 5053 131 632 Western Australia Perth 45 Sarich Court Osborne Park 6017 131 632 For Service in outer areas please contact you...

Page 52: ...P NO MAN06GDP018 a GPN06MA013B NEC ...

Reviews: