background image

English

English-13

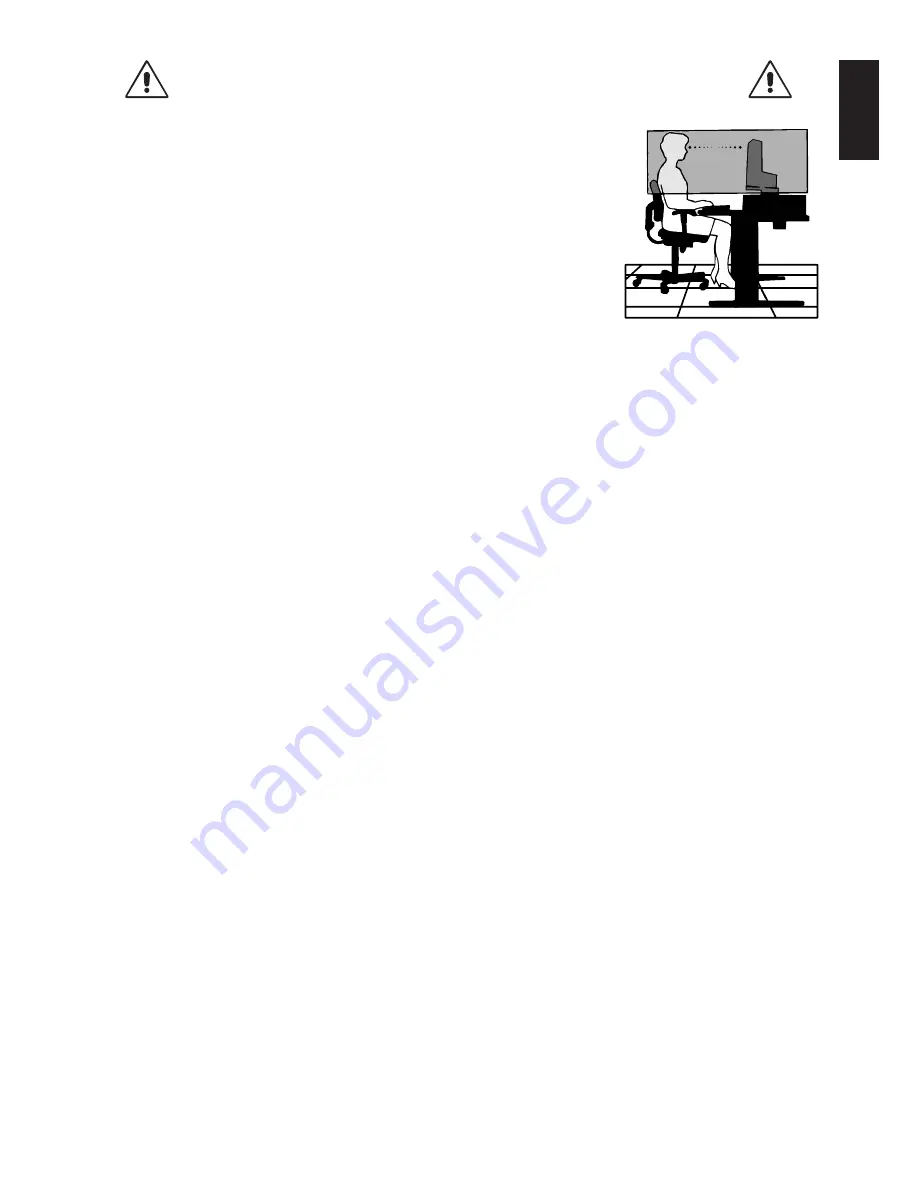
CORRECT PLACEMENT AND ADJUSTMENT OF THE MONITOR CAN

REDUCE EYE, SHOULDER AND NECK FATIGUE. CHECK THE

FOLLOWING WHEN YOU POSITION THE MONITOR:

For optimum performance, allow 20 minutes for warm-up.

Adjust the monitor height so that the top of the screen is at or slightly below eye level.
Your eyes should look slightly downward when viewing the middle of the screen.

Position your monitor no closer than 40 cm and no further away than 70 cm from your
eyes. The optimal distance is 50 cm.

Rest your eyes periodically by focusing on an object at least 20 feet away. Blink often.

Position the monitor at a 90° angle to windows and other light sources to minimize glare
and reflections. Adjust the monitor tilt so that ceiling lights do not reflect on your screen.

If reflected light makes it hard for you to see your screen, use an anti-glare filter.

Clean the LCD monitor surface with a lint-free, non-abrasive cloth. Avoid using any
cleaning solution or glass cleaner!

Adjust the monitor’s brightness and contrast controls to enhance readability.

Use a document holder placed close to the screen.

Position whatever you are looking at most of the time (the screen or reference material) directly in front of you to minimize
turning your head while you are typing.

Avoid displaying fixed patterns on the monitor for long periods of time to avoid image persistence (after-image effects).

Get regular eye checkups.

Ergonomics

To realize the maximum ergonomics benefits, we recommend the following:

Adjust the Brightness until the background raster disappears.

Do not position the Contrast control to its maximum setting.

Use the preset Size and Position controls with standard signals.

Use the preset Colour Setting.

Use non-interlaced signals with a vertical refresh rate more than 60 Hz.

Do not use primary colour blue on a dark background, as it is difficult to see and may produce eye fatigue to insufficient
contrast.

Cleaning the LCD Panel

When the liquid crystal panel is stained with dust or dirt, please wipe with soft cloth gently.

Please do not rub the LCD panel with hard material.

Please do not apply pressure to the LCD surface.

Please do not use OA cleaner it will cause deterioration or discolor on the LCD surface.

Cleaning the Cabinet

Unplug the power supply

Gently wipe the cabinet with a soft cloth

To clean the cabinet, dampen the cloth with a neutral detergent and water, wipe the cabinet and follow with a dry cloth.

NOTE:

Many plastics are used on the surface of the cabinet. DO NOT clean with benzene, thinner, alkaline detergent,
alcoholic system detergent, glass cleaner, wax, polish cleaner, soap powder, or insecticide. Do not touch rubber or
vinyl to the cabinet for a long time. These types of fluids and fabrics can cause the paint to deteriorate, crack or
peel.

Summary of Contents for MultiSync LCD1990FX

Page 1: ...MultiSync LCD1990FX User s Manual...

Page 2: ...ion of Conformity English 2 Contents English 3 Quick Start English 4 Controls English 8 Recommended use English 12 Specifications English 14 Features English 15 Troubleshooting English 16 Appendix Eng...

Page 3: ...and complies with the safety standard of your particular country TO PREVENT FIRE OR SHOCK HAZARDS DO NOT EXPOSE THIS UNIT TO RAIN OR MOISTURE ALSO DO NOT USE THIS UNIT S POLARIZED PLUG WITH AN EXTENSI...

Page 4: ...ur in a particular installation If this equipment does cause harmful interference to radio or television reception which can be determined by turning the equipment off and on the user is encouraged to...

Page 5: ...VI D cable User s Manual CD ROM Cable Cover Screw x 4 to mount the monitor to a flexible arm page 7 Power Cord Continental User s Manual DVI D to DVI D cable Cable Cover CD ROM 15 pin mini D SUB male...

Page 6: ...to the highest position Figure C 1 4 Connect all cables to the appropriate connectors Figure C 1 NOTE Incorrect cable connections may result in irregular operation damage display quality components of...

Page 7: ...nlet must be turned on Turn on the monitor with the front power button Figure E 1 and the computer NOTE The Vacation Switch is a true on off switch If this switch is on the OFF position the monitor ca...

Page 8: ...raise the screen place hands on each side of the monitor and lift up to the highest position Figure RL 1 To rotate screen place hands on each side of the monitor screen and turn clockwise from Landsca...

Page 9: ...ns on how Remove Monitor Stand for Mounting to remove the stand 2 Using the 4 screws from the stand removal and attach the arm to the monitor Figure F 1 Caution Use ONLY the screws 4 pcs that are incl...

Page 10: ...ake adjustments to various settings resulting in a more comfortable viewing experience Do not cover this sensor Turns the monitor on and off Indicates that the power is on Can be changed between blue...

Page 11: ...n within the display area of the LCD H SIZE V SIZE Analog input only Adjusts the horizontal size by increasing or decreasing this setting If the AUTO Adjust function do not give you a satisfactory pic...

Page 12: ...itches the video source input port to the new found video source automatically The monitor will not look for other video signals while the current video source is present NONE The Monitor will not sea...

Page 13: ...rols can be adjusted while in the lock out mode OSM LOCK OUT with BRIGHTNESS only control To activate the OSM Lock Out function press SELECT then Down and Left buttons and hold down simultaneously To...

Page 14: ...outlet and refer servicing to qualified service personnel under the following conditions When the power supply cord or plug is damaged If liquid has been spilled or objects have fallen into the monito...

Page 15: ...ixed patterns on the monitor for long periods of time to avoid image persistence after image effects Get regular eye checkups Ergonomics To realize the maximum ergonomics benefits we recommend the fol...

Page 16: ...n at 60 Hz for 1280 x 1024 at 60 Hz to 75 Hz optimal display performance Active Landscape Horiz 376 mm 14 8 inches Display Area Vert 301 mm 11 9 inches Portrait Horiz 301 mm 11 9 inches Vert 376 mm 14...

Page 17: ...ust all elements of your screen image via simple to use on screen menus ErgoDesign Features Enhance human ergonomics to improve the working environment protect the health of the user and save money Ex...

Page 18: ...hen not in use Message OUT OF RANGE is displayed screen is either blank or shows rough images only Image is displayed only roughly pixels are missing and OSM warning OUT OF RANGE is displayed Either s...

Page 19: ...nitor with your BRIGHTNESS setting NOTE Do not cover environmental brightness sensor Ambibright sensor Black Level Allows you to manually adjust the black level Press Left or Right to adjust Tag2 Auto...

Page 20: ...IPM Intelligent Power The Intelligent Power Manager allows the monitor to enter into a power saving mode after Manager a period of inactivity The IPM has two settings STANDARD Monitor enters power sa...

Page 21: ...h BRIGHTNESS only control To activate the OSM Lock Out function press SELECT then Down and Left buttons and hold down simultaneously To deactivate the OSM Lock Out press SELECT then Down and Left butt...

Page 22: ...Figure 2 2 Set the DARK level This is the level of brightness that the monitor will go down to when the ambient light level is low Make sure the room is at its darkest when setting this level Then us...

Page 23: ...rgy Energy saving mode after a certain time beneficial both for the user and the environment Electrical safety Emissions Electromagnetic fields Noise emissions Ecology The product must be prepared for...

Page 24: ...gnal is sent to the monitor the Energy Saving mode is activated The monitor enters a single Energy Saving mode Mode Power consumption LED colour Normal Operation Approx 40W Green or Blue Energy Saving...

Reviews: