background image

English

English-5

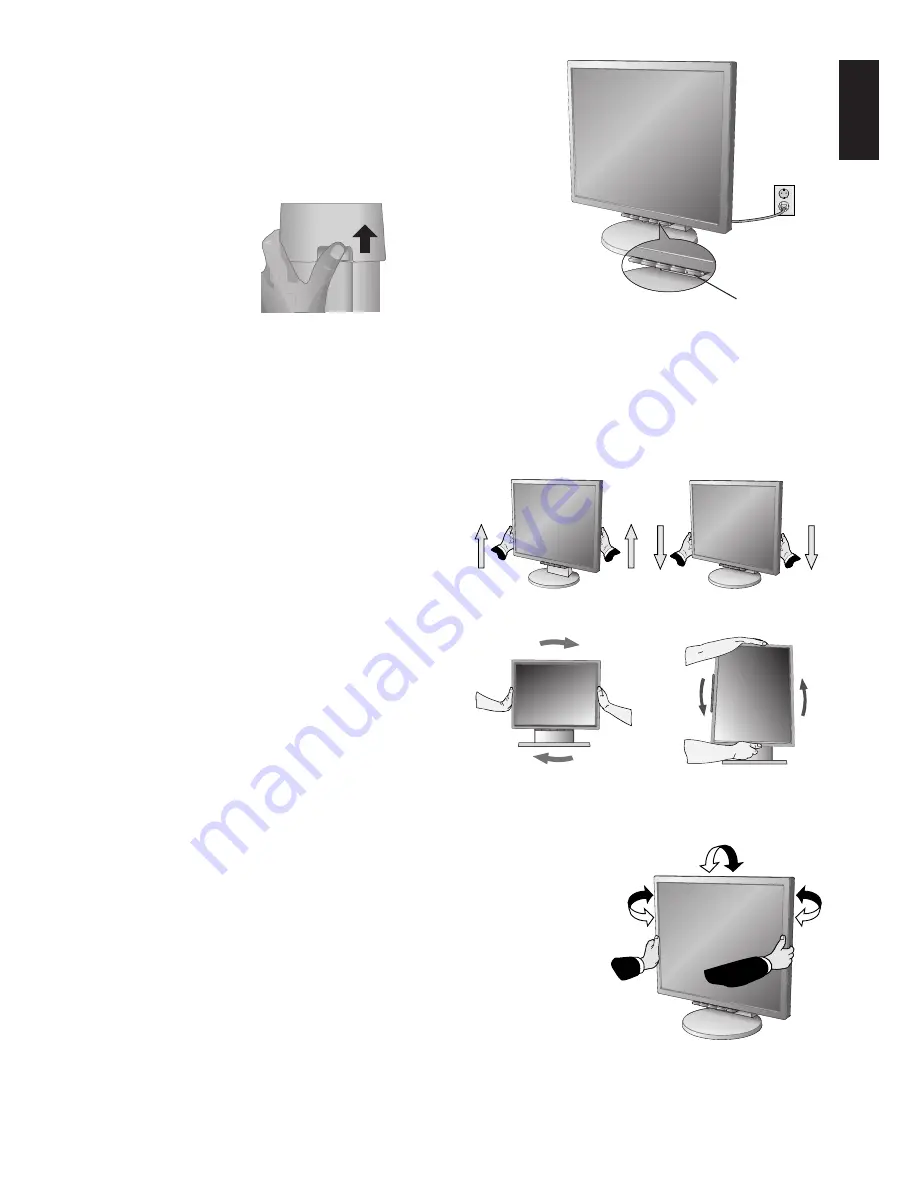
10. Connect the power cord to the power outlet (

Figure E.1

).

NOTE:

If you have difficulty removing the cable cover, please push the
lower opening upward to remove it, as show in 

Figure E.2

.

NOTE:

Please refer to 

Caution

 section of this manual for proper selection

of AC power cord.

11. Turn on the monitor with the front power button and the computer

(

Figure E.1

).

Figure E.1

Figure E.2

12. No-touch Auto Adjust automatically adjusts the monitor to optimal settings upon initial setup for most timings.

For further adjustments, use the following OSD controls:

• Auto Adjust Contrast

• Auto Adjust

Refer to the 

Controls 

section of this User’s Manual for a full description of these OSD controls.

NOTE:

If you have any problem, please refer to the 

Troubleshooting

 section of this User’s Manual.

Figure RL.1

Raise and Lower Monitor Screen

The monitor may be raised or lowered. To raise or lower
screen, place hands on each side of the monitor and lift or
lower to the desired height (

Figure RL.1

).

NOTE:

Handle with care when raising or lowering the
monitor screen.

Screen Pivot

Before rotating, the screen must be raised to the highest level
to avoid accidentally damaging the screen and to avoid
pinching fingers. With one hand, grip the top of the display by
the handle using the other hand to grip the bottom. Lift up to
the highest position (

Figure RL.1

).

To rotate the screen, place hands on each side of the monitor
screen and turn clockwise from Landscape to Portrait or
counter-clockwise from Portrait to Landscape (

Figure R.1

).

NOTE:

Disconnect cables before rotating the screen.
Re-connect cables when screen is in desired position.

Power Button

Tilt and Swivel

Grasp both sides of the monitor screen with your hands and adjust the tilt and swivel
as desired (

Figure TS.1

).

NOTE:

Handle with care when tilting and swivelling the monitor screen.

Figure R.1

Figure TS.1

Summary of Contents for MultiSync LCD195NX

Page 1: ...MultiSync LCD195NX User s Manual ...

Page 2: ... STAR emblem does not represent EPA endorsement of any product or service ErgoDesign is a registered trademark of NEC Display Solutions Ltd in Austria Benelux Denmark France Germany Italy Norway Spain Sweden U K IBM PC XT AT PS 2 MCGA VGA 8514 A and XGA are registered trademarks of International Business Machines Corporation Apple and Macintosh are registered trademarks of Apple Inc Microsoft and ...

Page 3: ...ause harmful interference to radio communications However there is no guarantee that interference will not occur in a particular installation If this equipment does cause harmful interference to radio or television reception which can be determined by turning the equipment off and on the user is encouraged to try to correct the interference by one or more of the following measures Reorient or relo...

Page 4: ... D SUB signal cable to the MultiSync Macintosh cable adapter Figure A 3 Tighten all screws NOTE Some Macintosh systems do not require a Macintosh cable adapter User s Manual CD ROM Power Cord 15 pin mini D SUB male to 15 pin mini D SUB male DVI D to DVI D MultiSync LCD monitor Cable management cover Figure A 1 Figure A 3 Macintosh Cable Adapter not included Figure A 2 Remember to save your origina...

Page 5: ...ific hooks indicated in Figure C 2 7 Place the DVI cable and D Sub cable into the specific hooks indicated in Figure C 2 Highest Stand Position 30 Tilt DVI Cable Power Cord Insert Top First Figure C 1 Figure C 2 8 Make sure all cables are resting flat against the stand Figure C 3 Figure D 1 Figure D 2 DVI Cable Flat Figure C 3 9 Hold the all cables firmly and place the cable cover onto the stand F...

Page 6: ... Screen The monitor may be raised or lowered To raise or lower screen place hands on each side of the monitor and lift or lower to the desired height Figure RL 1 NOTE Handle with care when raising or lowering the monitor screen Screen Pivot Before rotating the screen must be raised to the highest level to avoid accidentally damaging the screen and to avoid pinching fingers With one hand grip the t...

Page 7: ... all cables 3 Place monitor face down on a non abrasive surface Figure S 2 NOTE Handle with care when monitor facing down for avoiding the damage to the front buttons 4 Remove the 2 screws connecting the stand to the monitor Figure S 2 Figure S 2 Figure S 3 5 Remove the stand having three hooks toward direction Figure S 3 The monitor is now ready for mounting in an alternate manner 6 Connect the c...

Page 8: ...attach the arm to the monitor Figure F 1 NOTE The LCD monitor should only be used with an approved arm e g GS mark To meet the safety requirements the monitor must be mounted to an arm which guaranties the necessary stability under consideration of the weight of the monitor Thickness of Bracket Arm 2 0 3 2 mm Weight of LCD assembly 5 0 kg MAX 100 mm 100 mm Figure F 1 4 Screws 4M Max Depth 8 mm 12 ...

Page 9: ...just by using or Press or Example Tool Press SELECT key Press SELECT key Showing OSD Shortcut to Bright adjust window Button At No OSD showing Shortcut to Volume adjust window Input signal select At OSD showing Icon selection stage Go to Adjustment stage Cursor goes to left Cursor goes to right At OSD showing Adjustment stage Go to Icon selection stage Adjust value decrease or Cursor for adjust go...

Page 10: ... presets 9300 7500 sRGB USER NATIVE select the desired colour setting The sRGB and NATIVE colour presets are standard and cannot be changed COLOUR RED Increase or decreases Red The change will appear on screen COLOUR GREEN Increase or decreases Green The change will appear on screen COLOUR BLUE Increase or decreases Blue The change will appear on screen TOOL Selecting TOOL allows you to get into t...

Page 11: ...tor MONITOR INFO Indicates the model and serial numbers of your monitor OSD Warning OSD Warning menus disappear with SELECT button NO SIGNAL This function gives a warning when there is no signal present After power is turned on or when there is a change of input signal or video is inactive the No Signal window will appear RESOLUTION NOTIFIER This function gives a warning of use with optimized reso...

Page 12: ...ature humid dusty or oily areas Do not cover vent on monitor Immediately unplug your monitor from the wall outlet and refer servicing to qualified service personnel under the following conditions When the power supply cord or plug is damaged If liquid has been spilled or objects have fallen into the monitor If the monitor has been exposed to rain or water If the monitor has been dropped or the cab...

Page 13: ... patterns on the monitor for long periods of time to avoid image persistence after image effects Get regular eye checkups Ergonomics To realize the maximum ergonomics benefits we recommend the following Use the preset Size and Position controls with standard signals Use the preset Colour Setting Use non interlaced signals with a vertical refresh rate between 60 75 Hz Do not use primary colour blue...

Page 14: ... Hz for 1280 x 1024 60 Hz to 75 Hz optimal display performance Active Display Area LANDSCAPE Horizontal 376 3mm Vertical 301 1mm PORTRAIT Horizontal 301 1mm Vertical 376 3mm Power Supply 100 240 V 50 60 Hz Speakers Practical Audio Output 1 1 W Power Consumption 40 W Dimensions Landscape 405 5 mm W x 385 5 495 5 mm H x 210 0 mm D with stand 405 5 mm W x 345 5 mm H x 66 5 mm D without stand Portrait...

Page 15: ...compliance with MPRII and TCO guidelines for lower emissions Plug and Play The Microsoft solution with the Windows operating system facilitates setup and installation by allowing the monitor to send its capabilities such as screen size and resolutions supported directly to your computer automatically optimizing display performance IPM Intelligent Power Manager System Provides innovative power savi...

Page 16: ...erase the image As with all personal display devices NEC DISPLAY SOLUTIONS recommends displaying moving images and using a moving screen saver at regular intervals whenever the screen is idle or turning off the monitor when not in use Image is unstable unfocused or swimming is apparent Signal cable should be completely attached to the computer Use the OSD Image Adjust controls to focus and adjust ...

Page 17: ... Energy saving mode after a certain time beneficial both for the user and the environment Electrical safety Emissions Electromagnetic fields Noise emissions Ecology The product must be prepared for recycling and the manufacturer must have a certified environmental management system such as EMAS or ISO 14 001 Restrictions on chlorinated and brominated flame retardants and polymers heavy metals such...

Page 18: ...ope http www nec display com in Japan or http www necdisplay com in USA Energy Saving This monitor features an advanced energy saving capability When a VESA Display Power Management Signalling DPMS Standard signal is sent to the monitor the Energy Saving mode is activated The monitor enters a single Energy Saving mode Mode Power consumption LED colour Normal Operation Approx 40W Green Energy Savin...

Reviews: