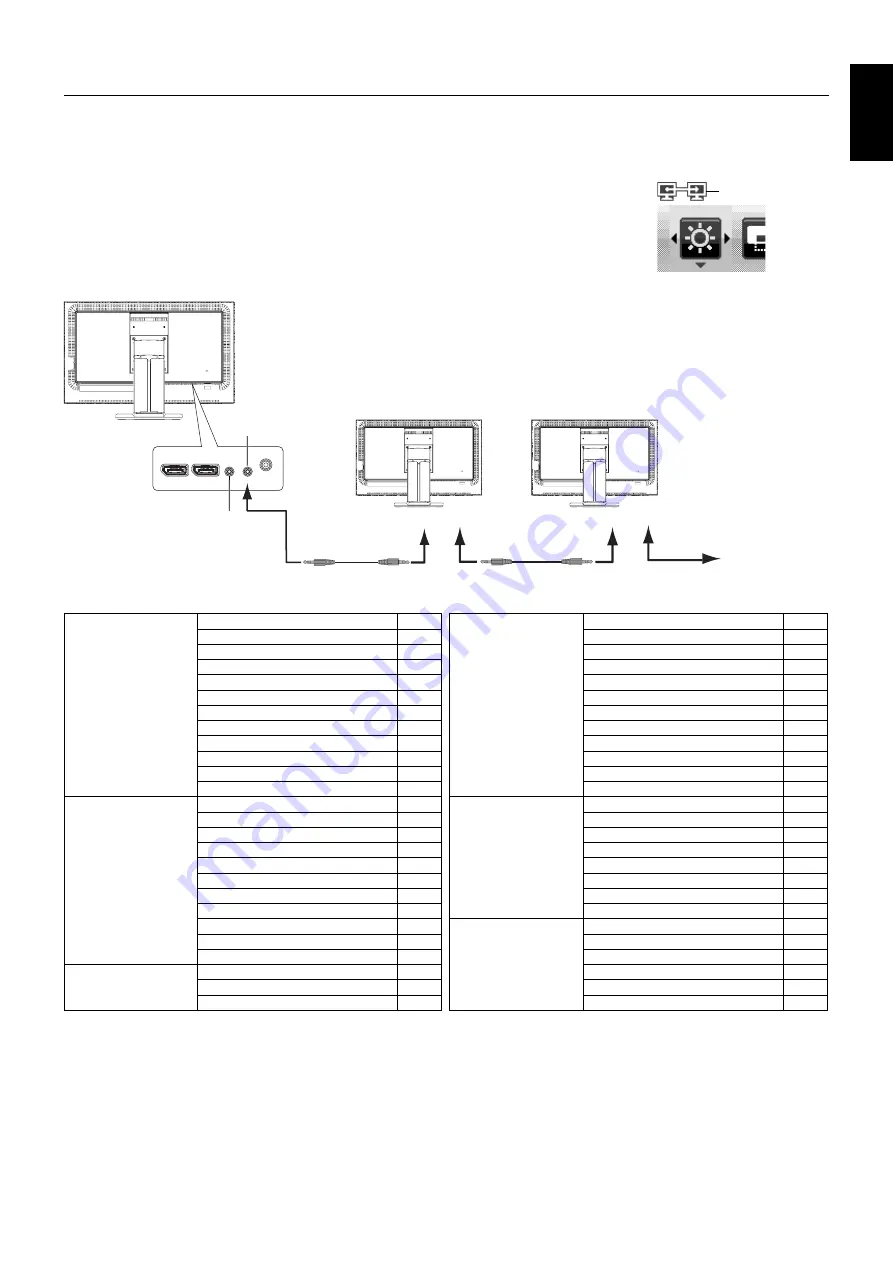
background image

English-29

English

ControlSync

1. Connect the master monitor with a sub monitor via a ControlSync cable (ø 2.5) into ControlSync IN/OUT. 
2. Follow the steps of DATA COPY. When the setting of the master monitor is adjusted, it will be copied and sent to the  


  connected sub monitor(s) automatically.
3. Up to 5 sub monitors can be daisy-chained via ControlSync.

NOTE:


Connect the master monitor via ControlSync OUT connector.
The ControlSync icon will appear on the TOP-LEFT of the OSD menu in the sub monitor.
Do not connect IN-IN or OUT-OUT.
Do not make “loop” connection.
Once the monitors are connected, turn the master monitor’s power button off and on 
to check if ControlSync operates correctly.

IN (Gray)

Next monitor

OUT (Black)

IN

OUT

IN

OUT

ControlSync cable

ControlSync cable

Up to 5 sub monitors

(Gray)

(Black)

(Gray)

(Black)

Sub Monitor 1

Sub Monitor 2

Master Monitor

The following settings can be controlled by ControlSync:

ECO TOOLS

BRIGHTNESS*

Yes

CONTRAST

No

ECO MODE

Yes

AUTO BRIGHTNESS

Yes

BLACK LEVEL

No

OFF MODE SETTING

Yes

OFF MODE SENSOR SETTING

Yes

OFF MODE START TIME

Yes

HUMAN SENSING

Yes

HUMAN SENSOR SETTING

Yes

HUMAN SENSOR START TIME

Yes

DV MODE

Yes

SCREEN

LEFT/RIGHT

No

DOWN/UP

No

H.RESOLUTION

No

V.RESOLUTION

No

VIDEO LEVEL

No

OVER SCAN

No

EXPANSION

Yes

RESPONSE IMPROVE

No

UNIFORMITY

No

SHARPNESS

No

UHD UPSCALING

No

COLOR

PICTURE MODE

No

WHITE

No

ADJUST

No

TOOLS

VOLUME

Yes

SOUND INPUT

No

VIDEO DETECT

No

MULTI PICTURE

No

PICTURE PATTERN

No

ACTIVE PICTURE

No

OFF TIMER

Yes

POWER SAVE TIMER

No

LED BRIGHTNESS

Yes

DDC/CI

Yes

USB POWER

No

FACTORY PRESET

No

MENU TOOLS

LANGUAGE

Yes

OSD TURN OFF

Yes

OSD LOCK OUT

Yes

HOT KEY

Yes

SIGNAL INFORMATION

Yes

SENSOR INFORMATION

Yes

KEY GUIDE

Yes

CUSTOMIZE SETTING

No

ECO INFORMATION

CARBON SAVINGS

No

CARBON USAGE

No

COST SAVINGS

No

CARBON CONVERT SETTING

Yes

CURRENCY SETTING

Yes

CURRENCY CONVERT SETTING

Yes

Other settings:
 

Power Control (DC switch)


Ambient Light Sensor


Human Sensor Result

 Audio 

Mute

NOTE:


Only the master monitor’s human sensor and ambient light sensor are active. Please do not cover these sensors.
Turn the monitor’s power off before connecting/disconnecting the ControlSync cable.
Do not use the ControlSync connectors for any purpose other than specifi ed.

* This value is not a directly adjusted output value. This is adjusted relatively.

ControlSync icon

Summary of Contents for MultiSync EA244UHD-BK

Page 1: ...Desktop Monitor MultiSync EA244UHD User s Manual...

Page 2: ...ish 19 Specifications English 20 Features English 21 Troubleshooting English 22 Using Multi Picture Function English 24 Using the Zoom Function English 26 Using the Auto Brightness function English 28...

Page 3: ...power outlet being used NOTE This product can only be serviced in the country where it was purchased Windows is a registered trademark of Microsoft Corporation NEC is a registered trademark of NEC Cor...

Page 4: ...e user is encouraged to try to correct the interference by one or more of the following measures Reorient or relocate the receiving antenna Increase the separation between the equipment and receiver C...

Page 5: ...our monitor from the wall outlet and move to a safe location then refer servicing to qualified service personnel under the following conditions If the monitor is used in this condition the monitor may...

Page 6: ...s To realize the maximum ergonomics benefits we recommend the following To avoid eye fatigue adjust the brightness to a moderate setting Place a sheet of white paper next to the LCD screen for luminan...

Page 7: ...SB Cable 2 ControlSync Cable Remember to save your original box and packing material to transport or ship the monitor 1 The type and number of power cords included will depend on the where the LCD mon...

Page 8: ...go 2 When removing the DisplayPort cable hold down the top button to release the lock 3 Place hands on each side of the monitor to tilt the LCD panel 30 degree angle and lift up to the highest positio...

Page 9: ...Cable 2 Audio Cable 2 3 ControlSync Cables USB Cables Power Cord DisplayPort Cable HDMI Cable 2 DVI Cable 2 Audio Cable 2 3 ControlSync Cables USB Cables 2 Cable not included 3 3 5 stereo mini plug 7...

Page 10: ...be raised to the highest level and tilt to avoid knocking the screen on the desk or pinching your fingers To raise the screen place a hand on each side of the monitor and lift up to the highest positi...

Page 11: ...to the highest position 3 Place monitor face down on a non abrasive surface Figure S 1 NOTE Handle with care when the monitor is facing down 4 Remove 2 bottom screws first Move stand left and right to...

Page 12: ...pproved arm e g TUEV GS mark NOTE Tighten all screws recommended Fasten Force 98 137N cm Figure F 1 Weight of LCD assembly 5 0 kg 100 mm 100 mm Thickness of Bracket Arm 2 0 3 2 mm Additional VESA Hole...

Page 13: ...the OSD sub menu Exits OSD menu 6 LEFT RIGHT Navigates to the left or right through the OSD menu You can adjust the BRIGHTNESS directly while the OSD menu is off 1 7 UP DOWN Navigates up or down throu...

Page 14: ...e white display area The environmental brightness sensor ambient light sensor has no function 3 AMBIENT CONTENT Automatically adjusts the brightness to the optimal setting based on the white display a...

Page 15: ...nes best suited for movies GAMING Setting that boosts whole tones best suited for games that use vivid colorful images PHOTO Setting that optimizes contrast best suited for still images DYNAMIC Settin...

Page 16: ...If ON is selected low resolution image will be improved by complementing the missing pixels Color PICTURE MODE Change the Picture mode that is most suitable for the type of content that is shown You c...

Page 17: ...en Outputs the audio signal of the left screen s video signal The adjustable screen is shown like below in SOUND INPUT 2 split screen LEFT RIGHT 3 split screen LEFT CENTER RIGHT LEFT TOP RIGHT BOTTOM...

Page 18: ...lease see the Using Multi Picture function see page 24 OFF TIMER Monitor will automatically power down when you have selected a pre determined amount of time Before powering off a message will appear...

Page 19: ...wn key adjusts the volume level OFF The HOT KEY function for Left Right and Up Down functions are disabled SIGNAL INFORMATION If you select ON monitor displays VIDEO INPUT MENU after changing the inpu...

Page 20: ...RIGHT key in Current setting item 4 Select CURRENCY CONVERT SETTING by touching the UP or DOWN key 5 Adjust CURRENCY CONVERT SETTING by touching the LEFT or RIGHT key This initial Euro setting is Germ...

Page 21: ...ard color space used for the Internet Windows operating systems and digital cameras Recommended setting for general color management Adobe RGB Provides a standard color space used in high end graphics...

Page 22: ...n Revision 3 0 Upstream 1 USB 3 0 Downstream 3 Maximum 0 9 A per port for USB 3 0 USB Upstream port applicable to USB monitor control AUDIO AUDIO Input STEREO Mini Jack DisplayPort Connector HDMI Conn...

Page 23: ...tandard Mounting Interface Allows users to connect your MultiSync monitor to any VESA standard third party mounting arm or bracket sRGB Color Control A new optimized color management standard which al...

Page 24: ...one hour to erase the image NOTE As with all personal display devices NEC DISPLAY SOLUTIONS recommends using a moving screen saver at regular intervals whenever the screen is idle or turning off the m...

Page 25: ...ightness based on the environment When the brightness of surrounding environment changes the monitor will also change USB Hub does not operate Check to make sure the USB cable is properly connected Re...

Page 26: ...VIDEO LEVEL OVER SCAN PROGRAMMABLE VOLUME SOUND INPUT VIDEO DETECT MULTI PICTURE PICTURE PATTERN ACTIVE PICTURE RESPONSE IMPROVE OFF TIMER POWER SAVE TIMER LED BRIGHTNESS DDC CI USB POWER LANGUAGE OSD...

Page 27: ...uch SELECT 5 Set the input signal shown on the key guide The adjustable screen is shown on the top of key guide Then set other settings for the screen NOTE If the OSD menu may disappear touch MENU to...

Page 28: ...a H RESOLUTION or V RESOLUTION see page 13 Vertical expansion Horizontal expansion 3 The image position can be moved from the center to left or right by selecting LEFT RIGHT and upward or downward by...

Page 29: ...split images use the following procedures to reduce the black area and enlarge the split images 1 In case A a priority image is set to be on the right side The size of the black area can be reduced b...

Page 30: ...Figure 2 Figure 1 Figure 2 2 Set the DARK level This is the level of brightness that the monitor will go down to when the ambient lighting level is low Make sure the room is at its darkest when setti...

Page 31: ...ME Yes HUMAN SENSING Yes HUMAN SENSOR SETTING Yes HUMAN SENSOR START TIME Yes DV MODE Yes SCREEN LEFT RIGHT No DOWN UP No H RESOLUTION No V RESOLUTION No VIDEO LEVEL No OVER SCAN No EXPANSION Yes RESP...

Page 32: ...1 Default is DP1 2 2 DP1 2 2 DisplayPort 1 2 setting with 3840 x 2160 60 Hz Maximum resolution DP1 2 1 DisplayPort 1 2 setting with 3840 x 2160 30 Hz Maximum resolution DP1 1 DisplayPort 1 1 setting w...

Page 33: ...the number of different plastics used Product Lifetime Product Take Back Minimum one year product warranty Minimum three year availability of spare parts Product take back Packaging Limits on hazardo...

Page 34: ...nergy Saving mode Mode Power consumption LED colour Maximum Operation 108 W Blue Normal Operation at TCO testing 62 W Default setting USB Audio sleeping Blue Energy Saving Mode 0 33 W Amber Off Mode 0...

Reviews: