background image

E-45

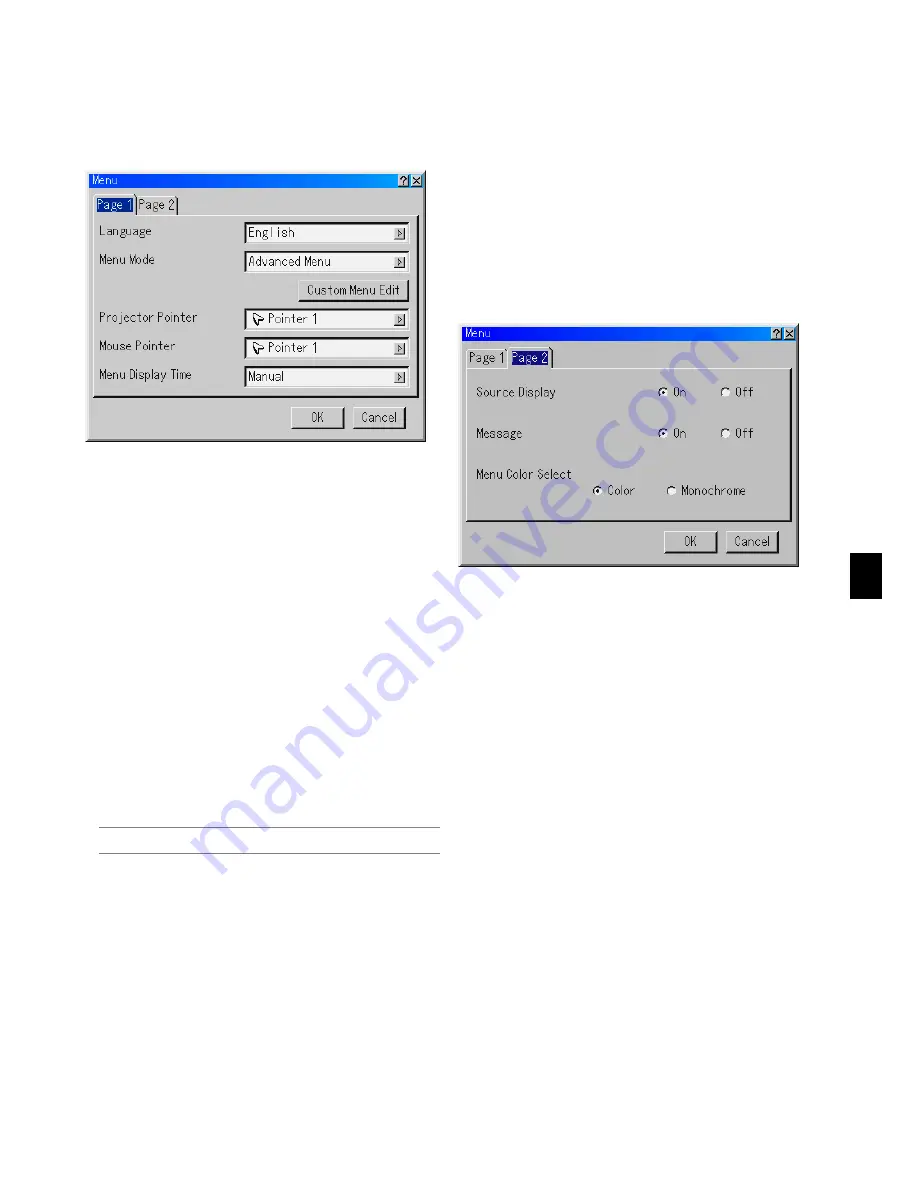
Menu

Allows you to set preferences for the on-screen menu. Press "OK" to
save your changes for all the features of Page 1 and Page 2.

[Page1]

Selecting Menu Language [Language]:

You can choose one of seven languages for on-screen instructions.
The options are: English, German, French, Italian, Spanish, Swedish
and Japanese.

Selecting Menu Mode [Menu Mode]:

This feature allows you to select 3 menu modes: Advanced Menu,
Custom Menu and Basic Menu.

Advanced Menu ............ This is the menu that contains all the avail-

able menus and commands.

Basic Menu ................... This is the basic menu that contains mini-

mum essentials of menus and commands.

Custom Menu ............... This is the menu that you can customize us-

ing the Custom Menu Edit to fit your needs.

Customizing the Menu:

See page E-34 for instructions about how to customize the Menu.

Selecting Projecting Pointer Icon [Projector Pointer]:

This enables you to select from nine different Pointer icons for the
"Pointer" button on your remote control.
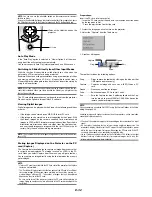
After moving your Pointer icon to the area you want on the screen,
press the Magnify button on the remote control to enlarge the se-
lected area on the screen. See page E-27 for more details.

NOTE: 

There may be cases where the Pointer function is not available (ex. a

non-interlace signal at 15kHz such as video game.)

Selecting a Mouse Pointer Icon [Mouse Pointer]:

This option enables you to select one of nine different mouse point-
ers when using a USB mouse.

Selecting Menu Display Time:

This option allows you to select how long the projector waits after the
last touch of a button to turn off the menu.
The preset choices are "Manual", "Auto 5 sec", "Auto 15 sec", and
"Auto 45 sec". The "Auto 45 sec" is the factory preset.

Manual ........... The menu can be turned off manually.

Auto 5 sec ...... The menu will automatically be turned off in 5 sec-

onds if no buttons are pressed within 5 seconds.

Auto 15 sec .... The menu will automatically be turned off in 15 sec-

onds if no buttons are pressed within 15 seconds.

Auto 45 sec .... The menu will automatically be turned off in 45 sec-

onds if no buttons are pressed within 45 seconds.

[Page 2]

Turning On / Off Source Display [Source Display]:

This option turns on or off input name display such as RGB1/2, Video,
and No Input to be displayed in the top right corner of the screen.

Turning On / Off Message [Message]:

This option turns on and off messages for lamp life warning, 3-minute
before power off time, “Please clean filter” and “Please wait a moment”.

Selecting Menu Color [Menu Color Select]:

You can choose between two color modes for menu color: color and
monochrome.

Summary of Contents for MT1075/MT1065

Page 1: ...Portable Projector MT1075 MT1065 User s Manual English Deutsch Fran ais Italiano Espa ol Svenska...

Page 2: ...adio communications However there is no guar antee that interference will not occur in a particular installa tion If this equipment does cause harmful interference to radio or television reception whi...

Page 3: ...for consecutive days From the Advanced menu select Projector Options Setup Page 4 High Speed Fan Mode 4 Do not unplug the power cable from the wall outlet under any one of the following circumstances...

Page 4: ...Descriptions Functions E 39 Source Select E 39 RGB Video S Video DVI DIGITAL Viewer LAN Entry List Picture E 40 Sound E 40 Image Options E 40 Selecting Aspect Ratio E 40 Masking Unwanted Area Blanking...

Page 5: ...terial With the built in image sensor the projector adjusts the colors for screen sizes between 40 and 150 diagonally Variable audio out control via projector The built in Viewer allows you to start y...

Page 6: ...and plug the other end into an active wall outlet See page E 17 Main Power Switch When you plug the supplied power cable into an active wall outlet and turn on the Main Power switch the POWER indicat...

Page 7: ...lay the Source List Each time this button is pressed for a minimum of ONE second the input source will change as follows RGB1 RGB2 Video S Video DVI DIGITAL Viewer RGB1 If no input signal is present t...

Page 8: ...EO IN Connector Mini DIN 4 Pin Here is where you connect the S Video input from an external source like a VCR NOTE S Video provides more vivid color and higher resolution than the tra ditional composi...

Page 9: ...nimum of 2 seconds the drag mode is set When you are in the Projector mode which is indicated by lighting the PJ button Use this button to enter your menu selection It works the same way as the ENTER...

Page 10: ...ify ing icon When the pointer is not displayed the image is magnified about the center of the screen See page E 27 25 ZOOM Button Zoom the lens in and out 26 FOCUS Button Adjust the lens focus 27 SLID...

Page 11: ...tteries Do not place the batteries upside down Do not use new and old batteries together or use different types of batteries together Operating Range for Wireless Remote Control 7m 22 feet 7m 22 feet...

Page 12: ...ust first z Set up a screen and the projector x Connect your computer or video equip ment to the projector See page E 14 17 c Connect the supplied power cable See page E 17 NOTE Ensure that the power...

Page 13: ...Wide Tele inch 15 18 24 36 40 43 48 50 54 60 72 90 108 120 126 144 157 162 180 210 240 270 300 Screen Size B C Wide Tele Diagonal Width Height inch 39 6 35 1 47 8 47 4 64 4 72 1 97 6 80 7 109 2 86 9...

Page 14: ...m 196 long The DVI DIGITAL connector accepts VGA 640x480 SVGA 800x600 1152x864 XGA 1024x768 and SXGA 1280x1024 up to 60Hz PHONE PHONE DVI IN RGB 2 IN RGB 1 IN Connecting Your PC or Macintosh Computer...

Page 15: ...s and DVD players It is also referred to as Euro connector NOTE The ADP SC1 SCART adapter is obtainable from your NEC dealer in Eu rope Contact your NEC dealer in Europe for more information To RGB IN...

Page 16: ...RCA female 3 cable to connect your DVD player to the RGB IN1 or IN2 connector on the projector Component video RCA 3 cable not supplied For a DVD player without component video Y Cb Cr output use com...

Page 17: ...audio equipment if your VCR or laser disc player has this capability Be careful to keep your right and left channel connections correct for stereo sound 3 Turn on the projector and the VCR or laser d...

Page 18: ...Italian Spanish Swedish and Japa nese To select a menu language follow these steps 1 Use the SELECT or button to select one of the seven languages for the menu MENU E NTER CANCE L SELECT MENU E NTER C...

Page 19: ...RGB1 RGB2 Video S Video DVI Digital Viewer If no input signal is present the input will be skipped When the input source you wish to project is displayed release the button Press the ENTER button Adj...

Page 20: ...or off Focus and Wall Color Correction See page E 49 NOTE Just pressing quickly the AUTO ADJUST button on the cabinet or AUTO ADJ button on the remote control will enable the Auto Adjust feature inste...

Page 21: ...ENTER button Screen The confirmation screen is displayed On the Cornerstone adjustment screen select Exit and then OK or press the CANCEL but ton on the remote control 8 Use the SELECT button to selec...

Page 22: ...stment Aspect Ratio and Screen may not be available Should this happen first reset the 3D Reform data and then do each setting Second repeat the 3D Reform adjustment Changing Aspect Ratio and or Scree...

Page 23: ...binet or the POWER OFF button on the remote control for a minimum of two seconds The power indicator will glow or ange After the projector turns off the cooling fans keep operating for 90 seconds Cool...

Page 24: ...he Computer mode the PJ button is not lit Not lit Works as a mouse for your computer Works as a right click button for your computer Works as the SELECT button on the projector Lit red Works as the CA...

Page 25: ...cting an image 2 Press the 3D REFORM button The 3D Reform Cornerstone screen is displayed Projected area 3 Press and hold the AUTO ADJUST button for a minimum of 2 sec onds A guide pattern that shows...

Page 26: ...Focus See page E 49 Wall Color Correction See page E 49 3D Reform Clear a check mark from the check box to disable the Auto 3D Reform Adjustment Inside Corrects so that an image is projected inside o...

Page 27: ...pointer POINTER Press the Pointer button to display the pointer Use the Select button to move the pointer SELECT Use the Select button to move the pointer Enlarging and Moving a Picture You can enlar...

Page 28: ...e middle button on your mouse With the middle button you can use a scroll bar when it is available or click the middle button to display or hide the Chalkboard toolbar USB MOUSE HUB Using the USB HUB...

Page 29: ...to display the eraser pal ette containing four eraser of different thickness from which you can select an eraser you prefer by left clicking Clear Left click to clear the drawing completely from the C...

Page 30: ...ty software for computer Dynamic Image Utility 2 0 operable on Windows 98 Me XP 2000 Slides can be created by capturing the currently displayed im age Control screen for displaying lists of slides and...

Page 31: ...o resume playing from the selected slide or folder when Auto Play is selected Jump Displays a list of slides while you are playing back Select Displays a list of folders while you are playing back Dri...

Page 32: ...PEG in the PC card When you select Capture from the menu you will get a tool bar You can capture an image directly using the tool bar when the menu is not displayed NOTE Unless a PC card is inserted i...

Page 33: ...You can also sort files by file name or date or display the file Although a list of all the files in the PC card is displayed you can view files in idx text HTML JPEG and BMP format only Selecting BMP...

Page 34: ...s the ENTER button again to clear the check box If you select an item with a solid triangle and press the ENTER button on the remote control or the projector cabinet you can enable all the items withi...

Page 35: ...m High RGB Component Advanced Menu Source Select Picture Sound Image Options Picture Management Projector Options Tools Help Factory Default RGB1 RGB2 Video S Video DVI DIGITAL Viewer LAN more Aspect...

Page 36: ...Desktop Front Ceiling Rear Desktop Rear Ceiling Front Blue Black Logo Last RGB1 RGB2 Off Caption1 4 Text1 4 Page 3 Signal Select RGB1 RGB2 Video S Video RGB Component RGB Component Scart RGB Component...

Page 37: ...Off On Off Inside Outside Lower Medium Higher Screen Type 4 3 16 9 Position LAN Mode IP Address Automatic Manual Projector Name DNS Configuration Domain Name IP Address Subnet Mask Gateway Lamp Mode...

Page 38: ...icates settings or the direction of adjustment OK button Press to confirm your setting You will return to the previous menu Menu Elements Title bar Highlight Check box Drag Tab Help Button Close Butto...

Page 39: ...when you press the MENU button A press of the MENU button displays the toolbar a press of the MENU button again displays the Menu and hereafter each press of the MENU button switches displaying betwe...

Page 40: ...nt of copyrights which are protected by copyright law NOTE During 3D Reform adjustment Aspect Ratio may not be available Should this happen first reset the 3D Reform data and then do setting again Sec...

Page 41: ...ile you are displaying an image with higher resolution than the projector s native resolution Resolution is not available Selecting Overscan Percentage Select overscan percentage 0 5 10 and 25 for sig...

Page 42: ...Press the SELECT button to adjust the horizontal keystone 2 Press the SELECT button to select Vertical 3 Press the SELECT button to adjust the vertical keystone 4 After completing press the ENTER butt...

Page 43: ...the projector There are two ways for color correction Automatic and Manual Automatic correction affects all colors Manual correction allows you to correct each color R G B and W respectively Off Disab...

Page 44: ...plete correcting White the Exit Adjustment screen is displayed 10 Highlight the Correction Level bar and then use the SELECT or button to finely adjust 11 Highlight OK and press the ENTER button NOTE...

Page 45: ...y be cases where the Pointer function is not available ex a non interlace signal at 15kHz such as video game Selecting a Mouse Pointer Icon Mouse Pointer This option enables you to select one of nine...

Page 46: ...to select the presentation from a PC card Auto Play If this option is checked when the Viewer source is selected on the projector any given slide will start to play automatically Auto Play Interval Y...

Page 47: ...a confirmation dialog for turning off the projector will appear or not NOTE When the confirmation message is displayed you must be in the Pro jector mode to operate your projector using the remote co...

Page 48: ...e remote control and the PC Control functions When the cabinet buttons are disabled pressing and holding the CANCEL button for about 10 seconds will change the setting to enabled Selecting Lamp Mode a...

Page 49: ...ng video with an aspect ratio selected When some aspect ratios are selected in Image Options the image is displayed with black borders on the top and bottom You can adjust the vertical position betwee...

Page 50: ...to the previously set routing information however when the transfer location has not been found as a result of the search the data will be sent to the device that holds the IP address set here The IP...

Page 51: ...Network Type Test Mail is available only when there is a LAN card in the PC card slot of the projector Alert Mail Checking this box enables Alert Mail feature This option notifies your computer of an...

Page 52: ...d screen and press the ENTER button The Confirm Password screen will be displayed 2 Type the same password again Highlight OK on the Enter the Pass word screen and press the ENTER button Your password...

Page 53: ...and use the soft ware keyboard to enter a keyword NOTE To use a PC card as a protect key you must also set up a keyword Please make a note of your keyword This completes registration of your PC card T...

Page 54: ...ease Code your Se curity will be disabled NOTE Some types of PC cards cannot be registered as your protect key It is recommended that you register two or more PC cards in case you lose or damage your...

Page 55: ...the pieces of glass may cause injury If this happens contact your NEC dealer for lamp replacement To replace the lamp NOTE The optional lamp comes with a flat head screwdriver 1 Remove the lamp cover...

Page 56: ...filter cover with a vacuum cleaner Do not attempt to operate the projector without the filter cover To clean the air filter Vacuum the filter through the filter cover Catch To reset the filter usage t...

Page 57: ...5 sec OFF 7 cycles 0 5 sec ON 0 5 sec OFF Normal Lamp cover error or lamp housing error Temperature error Power error Fan error Lamp error Fails to read lamp data Re firing the lamp Control key locke...

Page 58: ...ith the projector If the screen goes blank while using your remote control it may be the result of the computer s screen saver or power management software If you accidentally hit the POWER button on...

Page 59: ...appen deactivate the notebook PC s LCD screen when the projector display is in use Each notebook PC has a different way of deactivate reactivate the local LCD screens as described in the previous step...

Page 60: ...nes SECAM 350 TV lines RGB 1024 dots H 768 dots V External Control RS232 IR USB LAN optional Sync Compatibility Separate Sync Composite Sync Sync on G Built in Speakers 5W 2 stereo Power Requirement 1...

Page 61: ...YCbCr 800 TV lines RGB 1024 dots H 768 dots V External Control RS232 IR USB LAN optional Sync Compatibility Separate Sync Composite Sync Sync on G Built in Speakers 5W 2 stereo Power Requirement 100 1...

Page 62: ...6 Red Ground Cr Ground 7 Green Ground Y Ground 8 Blue Ground Cb Ground 9 No Connection 10 Sync Signal Ground 11 SCART Sync 12 Bi directional DATA SDA 13 Horizontal Sync or Composite Sync 14 Vertical S...

Page 63: ...900 71 736 76 05 VESA 1280 960 60 60 VESA 1280 1024 63 981 60 02 MAC 1280 1024 69 89 65 2 HP 1280 1024 78 125 72 01 SUN 1280 1024 81 13 76 11 VESA 1280 1024 79 976 75 03 VESA 1280 1024 91 146 85 02 S...

Page 64: ...7H PICTURE MUTE ON 02H 10H 00H 00H 00H 12H PICTURE MUTE OFF 02H 11H 00H 00H 00H 13H SOUND MUTE ON 02H 12H 00H 00H 00H 14H SOUND MUTE OFF 02H 13H 00H 00H 00H 15H ON SCREEN MUTE ON 02H 14H 00H 00H 00H 1...

Page 65: ...ess of the projector has been set in the HOSTS file of the computer being used Example 1 When the host name of the projector has been set to pj nec co jp http pj nec co jp index html is specified for...

Page 66: ...el name serial number and name of the store of purchase are not indicated on the warranty or have been altered 2 Problems or damage caused by dropping or shocks during ship ment or movement by the cus...

Page 67: ...ems Integration Malaysia Sdn Bhd Address Ground Floor Menara TA One 22 Jalan P Ramlee 50250 Kuala Lumpur Malaysia Telephone 6 03 2164 1199 Fax Line 6 03 2160 3900 Email Address necare nsm nec co jp WE...

Page 68: ...I also confirm following information is correct Regards Application Sheet for TravelCare Service Program Date P 1 Country product purchased User s Company Name User s Company Address Phone No Fax No U...

Page 69: ...ion 1 Accidents transportation neglect misuse abuse water dust smoke or default of or by the Customer its employees or agents or any third party 2 Failure or fluctuation of electrical power electrical...

Reviews: