E – 35
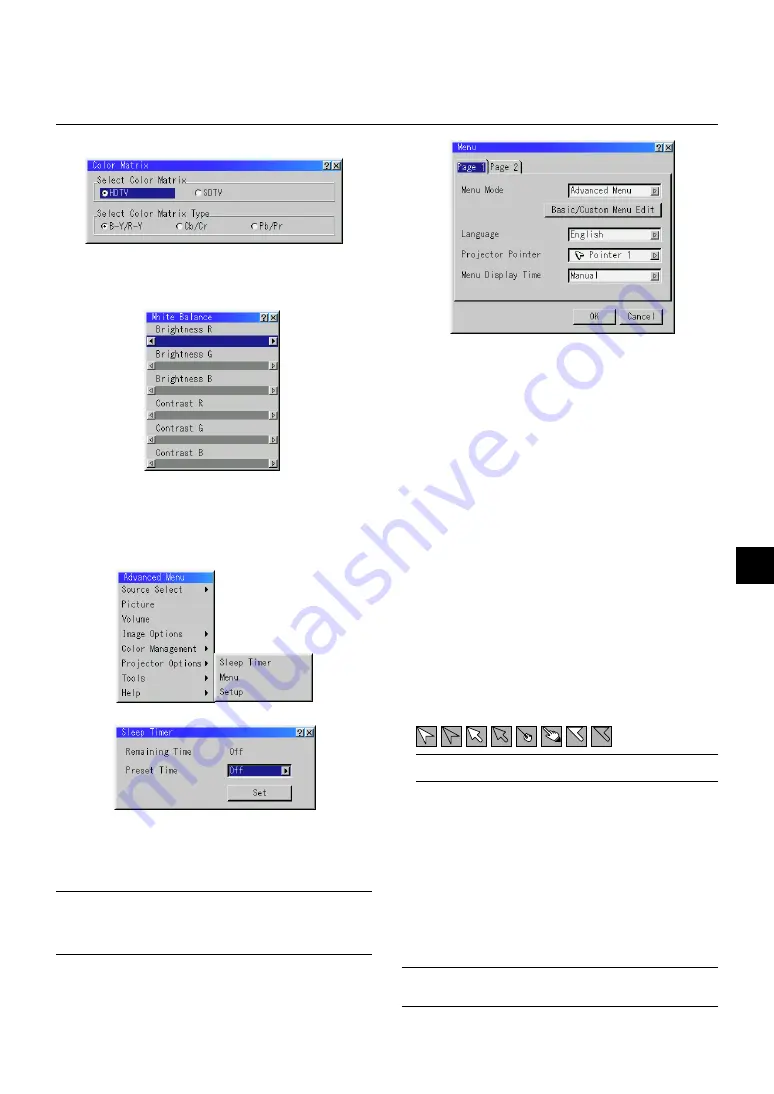
Allows you to set preferences for the on-screen menu.
Press “OK” to save your changes for all the features of Page 1 and Page 2.
[Page 1]
Menu Mode:
This feature allows you to select two menu modes: Advanced Menu
and Basic/Custom Menu.
Advanced Menu .......... This is the menu that contains all the available menus
and commands.
Basic/Custom Menu .... This is the menu that you can customize using the
Basic/Custom Menu Edit to fit your needs.
The factory default Basic/Custom menu includes:
Source Select (RGB1/2, Video, S-Video and PC Card Viewer), Pic-
ture, Volume, Image Options (Keystone), Projector Options (Menu
and Setup), Tools (Capture, PC Card Files and ChalkBoad) and
Help (Contents and Information). See page E-28 for instructions
about how to customize the Basic/Custom Menu.
Language:
You can choose one of seven languages for on-screen instructions.
The options are: English, German, French, Italian, Spanish, Swed-
ish and Japanese.
Projector Pointer:
This enables you to select from eight different Pointer icons for the
“Pointer” button on your remote control.
After moving your Pointer icon to the area you want on the screen,
press the Magnify button on the remote control to enlarge the se-
lected area on the screen. See page E-27 for more details.
Menu
Projector Options
NOTE:
There may be cases where the Pointer function is not available (ex. a
non-interlace signal at 15kHz such as video game.)
Menu Display Time :
This option allows you to select how long the projector waits after
the last touch of a button to turn off the menu.
The preset choices are “Manual”, “Auto 5 sec”, “Auto 15 sec”, and
“Auto 45 sec”. The “Auto 45 sec” is the factory preset.
Manual ......... The menu can be turned off manually.
Auto 5 sec .... The menu will automatically be turned off in 5 seconds if no
buttons are pressed within 5 seconds.
Auto 15 sec .. The menu will automatically be turned off in 15 seconds if no
buttons are pressed within 15 seconds.
Auto 45 sec .. The menu will automatically be turned off in 45 seconds if no
buttons are pressed within 45 seconds.
NOTE:
If no buttons on the remote control are pressed within 10 seconds, the PJ
button’s light goes out to indicate that you are in the Computer mode. To enable
the projector menu operation again, press the PJ button again to light red.
Color Matrix
First select an appropriate color matrix to fit your component signal for
HDTV or SDTV. Then select an appropriate matrix type from B-Y/R-Y,
Cb/Cr or Pb/Pr.
Sleep Timer
1. Select your desired time between 30 minutes and 2 hours in 30
minute increments.
2. Select Set and press the ENTER button on the remote control.
3. The remaining time starts counting down.
4. The projector will turn off after the countdown is complete.
NOTE:
• To cancel the preset time, set “Off” for the preset time or turn off the power.
• When the remaining time reaches 3 minutes before the projector is turned
off, the “Projector will turn off in 3 minutes” message will be displayed on
the bottom of the screen.
White Balance
This allows you to adjust the white balance. Brightness for each color
(RGB) is used to adjust the black level of the screen;
Contrast for each color (RGB) to adjust the white level of the screen.
First use the
▲
or
▼
buttons to select R, G, or B for the brightness and
the contrast. Next use the
or
buttons to adjust the level.


