background image

5

• Memory card
• Memory card cover
• Wireless remote control
• AA batteries x 2
• Wireless remote control extension

cable

• Double sided tape

 (for Wireless remote

control extension cable)

Contents

• Video signal cable 

(DVI-D-DVI-D)

• Audio cable
• USB cable extension
• Bracket x 2
• Power Cord
• AC adapter 

(DXW1225N-S0068Z)

• Set up guide
• CD-ROM 

(User’s Manual & software)

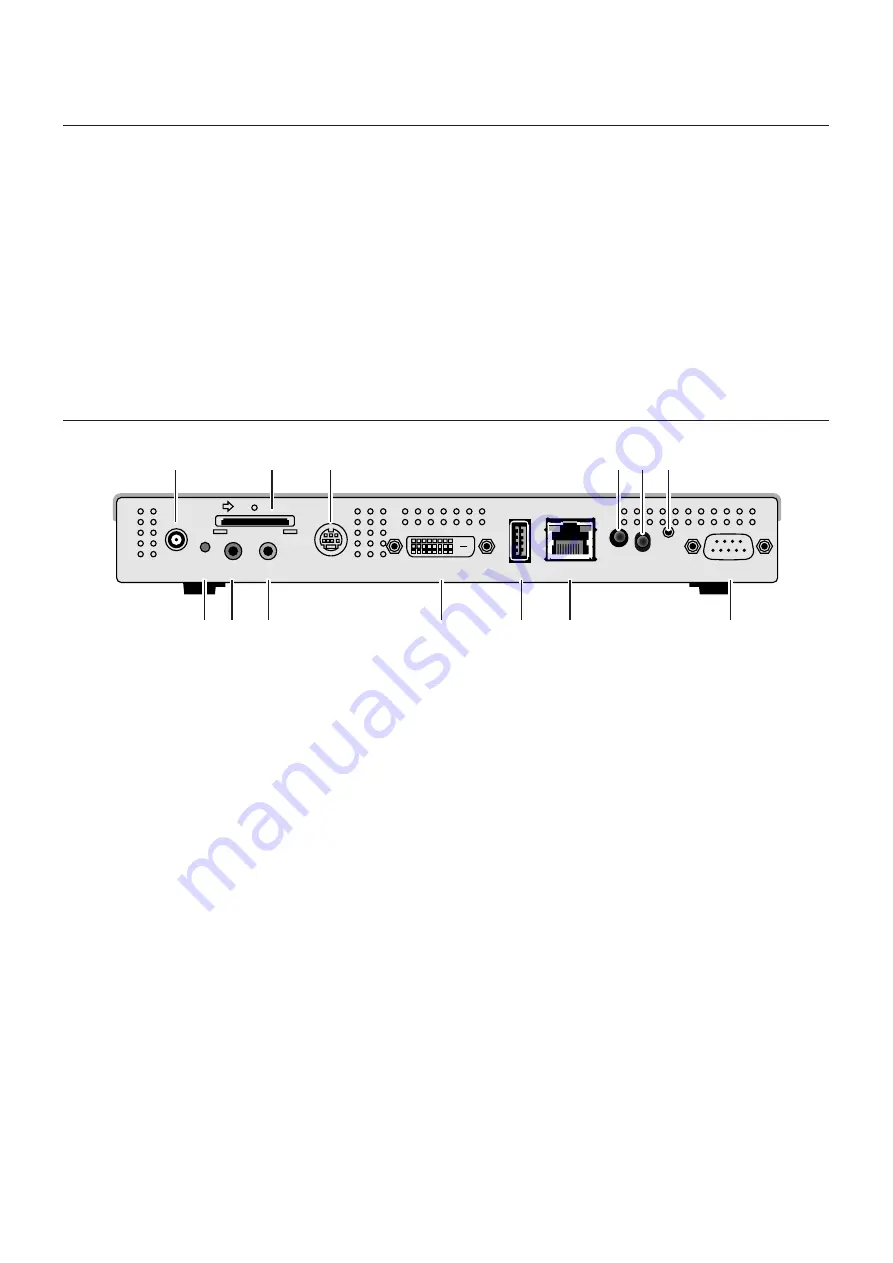
Terminal panel

SD

POWER

RESET

VIDEO IN

DVI

USB

LAN

RS232

AUDIO

IN

AUDIO

OUT

1

2

3

4 5 6

#

@

!

0

9

8

7

1

DC IN connector

Connect the enclosed AC adapter.

2

Memory card connector

Set the enclosed memory card.

3

S-VIDEO IN connector

Connect with video devices, such as DVD players, and movies from
video devices can be placed with messages and still images.

Use an S video cable (available in stores).

4

Power Indicator

Power button ON: Green light turns on
Power button OFF: Green light flashes then red light turns on

5

Remote control sensor

This is the light receiving part of the signal from the wireless
remote control.

6

Wireless remote control extension connector

In cases such as when the remote control sensor is hidden behind
the liquid crystal display, connect the enclosed wireless remote
control extension cable.

Secure the light receiving end of the wireless remote control
extension cable in a position from which remote control operation
is possible using the enclosed double-faced adhesive tape.

7

Reset button

The main body is reset. Even if the reset button is pressed, the data in
the memory card will not be erased.

8

AUDIO IN

When using the S-VIDEO IN connector, this is connected to
the audio output from a video device.

9

AUDIO OUT

This is connected to the AUDIO IN of the liquid crystal display.

0

DVI OUT

This is connected to the DVI input connector of the liquid
crystal display.

!

USB memory connector

This is used when distributing program data via USB memory
or when updating internal firmware.

If it is difficult to use the connector for USB memory due to
the location installed, use the enclosed USB cable extension.

@

LAN connector

This is connected to the LAN cable when distributing program
data via LAN.

#

External connector

Terminal used for maintenance.

Cannot be used.

Summary of Contents for MP-01

Page 1: ...authoring software and distributed via LAN or USB memory What is Authoring Software Layout setting The desired layout can be set by combining movies still images and messages Scheduling function This function displays the program at the designated time You can set the daily program start and end time or the program start and end time for a particular day Distribution function Program data is distr...

Page 2: ...as been tested and found to comply with the limits for a Class B digital device pursuant to part 15 of the FCC Rules These limits are designed to provide reasonable protection against harmful interference in a residential installa tion This equipment generates uses and can radiate radio frequency energy and if not installed and used in accordance with the instructions may cause harmful interferenc...

Page 3: ...erefore it should be read carefully in order to avoid any problems Declaration of the Manufacturer We hereby certify that the MP 01 L007KN Council Directive 2006 95 EC EN 60950 1 Council Directive 2004 108 EC EN 55022 EN 61000 3 2 EN 61000 3 3 EN 55024 and marked with NEC Display Solutions Ltd 4 13 23 Shibaura Minato Ku Tokyo 108 0023 Japan is in compliance with Media Player Important Information ...

Page 4: ...nect all cables Moving the Media Player with cables connected may cause electric shock Do not pull on the power cord to disconnect from power outlet as this may cause electric shock Hold onto to the plug at the end of the power cord to disconnect Do not cover vent on Media Player Do not use Media Player in high temperature humid dusty or oily areas Do not drop or subject to shock Do not place side...

Page 5: ...l 6Wireless remote control extension connector In cases such as when the remote control sensor is hidden behind the liquid crystal display connect the enclosed wireless remote control extension cable Secure the light receiving end of the wireless remote control extension cable in a position from which remote control operation is possible using the enclosed double faced adhesive tape 7Reset button ...

Page 6: ...ect usage of batteries can result in leaks or bursting NEC recommends the following battery use Place the batteries properly according to the and indicators Batteries have different characteristics depending on type so do not mix batteries of different types Do not combine new and old batteries Doing so may shorten the life of new batteries or cause liquid leakage from old batteries Remove dead ba...

Page 7: ... of the equipment will not work If it is difficult to operate the remote control using the remote control sensor on the rear side use the wireless remote control extension cable When using a wireless remote control extension cable secure the light receiving part at the end of the cable with the enclosed double faced adhesive tape in a location where the light of the remote control can reach it eas...

Page 8: ...en using it for the first time Refer to the authoring software User s Manual for the installation procedure USB memory Encoded USB memory cannot be used Connection when using USB memory to distribute programs 1 Remove the screw from the mounting hole for the memory card cover 2 Insert the attached memory card into the memory card connector CAUTION Insert the memory card with the label side down Ch...

Page 9: ...r outlet please use a power cord that matches the AC voltage of the power outlet and has been approved by and complies with the safety standard of your particular country Always use the AC adaptor DXW1225N S0068Z enclosed with the equipment Using other AC adaptors may cause smoke or sparks When connecting an AC adaptor make sure that the cord is not bent or placed under the equipment The power cor...

Page 10: ...y disc However animations and movies cannot be converted Create program data using authoring software Click on the authoring software in the computer to start the program For details on how to use authoring software refer to authoring software User s Manual Save the program data created on a USB memory connected to the computer using the distribution function of the authoring software Content file...

Page 11: ... copied onto the memory card in the equipment CAUTION While the Now updating Important message is displayed do not remove the USB memory or switch off the power source The data on the USB memory or memory card may be damaged 4 After the files are copied the equipment will automatically restart After the equipment completes initialization approx 1 minute the update confirmation screen is displayed ...

Page 12: ...witches the equipment ON OFF If there is program data that set the time for power on off the setting of the program data is valid and the timer setting is void The time set in the program is displayed Thisisasettingforfutureextensions Donotselectthiswhenusingtheequipment Select the language for the OSD menu Select the VIDEO OUT according to the Display to be used Check the Read Timing from Display...

Page 13: ...select Yes on the confirmation screen and the equipment will automatically restart NOTE While displaying still images press the direction buttons and the previous or next still image will be displayed How to set the Video Repeat Mode 1 Set the USB memory containing the movie file you wish to display in the Media Player Note Change the name of the folder containing the movie file to something other...

Page 14: ...ection with commercially available AV equipment Output AUDIO VIDEO S VIDEO L R External AV equipment Video game machines etc Media Player S Terminal video output Audio output S Terminal input connector AUDIO IN S Terminal video cable commercially available Audio cable Commercially available Program layout example Message External video image Still image NOTE Video signals with copy protection cann...

Page 15: ...e screws you removed screw the two brackets to each side of the equipment 2 Install the equipment on the rear side of the Liquid Crystal Display Using an M6 screw length is the thickness of the mounting fixture 10 mm tighten it securely tightening torque 470 635 N cm CAUTION Please purchase the M6 screw as it is not enclosed in the package How to use the enclosed brackets When installing the Media...

Page 16: ...ovides IP Addresses to equipment on the NETWORK Normally they are built in with routers The procedure for LAN setting is as follows MP 01 LAN setting The Media Player name setting of the MP 01 required only in the DHCP mode Authoring software LAN setting LAN connection test Not required for Static IP Open the OSD of the MP 01 using the enclosed remote control and conduct settings From Internet Exp...

Page 17: ... that are category 5 or higher SD POWE RESET VIDEO IN DVI USB LAN RS232 AUDIO IN AUDIO OUT LAN straight cable Computer Authoring software LAN connector Media Player SD POWE RESET VIDEO IN DVI USB LAN RS232 AUDIO IN AUDIO OUT SD POWE RESET VIDEO IN DVI USB LAN RS232 AUDIO IN AUDIO OUT Computer Authoring software Media Player Media Player LAN connector LAN connector LAN straight cable LAN straight c...

Page 18: ...te down the set IP Address and keep it for reference 4 Select the Apply 5 Close the OSD menu using the EXIT buttons CAUTION Set the computer s IP Address according to the network environment NOTE To confirm the IP Address and Netmask of the computer startup the command prompt In the Start menu All programs Accessories in Windows XP Vista 7 and run C ipconfig IP Netmask Gateway DNS Find out the IP ...

Page 19: ...rol menu Setting is completed NOTE The settings above can be changed in the Panel Property of the Panel Control 3 LAN connection test 1 Startup the Internet Explorer on the computer and input the Static IP address set in the authoring software after the http in the address bar 2 If the user name and password screen are displayed input the user name default and password 0000 3 Confirm that the sett...

Page 20: ...TWORK on the OSD screen of the Media Player confirm that the IP address is properly set on the DHCP server and keep a memo of the IP address It can be set to anything other than 0 0 0 0 3 Confirm that the computer s IP Address is set NOTE IP Address is set when the DHCP is set in OSD or during startup 4 Startup Internet Explorer on the computer input the IP Address of the Media Player confirmed in...

Page 21: ...NETWORK of the OSD Example In the case of MAC 0050418000e9 the media player name is DS348000e9 It can be used without changing the name 3 Authoring software panel registration Click the panel setting wizard in the Panel Control menu of the Authoring Software and startup the wizard 1 Distribution list name setting If no changes are necessary click Next 2 Set to LAN DHCP in the connection type setti...

Page 22: ... uppercase and lowercase alphabets in the media player name are not differentiated 2 When the user name and password screen are displayed input user name default and password 0000 3 Confirm that the setting screen is displayed NOTE The Media Player setting can be confirmed in the WEB setting screen CAUTION I It may not be properly displayed on a browser other than Internet Explorer User name passw...

Page 23: ... CAUTION If the data is received while a program is not displayed the message is not displayed and the screen remains black 9 After receiving the program data the Media Player will generate the program data 10 Media Player will restart it will take approx 1 minute and afterwards the program will be displayed according to the schedule CAUTION Once distribution is conducted the old programs in the S...

Page 24: ...ogram 2 still image 2 and movie 1 the program data capacity will be the total capacity for still image 1 movie 1 still image 2 movie 1 Note 2 After distribution the SD card occupied area can be confirmed in the Memory Card items of the OSD Note 3 Depending on the structure of the program the maximum capacity may increase Media Player power management during distribution When distributing the Media...

Page 25: ... the audio input of speaker devices and volume is properly selected Conduct the following operations to initialize the system Doing so will return the settings to the default conditions 1 Switch off the power with the remote control 2 Press the power button on the remote control and after the power indicator turns green immediately press the number buttons in the following order 7 8 and 5 3 The Me...

Page 26: ...on cannot be displayed due to copyright protection When switching the movie there is about 10 to 20 seconds where there is no image or audio however this is not an error or malfunction Confirm that there are no errors in the schedule setting of the authoring tool If there are any errors correct the schedule and update the content Confirm that the date and time setting are correct Reference page P3...

Page 27: ...nnot be connected reconfirm the LAN cable connection Media Player and computer settings and make sure the Media Player is switched ON power indicator is green If it can be connected with this test but cannot distribute confirm that the firewall or security software is not set to block the FTP transmission Command prompt screen C ping 192 168 0 2 Pinging 192 168 0 2 with 32 bytes of data Reply from...

Page 28: ...bit rate Mbps x 1024 kb AUDIO bit rate kbps Ex SD Memory card 2 Gbytes VIDEO bit rate 10 Mbps AUDIO bit rate 128 kbps 2G x 0 9 x 1024 x 1024 x 8 10 x 1024 128 25 min Concerning Memory cards The firmwares Files with img extension are pre written on the enclosed memory card If it is mistakenly erased use the computer to copy the firmware from the firmware_folder in the enclosed CD ROM to the memory ...

Page 29: ... Windows Vista Ultimate 32 bit Ver MicrosoftWindowsVista Business 32 bit Ver MicrosoftWindowsXP Professional 32 bit Ver Microsoft Windows XP Home Edition 32 bit Ver MicrosoftWindows7 Professional 32 bit Ver MicrosoftWindows7 Home Premium 32 bit Ver For Windows XP Microsoft NET Framework Version 2 0 or 3 5 Layout function Create Message Create schedule Distributing Programs CPU Memory Resolution Re...

Page 30: ...Main Profile High Level Up to 1280 x 720 30p or 1920 x 1080 25p AP L3 Advanced Profile L3 Level Up to 1920 x 1080 50i or 1920 x 1080 25p or 1280 x 720 60p The following are not supported Complex Profile File created using the WMV9 BETA encoder WMV1 or WMV2 Note 3 MP HL Main Profile High Level Up to 1920 x 1080 25p or 1920 x 1080 60i or 1280 x 720 60p Details Supports baseline JPEG Supports RGB 24 ...

Page 31: ...wer cords When you need to dispose of your NEC display products please follow the guidance of your local authority or ask the shop where you purchased the product or if applicable follow any agreements made between yourself and NEC The mark on electrical and electronic products only applies to the current European Union Member States Outside the European Union If you wish to dispose of used electr...

Page 32: ...PTM Devices Software license information pdf p 27 Net SNMP Software license information pdf p 28 p 34 Thttpd Software license information pdf p 35 Pure FTPd Software license information pdf p 36 Libjpeg Software license information pdf p 37 p 39 Libpng Software license information pdf p 40 p 43 TinyXML Software license information pdf p 44 Refer to the page below for information on the copyright f...

Reviews: