NEC LT265 - INSTALLTION GUIDE Network Manual Download Page 34

7. Setting the LAN Setting of Projector

32

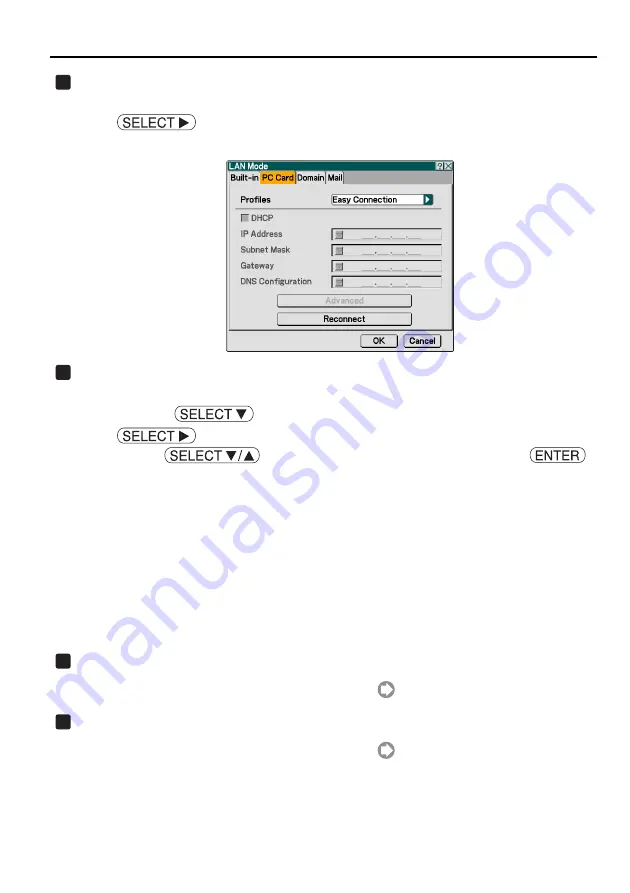
Select "PC Card" page.

<1> Confirm that the highlight is on "Built-in" in the "LAN Mode" screen, press the  

 button once to highlight the "PC Card" tab.

The "PC Card" page will be displayed.

Select "Profiles".

In this example, "Profile 1" is selected.

<1> Press the 

 button once to highlight the "Profiles" field and press the 

 button.

<2> Use the 

 button to highlight "Profile 1", and press the 


button.

"Profile 1" or "Profile 2" can be stored in the memory of the projector as the setting for LAN
when wireless LAN is used.

"Easy Connection" is a mode in which the personal computer that runs Image Express Utility
2.0 in the User Supportware 2 CD-ROM is easily connected to wireless LAN.
Note that "Easy Connection" does not support software other than Image Express Utility 2.0.

When "Easy Connection" is selected, the IP address and subnet mask do not have to be set.
To use "Easy Connection", the OS of the personal computer must be Windows XP ([Computer
Administrator] privilege).  It cannot be used with Windows 2000.
The communication mode is "802.11 Ad Hoc".

Set "DHCP".

The operation is the same as "7-2. Wired LAN" (

page 28).

Input "IP Address", "Subnet Mask", "Gateway", and "DNS Configuration".

The operation is the same as "7-2. Wired LAN" (

pages 29 and 30).

1

2

3

4

Summary of Contents for LT265 - INSTALLTION GUIDE

Page 1: ...r and the personal computer Explains the basic operation of the software Explains how to perform troubleshooting and get information about downloading service NEC Projector LT265 LT245 Wired and Wirel...

Page 2: ...uns on Windows XP and Windows 2000 Image Express Utility 2 0 Desktop Control Utility 1 0 Ulead Photo Explorer 8 0 SE Basic Viewer PPT Converter 3 0 PC Control Utility 3 0 This document explains the ba...

Page 3: ...uld lead to fire or electric shock Do not use a wireless LAN card in wet or moist places such as in bathrooms or near humidifiers Doing so could lead to fire electric shock or malfunctions To prevent...

Page 4: ...Operating Environment 11 2 1 Supported Projector 11 2 2 Operating Environment 12 3 Installing User Supportware 2 13 3 1 Installation 13 3 2 Uninstalling 19 4 Using Help 20 4 1 Displaying Help 20 4 2 H...

Page 5: ...Desktop Screen by Using Projector 54 3 Ulead Photo Explorer 8 0 SE Basic 61 3 1 Sending Slideshow of Image to Projector 61 4 Viewer PPT Converter 3 0 65 4 1 Converting PowerPoint file and displaying i...

Page 6: ...4...

Page 7: ...t You Can Do with User Supportware 2 6 2 Operating Environment 11 3 Installing User Supportware 2 13 4 Using Help 20 5 Connecting LAN Cable 22 6 Attaching Wireless LAN Card 23 7 Setting the LAN Settin...

Page 8: ...ork at high speed from your personal computer to the projector z Simultaneous projection by multiple projectors Images can be sent from a personal computer to not only one projector but also to two or...

Page 9: ...ing personal computer Using the Training Mode allows you to use a single personal computer Manager to manage which personal computer Attendant projects Possible operation includes switching projecting...

Page 10: ...s the personal com puter does not need to be brought into the conference room 1 2 Desktop Control Utility 1 0 Office Conference room Important You can use the Desktop Control Utility 1 0 to operate a...

Page 11: ...s connected Additional functions are listed below For details of each function refer to the help function of Ulead Photo Explorer 8 0 Image transmission Sends images to the projector PowerPoint file c...

Page 12: ...002 2003 is installed in your personal computer you can activate Viewer PPT Converter 3 0 from PowerPoint PPT Converter add in is automatically regis tered to PowerPoint Operation page 69 PC Control U...

Page 13: ...ireless LAN adapter for the personal computer If connecting multiple personal computer and projectors use NEC s optional wireless LAN card NWL 100 series on the personal computers for better transmiss...

Page 14: ...r required Pentium 800 MHz or higher recommended Recipient personal computer Pentium III 800 MHz or higher required Pentium III 1 2 GHz or higher recommended Memory Windows XP 128 MB or more required...

Page 15: ...ing menu screen will be displayed If the above menu is not displayed follow these steps 1 Click Start of Windows 2 Click Run 3 In the Open field enter the CD ROM drive name 1 e g Q followed by SETUP E...

Page 16: ...If you agree to the End User License Agreement click I accept the terms in the license agreement then Next The Customer Information screen will be displayed Input User Name and Organization and click...

Page 17: ...played click Start Run CD ROM drive name SETUP EXE e g Q SETUP EXE followed by OK The menu screen of the User Supportware 2 CD ROM will be displayed again 7 Important Immediately after installation ha...

Page 18: ...ROM Click Installing Ulead Photo Explorer 8 0 on the menu screen Ulead Photo Explorer 8 0 s setup screen will be displayed 1 Important Be sure to register your software Technical support for Ulead Ph...

Page 19: ...th the installation When installation is complete the menu screen of the User Supportware 2 CD ROM is dis played again Click Installing Viewer PPT Converter 3 0 on the menu screen Preparation for the...

Page 20: ...eparation is complete Welcome to the InstallShield Wizard for PC Control Utility 3 0 screen is displayed After that follow the instructions on the screen to continue the installation When installation...

Page 21: ...installation of the program will begin To uninstall Ulead Photo Explorer 8 0 click Change Remove Remove and Next After an installation of the program is complete a message prompting you to restart the...

Page 22: ...t program The following instructions use operations under Windows XP as an example Before displaying Help install each software onto your personal computer from the User Supportware 2 CD ROM You canno...

Page 23: ...User Supportware 2 Help 1 2 4 2 Help Screen Layout Contents tab Displays the contents of Help Select a topic to display contents in the right pane Index tab Displays a list of keywords for Help Selec...

Page 24: ...onnecting the projector to wired LAN After connecting the LAN cable to the projector set the required settings for the projector page 25 PC CARD R AUDIO IN L AC IN VIDEO IN AUDIO OUT S VIDEO IN PC CON...

Page 25: ...slot the eject button will slightly come forward Important The wireless LAN card must be inserted into the PC card slot in the correct direction It cannot be inserted in the reverse direction If the...

Page 26: ...LAN Card 24 Removing card from PC card slot Press the O off side of the main power switch of the projector Slowly press the PC card eject button The inserted card will slightly come forward Slowly pul...

Page 27: ...r and how to operate the buttons and remote control of the projector refer to 1 Introduction 2 Installation and Connections and 3 Projecting an Image Basic Operation of User s Manual included in the U...

Page 28: ...Press the button three times to highlight LAN Mode and press the button The LAN Mode screen will be displayed 5 To make setting of wired LAN Proceed to 7 2 Wired LAN page 27 To make setting of wireles...

Page 29: ...n page of LAN Mode Flow of setting 7 2 Wired LAN Step 1 Display Built in page of LAN Mode Step 2 Select Profiles Step 3 Enable or disable DHCP If Disabled without check mark Step 4 Input IP Address St...

Page 30: ...this check box if the network to which the projector is to be connected automatically assigns the IP address via the DHCP server 1 Press the button once to highlight the DHCP check box and press the b...

Page 31: ...has the following function SP Inputs space BS Deletes one character to the left of the character insertion posi tion in the IP Address field Moves the character insertion position in the IP Address f...

Page 32: ...nnected The method of inputting is the same as that of the IP Address field Reconnect the network 1 When all the above items have been input or set use the button to highlight Reconnect and press the...

Page 33: ...Survey Input SSID if necessary Select Mode if necessary 6 2 Setting of WEP Select the number of bits of WEP Select Key Select Set Key 1 to Key 4 Step 7 Finalize Advanced Step 8 Reconnect the network S...

Page 34: ...is used Easy Connection is a mode in which the personal computer that runs Image Express Utility 2 0 in the User Supportware 2 CD ROM is easily connected to wireless LAN Note that Easy Connection doe...

Page 35: ...g the LAN Setting of Projector Example of setting 1 Select Advanced Set Network Type and WEP encryption specific to wireless LAN 1 Use the button to highlight Advanced on the PC Card page and press th...

Page 36: ...plete a list of SSID is displayed Icon Access point Personal computer Ad Hoc WEP setting 2 Use the button to highlight the SSID of the network to be connected Press the button once to highlight OK and...

Page 37: ...o or more devices connected by wired or wireless LAN via an access point 802 11 Ad Hoc This is selected to perform peer to peer communication between the projector and a personal computer by using onl...

Page 38: ...bits 128 bits or 152 bits is selected from WEP select which of the following encryption keys Key 1 to Key 4 is to be used Input Key 1 to Key 4 If 64 bits 128 bits or 152 bits is selected on the WEP f...

Page 39: ...Cancel Cancels the input character and closes the software keyboard HEX or ASCII Selects alphanumeric character input or hexadecimal number input When HEX is displayed alphanumeric characters ASCII c...

Page 40: ...lity dedicated to a wireless LAN card is executed terminate that utility Make the wireless LAN setting of the projector For details refer to 6 Attaching Wire less LAN Card page 23 and 7 Setting the LA...

Page 41: ...Right click the Wireless Network Connection icon and click Property A property window for wireless network connections will be displayed Click the Wireless Network tab Click Use Windows to configure m...

Page 42: ...of Available networks and click Configure In this example SSID of the project is set to NECPJ page 35 Select click NECPJ from the list The configuration window of NECPJ will be displayed Click OK The...

Page 43: ...etting of Personal Computer Click the General tab From the list of This connection uses the following Items select click Inter net Protocol TCP IP and click Properties The property window for Internet...

Page 44: ...t the personal computer as shown below Click OK The property window for the wireless network connection will be displayed again Click Close This completes the Ad Hoc connection of wireless LAN on the...

Page 45: ...operations of the soft ware in the User Supportware 2 CD ROM 1 Image Express Utility 2 0 45 2 Desktop Control Utility 1 0 54 3 Ulead Photo Explorer 8 0 SE Basic 61 4 Viewer PPT Converter 3 0 65 5 PC C...

Page 46: ...card supplied as an option to the PC card slot of the projector page 23 3 Display the on screen menu of the projector and set it in accordance with the wired LAN or wireless LAN page 25 4 Set the LAN...

Page 47: ...e 6 Connecting projector Turn on the power to the projector for which LAN has been set Click Windows Start All Programs NEC Projector User Supportware 2 Image Express Utility 2 0 Presenter in that ord...

Page 48: ...open the PowerPoint file and start your presentation Click Skip The Projector List window will be displayed Check the projector to connect and click Connect If the name of the projector to connect is...

Page 49: ...ar will change Click the projector icon on the Windows taskbar A pop up menu will be displayed Click Start Sending The projector icon on the taskbar will change The transmission of the screen for the...

Page 50: ...ll be displayed Click Exit Follow steps through in n Connecting Projector of 1 1 Sending Images to Projector page 45 The screen of your personal computer will be projected from the projector Click the...

Page 51: ...the check box of Public A check mark will be placed and the file will be shown to the participants Click File in the presenter window and click Exit The Saving Of File For Reopening Meeting window wil...

Page 52: ...ork equipment connected to your personal computer will be displayed Select the network equipment that is to be used and click OK If network equipment of wireless LAN is selected the confirmation windo...

Page 53: ...selected conference and the attendant window will be displayed If the presenter selects Send to PC And Projector page 49 the image projected from the projector is displayed in the attendant window Cli...

Page 54: ...ed to a file in the created folder For example if a conference was held at 11 20 July 10 2004 the default folder name is My Documents ImageExpress 2004 07 10_11 20_Meeting Records In this folder an HT...

Page 55: ...t folder name for storing files is My Documents ImageExpress A folder is created below the default folder based on the time and day of the confer ence and the file is saved to a file in the created fo...

Page 56: ...played A list of the network equipment connected to your personal computer will be displayed Select the network equipment that is to be used and click OK The Startup password settings window will be d...

Page 57: ...p Control Utility 1 0 will be started Move to the room where the projector is installed with the paper on which you have written down the password in step Connect a USB mouse that is commercially avai...

Page 58: ...layed if a password for the Desktop Control is registered If this message is not displayed proceed to step Press the button of the projector or remote control The connection bar will be displayed at t...

Page 59: ...es one character to the left of the character insertion position in the Password field Moves the character insertion position in the Password field to the left or the right OK Finalizes the input char...

Page 60: ...on screen will be displayed If the connection destination has not been found as a result of a PC search search for the connection destination by inputting the IP address of the personal computer at th...

Page 61: ...operation as when the ESC key of the personal com puter is pressed is performed This icon is used for example to stop a slideshow of PowerPoint Operating the projector disconnecting communications Pr...

Page 62: ...e desktop screen is dis played Click Exit Desktop Control Utility 1 0 will be terminated Click the USB mouse A connection bar will be displayed at the lower left of the screen Click the USB mouse once...

Page 63: ...to Explorer 8 0 your personal computer and the projector can be connected with LAN or a serial cable This section explains how to connect the personal computer and projector with LAN Move an image to...

Page 64: ...d can also be displayed by selecting Slideshow from the Tools menu Drag and drop the image to project it from the projector to the slideshow story board By repeating step display all the images that a...

Page 65: ...con Or click NEC Projector User Supportware 2 on the Tools menu and click Start Slide Show The Connection Selection window will be displayed If your personal computer has already been connected to the...

Page 66: ...nd projected from the projector While the slideshow is being transferred the operation window is displayed When the slideshow is completed the following confirmation window is displayed Click OK The s...

Page 67: ...nt file and saving it to a flash memory card To send data from the personal computer to the projector USB memory as well as flash memory card can be used Set the flash memory card to the PC card slot...

Page 68: ...Start All Programs NEC Projector User Supportware 2 Viewer PPT Converter 3 0 Viewer PPT Converter 3 0 in that order Viewer PPT Converter 3 0 will be started Click Browse select a PowerPoint file to b...

Page 69: ...sage will be displayed Click OK Outputting of the file will start When outputting has been completed a completion message is displayed Click OK The Viewer PPT Converter 3 0 window will be displayed ag...

Page 70: ...and select Viewer For the operation of the Viewer refer to the User s Manual in User s Manual CD ROM To end the Viewer select another input signal by pressing the button of the remote control When th...

Page 71: ...LAN or a serial cable This section explains how to connect the personal computer and projector with LAN Checking IP address of projector First confirm the IP address of the projector to be controlled...

Page 72: ...s the button twice The on screen menu will be closed Click Windows Start All Programs NEC Projector User Supportware 2 PC Control Utility 3 0 PC Control Utility 3 0 in that order PC Control Utility 3...

Page 73: ...Click LAN The setting screen for LAN connection will be displayed Input the IP address of the projector you have written down to the IP Address in the Information screen Click Reconnect Connection wi...

Page 74: ...cted 4 Mute button When this button is clicked the video and audio are tempo rarily muted Clicking it once again restores the original condi tion 5 Freeze button Clicking this button makes motion pict...

Page 75: ...This Appendix explains how to execute troubleshooting and how to get information about downloading service Troubleshooting 74 About the Downloading Service 78 For Information 78 Appendix...

Page 76: ...when Windows 2000 is used Did you log on with the Computer Administrator privilege when Windows XP is used Log on with the above privileges to Windows 2000 or Windows XP and install the program Is Po...

Page 77: ...en stopped Then reinstall the software Add in to PowerPoint is automatically registered if Viewer PPT Con verter 3 0 is installed to a personal computer to which PowerPoint 2000 2002 2003 is installed...

Page 78: ...0 and Desktop Control Utility 1 0 do not support 256 or fewer colors Set the number of colors of Windows to High Color 15 bits or more Depending on the application software the number of colors chang...

Page 79: ...IEU2 0 DCU1 0 Depending on the personal computer and application software some of the screen s graphics and characters may not be sent to the projector If Image Express Utility 2 0 or Desktop Control...

Page 80: ...ktop Control Utility 1 0 Viewer PPT Converter 3 0 and PC Control Utility 3 0 refer to the NEC Projector s support page http www nec pj com For Information Ulead Photo Explorer 8 0 Visit http www ulead...

Page 81: ...n in the U S or other coun tries Ulead Systems and Photo Explorer are registered trademarks of Ulead Sys tems Inc Other manufacturer names and product names in this document are registered trademarks...

Page 82: ...5 Wired and Wireless Network User s Guide NEC Projector User Supportware 2 Image Express Utility 2 0 Desktop Control Utility 1 0 Ulead Photo Explorer 8 0 SE Basic Viewer PPT Converter 3 0 PC Control U...

Reviews: