background image

E – 29

3. In order for the changes to take effect, use the 

 or 

 button on

the remote control or the projector cabinet to highlight “OK”,
then press the Enter button. To cancel the changes, use the 

 or

 buttons to highlight “Cancel” and press the “Enter” button.

To return to the factory default, select “Reset” then press the “En-
ter” button.

The default Basic/Custom Menu items are:
Source Select (RGB1/2, Video, S-Video and PC Card Viewer), Pic-
ture, Volume, Image Options (Keystone, Color Temperature and
Lamp Mode), Projector Options (Menu and Setup), Tools (Capture,
PC Card Files and ChalkBoard) and Help (Contents and Informa-
tion)

NOTE: 

Once you have selected OK on the Basic/Custom Menu Edit screen, you

cannot cancel the changes on the Menu screen. However, you can re-edit the
menu items over again as described in the steps above.

NOTE: 

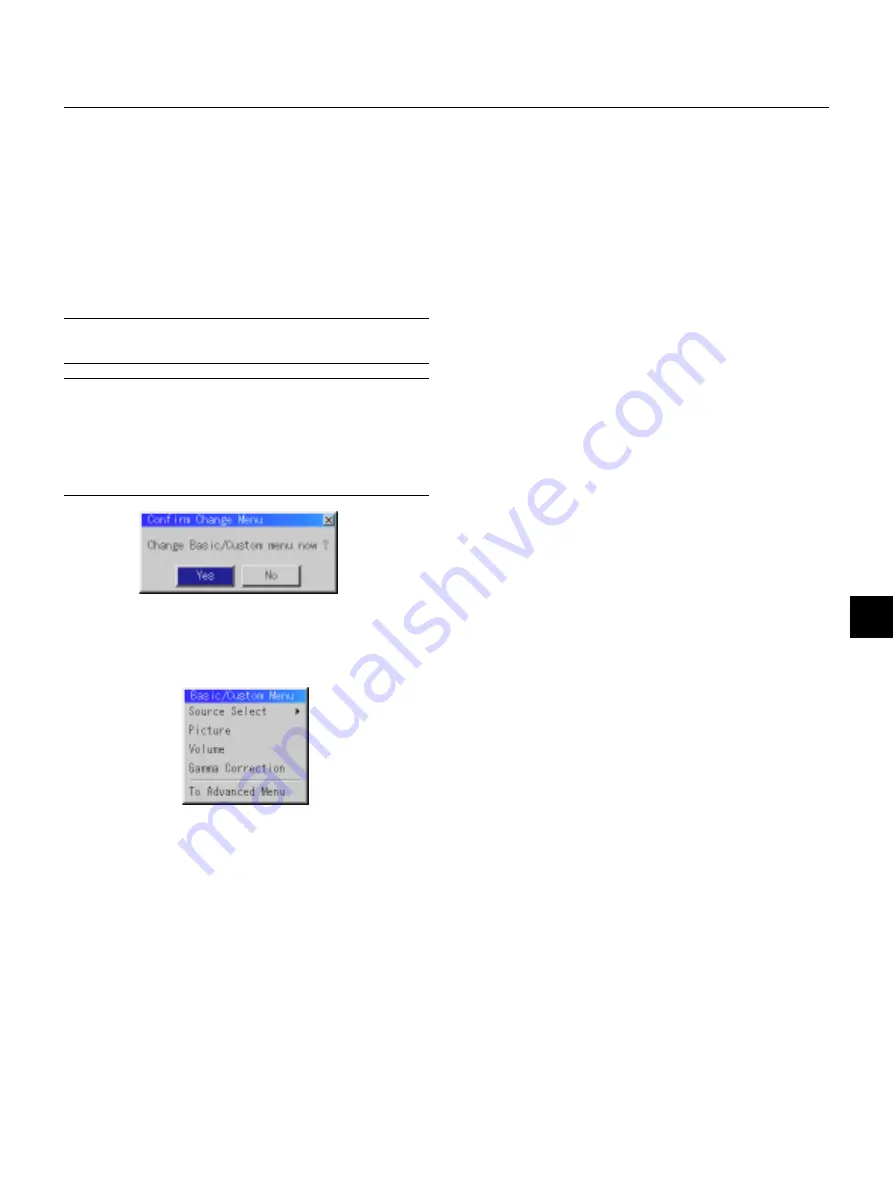
If the “Advanced Menu” item has been selected on the Menu mode, you

get the “Confirmation Change Menu” upon completion of “Basic/Custom Menu”
editing. In this case, selecting “Yes” then “Enter” will close all the menus and
apply the changes from the Advanced menu to the Basic/Custom Menu. If you
select “No” then “Enter” functions, then all menu items will return to the Ad-
vanced menu, but your changes will still be available within the “Basic/Custom
Menu” selection. To display the previously tailored Basic/Custom Menu, select
“Basic/Custom Menu” from the “Menu Mode”.

An item “To Advanced Menu” will be added to the bottom of the Basic/
Custom Menu.
Selecting this item and pressing the “Enter” button will display the “Ad-
vanced Menu” features.

Summary of Contents for LCDMT1050

Page 1: ...LCD Projector MultiSync MT1055 MT1050 MT850 User s Manual ...

Page 2: ... the dealer from whom you purchased the product 2 Whenever warranty service is required the original dated invoice or a copy must be presented as proof of warranty coverage In order to obtain warranty service you may be required to describe and demonstrate the problem to your dealer or to NEC Solutions 3 All products returned to NEC Solutions for service MUST have prior approval To receive approva...

Page 3: ...ence received including interference that may cause undesired operation U S Responsible Party Address Tel No NEC Technologies Inc 1250 N Arlington Heights Road Itasca Illinois 60143 630 467 5000 Type of Product Equipment Classification Models LCD Projector Class B Peripheral MT1055 MT1050 and MT850 We hereby declare that the equipment specified above conforms to the technical standards as specifie...

Page 4: ... S T A N D B Y S O U R C E A U T O A D J U S T AC IN S VIDE O VIDE O AU DIO RG B INPU T 2 AU DIO RG B INPU T 1 L MONO R AU DIO RG B MON ITOR OU TP UT USB PC CAR D C CO NT RO L MOU SE OU T RE MO CO NT R INPU MultiSync MT1055 MT1050 MT850 LCD Projector User s Manual English ...

Page 5: ... ernment regulation could void your right to operate this equip ment This equipment has been tested and found to comply with the limits for a Class B digital device pursuant to Part 15 of the FCC Rules These limits are designed to provide reasonable protection against harmful interference in a residential installation This equip ment generates uses and can radiate radio frequency energy and if not...

Page 6: ... amber glow Immediately after the cooling fan stops working The cooling fan con tinues to work for ONE minute after the projector is turned off with the POWER button While the POWER and the STATUS indicators are alternately flashing CAUTION Do not put the projector on its side when the lamp is turned on Doing so may cause damage to the projector Lamp Replacement To replace the lamp follow all inst...

Page 7: ...ode E 33 Gamma Correction E 33 Aspect Ratio E 33 Noise Reduction E 34 Color Matrix E 34 White Balance E 34 Position Clock E 34 Resolution E 34 Factory Default E 35 Projector Options E 35 Menu E 35 Menu Mode E 35 Advanced Menu Basic Custom Menu E 35 Language E 35 Projector Pointer E 35 Source Display E 35 Direct Button Volume Bar and Keystone Bar E 35 Menu Display Time E 35 Setup E 36 Orientation E...

Page 8: ...Macintosh component signal YCbCr YPbPr or any other RGB signals within a horizontal frequency range of 15 to 100 kHz and a vertical frequency range of 50 to 120 Hz This includes NTSC PAL PAL60 SECAM and NTSC4 43 standard video signals NOTE Composite video standards are as follows NTSC U S TV standard for video in U S and Canada PAL TV standard used in Western Europe PAL60 TV standard used for NTSC...

Page 9: ...OUT PU T USB PC CAR D C CO NT RO L MOUS E OUT RE MO CO NT R INPU K E Y S T O N E F R E E Z E P I C M U T E H E L P P O I N T E R P C C A R D V ID E O S V ID E O A U T O A D J R G B 1 M E N U L A S E R R C L IC K C A N C E L R G B 2 P J O N O F F M A G N IF Y V O L S L ID E F O L D E R S L ID E L IS T Q u i c k C o n n e c t G u i d e U s e r s M a n u a l NEC MultiSync MT1055 MT1050 or MT850 proje...

Page 10: ...r Lenscap AC Input Connect the supplied power cable s three pin plug here Adjustable Tilt Foot Lens Ventilation outlet Carrying Handle Terminal Panel Air Filter Slot for Kensington Micro saver Security System PC Card Slot USB Mouse Terminal Controls Remote Sensor Front Side Features M ENU ENTER C A N C E L S E L E C T P O W E R S T A T U S O N S T A N D B Y S O U R C E A U T O A D J U S T Rear Sid...

Page 11: ...ivates items selected from the menu Top Features 6 Cancel Button Press this button to exit Menus Press this button to return the adjust ments to the last condition while you are in the adjustment or setting menu 7 Status Indicator When this is lit red orange in Eco mode continually it s warning you that the projection lamp has exceeded 1500 hours 2500 hours in Eco mode of service After this light ...

Page 12: ... pin You can use this connector to loop your computer image to an external monitor from the RGB input source 9 RGB Audio Input 1 Connector This is where you connect RGB audio output from a computer or an other RGB source RGB Input 1 Connector Mini D Sub 15 pin Connect your PC or other RGB equipment Use the signal cable that s supplied to connect to a PC 10 RGB Audio Input 2 Connector This is where...

Page 13: ...ter or compo nent equipment connected to your RGB 2 port 10 Auto Adjust Button RGB only Press this button to automatically adjust the vertical horizontal posi tion clock frequency phase and resolution if the projected picture is not centered if there are vertical stripes on the picture or if the picture is flickering 11 PJ Button Press this button to switch the Mouse Cancel Right Click and Enter L...

Page 14: ...ound without turning off the menu 23 Volume Button Press to increase the volume and to decrease it 24 PC Card Button Press this button to select the PC Card Viewer source 25 Slide Button Press to select the next folder or slide and to select the previous folder or slide 26 Folder List Button Press this button to select PC Card Viewer source to display a list of folders included in a PC card 27 Sli...

Page 15: ...eries until it snaps into place Do not mix different types of batteries or new and old batteries Remote Control Precautions Handle the remote control carefully If the remote control gets wet wipe it dry immediately Avoid excessive heat and humidity If you will not be using the remote control for a long time remove the batteries Do not place the batteries upside down Do not look into the laser poin...

Page 16: ...ion again press the PJ button to light red To move the pointer or a magnified image again turn off the pointer and then turn on the pointer press the POINTER button two times When the PJ button is lit if you want to use the mouse function immediately press the PJ button to return to the Computer mode not lit KEYSTONE FREEZE PIC MUTE HELP POINTER PC CARD VIDEO S VIDEO AUTO ADJ RGB 1 MENU LASER R CL...

Page 17: ...projector is roughly 4 feet 1 3 m from the wall or screen The largest the image can be is 300 7 6 m when the projector is about 36 8 feet 11 2 m from the wall or screen Using a Tabletop or Cart 1 Place your projector on a flat level surface at the optimal dis tance from the screen or wall so you realize the size image you want Avoid having bright room lighting or sun light directly on the screen o...

Page 18: ...O UR CE AU TO AD JU ST AC IN Adjusting the Tilt Foot Press and hold the Tilt button on the left side of the projector Lift the front edge of the projector to the height you want and release the button to lock the Adjustable Tilt Foot To fine tune the image s position vertically on the screen rotate the foot Each of the rear feet height can be changed up to 0 6 4mm ...

Page 19: ...jec tor so heat can dissipate Do not cover the vents on the side or the front of the projector If your projector is mounted on the ceiling and your image is upside down use the Menu and Select buttons on your projector cabinet or button on your remote control to correct the orientation See page E 36 Reflecting the Image Using a mirror to reflect your projector s image enables you to enjoy a much l...

Page 20: ... 8 96 1 2440 5 103 4 2626 8 121 0 3073 8 129 8 3297 3 144 5 3669 8 173 8 4414 9 217 8 5532 4 261 8 6650 0 305 8 7767 6 349 8 8885 1 393 8 10002 7 437 8 11120 3 inch mm inch mm inch mm inch mm inch mm inch mm inch mm inch mm inch mm inch mm inch mm inch mm inch mm inch mm 68 2 1732 7 103 4 2626 7 115 7 2939 7 124 5 3163 2 145 7 3699 6 156 2 3967 8 173 8 4414 8 209 0 5308 9 261 8 6649 9 314 6 7991 0...

Page 21: ... button to resume Supplied serial cable Supplied mouse adapter For Macintosh or USB Supplied mouse adapter For IBM PS 2 or USB Macintosh or Compatibles Desktop type or notebook type IBM VGA or Compatibles Desktop type or notebook type Signal cable supplied To mini D Sub 15 pin connector on the projector It is recommended that you use a commercially available distribu tion amplifier if connecting a...

Page 22: ...ded that you use a commercially available distribu tion amplifier if connecting a signal cable longer than the supplied one IBM VGA or Compatibles Desktop type Audio cable not supplied Connecting Your PC Connecting your PC to your MultiSync MT1055 and MT1050 XGA MT850 SVGA projector will enable you to project your computer s screen image for an impressive presentation To connect to a PC simply 1 T...

Page 23: ...pplied 1 ON DIP 2 3 4 5 6 Pin adapter for Macintosh not supplied For older Macintosh use a commercially available pin adapter to connect to your Mac s video port The new Macintosh computer such as G3 will have the 15 pin HD connec tor The MT1055 MT1050 MT850 s Plug and Play data will be down loaded to the Macintosh Therefore a Mac adapter will not be necessary Connecting Your Macintosh Computer To...

Page 24: ...REMOTE CONTROL INPUT MOUSE OUT Serial cable suppried Macintosh IBM PS2 Connecting Your Computer to the Mouse Output Port The built in remote mouse receiver enables you to operate your computer s mouse functions from the remote control It is a great con venience for clicking through your computer generated presentations To connect the mouse output port 1 Turn off your computer 2 For PCs Remove your...

Page 25: ...d Audio Equipment Connecting Your DVD Player You can connect your projector to a DVD player with component out puts or Video output To do so simply 1 Turn off the power to your projector and DVD player 2 If your DVD player has the component video Y Cb Cr output use the optional 15 pin to RCA 3 cable to connect your DVD player to the RGB INPUT connector on the projector For a DVD player without com...

Page 26: ...ided to connect your VCR laser disc player or document camera to your projector To make these connections simply 1 Turn off the power to the projector and VCR laser disc player or document camera 2 Connect one end of your RCA cable to the video output connector on the back of your VCR or laser disc player connect the other end to the Video input on your projector Use an audio cable not supplied to...

Page 27: ...d Japa nese To select a menu language follow these steps 1 Use the Select or button to select one of the seven languages for the menu 2 Press the Enter button to execute the selection 3 The Basic Custom menu will be displayed in the language you have selected To close the menu press the Cancel button After this has been done you can proceed to the advanced menu op eration If you want you can selec...

Page 28: ...er cable during this time Using the Menus NOTE The on screen menu may not be displayed correctly while interlaced motion video image is projected 1 Press the Menu button on the remote control or projector cabi net to display the Main Menu NOTE When using a USB mouse click the mouse button to display the main menu For other operations do the same way as you use your PC mouse 2 Press the buttons on ...

Page 29: ...quencies that eliminate the horizontal banding in the image This func tion also adjusts the clock phase to reduce video noise dot interfer ence or cross talk This is evident when part of your image appears to be shimmering This adjustment may be necessary when you connect your computer for the first time NOTE The Auto Adjust function does not work for component signal Basic Operation Selecting the...

Page 30: ...CANCEL Exit Help Using Pointer You can use one of eight pointers to draw your audience s attention to the portion of a projected image you want Press the Pointer button to display the pointer Use the Select button to move the pointer Enlarging and Moving a Picture You can enlarge the area you want up to 400 percent To do so 1 Press the Pointer button to display the pointer 2 Move the pointer to th...

Page 31: ...out placing a check mark on the main menu item NOTE Up to 12 main menu items within Basic Custom Menu Edit not including submenu items can be selected 4 Return the image to the original size Correcting Keystone distortion Press or to correct keystone trapezoidal distortion to make the top or bottom of the screen longer or shorter so that the projected image is rectangular KEYSTONE NOTE The maximum...

Page 32: ...it screen you cannot cancel the changes on the Menu screen However you can re edit the menu items over again as described in the steps above NOTE If the Advanced Menu item has been selected on the Menu mode you get the Confirmation Change Menu upon completion of Basic Custom Menu editing In this case selecting Yes then Enter will close all the menus and apply the changes from the Advanced menu to ...

Page 33: ...ground Blue Black Logo Mouse Button Right Hand Left Hand Sensitivity Fast Medium Slow PC Card Viewer Options Show Folder List On Off Auto Play Manual Play Interval 5 300 sec Capture Options High Quality Normal High Compression Signal Select RGB1 Auto RGB Component RGB2 Auto RGB Component Video Auto NTSC3 58 NTSC4 43 PAL PAL60 SECAM S Video Auto NTSC3 58 NTSC4 43 PAL PAL60 SECAM Auto Adjust RGB Onl...

Page 34: ...icates settings or the direction of adjustment OK button Press to confirm your setting You will return to the previous menu Cancel button Press to cancel your setting You will return to the previous menu Close button Click to close the window with saving changes USB mouse only Help button Indicates that help about that feature is available USB mouse only Press the Help button on the remote control...

Page 35: ...ideo input VCR DVD player or laser disc player NOTE A frame may freeze for a brief period of time when a video is played back in fast forward or fast rewind with a Video or S Video source PC Card Viewer This feature enables you to make presentations using a PC card that contains captured images and slides created with the exclusive PC Card Viewer Utility contained in the CD ROM See page E 41 for i...

Page 36: ...r flesh tone Natural 2 for true reproduction of middle tones Each mode is recommended for Normal For the regular picture Natural 1 For true color reproduction of natural tones Natural 2 For dark portions of a picture Aspect Ratio not available for RGB and PC Card Viewer Aspect Ratio allows you to select the best Aspect mode to display your source image When 4 3 is selected from the source i e DVD ...

Page 37: ...t appear This function adjusts the clock frequencies that eliminate the horizontal banding in the image Press the 䊴 and 䊳 buttons until the banding disappears This adjustment may be necessary when you connect your computer for the first time This adjustment is made auto matically when the Auto Adjust is turned on Phase Use this item to adjust the clock phase or to reduce video noise dot interferen...

Page 38: ...r icons for the Pointer button on your remote control After moving your Pointer icon to the area you want on the screen press the Magnify button on the remote control to enlarge the se lected area on the screen See page E 27 for more details NOTE There may be cases where the Pointer function is not available ex a non interlace signal at 15kHz such as video game Source Display You can turn on and o...

Page 39: ...and 300 seconds NOTE The Auto Play Interval time set on the PC Card Viewer Utility over rides the one set here Manual Play Views a slide manually when PC Card Viewer input is selected NOTE The Auto Play and Manual Play options determine the behavior of the Play Stop icon on the Viewer toolbar NOTE If you check Auto Play and select PC Card Viewer on the projector the slides will automatically start...

Page 40: ...for fan speed high speed mode and normal speed mode When you wish to cool down the temperature inside the projector quickly check this box This is convenient especially when the pro jector is installed on the ceiling Auto Mute for Built in Speaker This option allows you to mute the built in speakers automatically when you connect an audio cable to the AUDIO OUT terminal Clear Lamp Hour Meter Reset...

Page 41: ...ction Unless a PC card is inserted into the PC Card slot of the projector the Capture feature is not available The Card Error display means that the free space of the PC card is insufficient for saving images Make more space available on the card by erasing unwanted images with your PC The number of images that can be captured depends on the size of the PC card NOTE Be sure not to turn off the pow...

Page 42: ...e con taining four eraser of different thickness from which you can select an eraser you prefer by left clicking Clear Left click to clear the drawing completely from the ChalkBoard screen View Hides the tool bar by left clicking Right clicking anywhere on the screen displays the ChalkBoard tool bar again Exit Clears the complete drawing and exits the ChalkBoard NOTE The ChalkBoard feature is avai...

Page 43: ...g PC Card Viewer PPT Converter 1 0 Add In Version converts files created with Microsoft PowerPoint 95 97 2000 hereafter referred to as PowerPoint into indexes playable with PC Card Viewer Microsoft Windows and PowerPoint are registered trademarks of Microsoft Corporation Inserting and Ejecting a PC Card A PC card is used to view presentation data prepared on the computer and to capture and play im...

Page 44: ...45 Starting Up the PC Card Viewer Software on your PC PC Card Viewer Utility 1 0 Use the PC Card Viewer Utility 1 0 for creating viewer slides To start the PC Card Viewer software Select Start Programs NEC Projector Tools PC Card Viewer Utility 1 0 Refer to online help for instructions on using the PC Card Viewer soft ware Contents of the English version PC Card Viewer software PC Card Viewer Util...

Page 45: ...r manually depending on the set ting on PC Card Viewer Options of the menu This allows you to move on to the next slide when Manual Play is selected Stop This allows you to stop Auto Play while you are playing back and to resume playing from the selected slide or folder when Auto Play is selected Jump Displays a list of slides while you are playing back Select Displays a list of folders while you ...

Page 46: ...s using a combination of slides and moving pictures from a VCR etc it is possible to switch from a PC Card Viewer slide to the video picture then back to the PC Card Viewer slide simply by using a source button and PC CARD button NOTE Even if you switch the current PC Card Viewer source to another source the current slide is retained When you return back to the PC Card Viewer you will get the slid...

Page 47: ... card data is damaged use a computer to repair the data NOTE The folder in the right bottom is always a folder exclusively for captured images To display the list of folders when there are 13 or more indexes stored on the PC card select Edit index from the PC Card Viewer software s File menu and move the index you want to display to within 12 indexes from the top of the folder index For details on...

Page 48: ...e software Use the procedure described below to uninstall the PC Card Viewer software files 1 From the Start menu select Settings then Control Panels 2 In the Control Panels dialog box double click on Add Remove Programs 3 In the Add Remove Programs Properties dialog box click the Setup Remove tab then select PC Card Viewer Utility 1 0 from the list of applications and click on Add Remove 4 In the...

Page 49: ...TA specifications It is one fourth the volume of a PCMCIA card PCMCIA 2 1 PC cards are divided into three types according to their thickness Type I 3 3 mm Type II 5 0 mm and Type III 10 5 mm A type of image format The standard Windows Bit Map format used for MS DOS Windows compatible computers A type of image format JPEG is the abbreviation of Joint Photographic Experts Group JPEG compression offe...

Page 50: ... C T P O W E R S T A T U S S O N S T A N D B Y M ENU S O U R C E A U T O 2 Loosen the two screws securing the lamp housing until the screw driver goes into a freewheeling condition The three screws are not removable Remove the lamp housing by pulling out the handle NOTE There is an interlock on this case to prevent the risk of electrical shock Do not attempt to circumvent this interlock M ENU ENTE...

Page 51: ... unless the filter cover is installed cor rectly To clean the air filter Vacuum the filter through the filter cover M E N U E N T E R C A N C E L S E L E C T P O W E R S T A T U S O N O F F S O U R C E A U T O A D JU S T US B AC IN To replace the air filter 1 Remove the filter cover by pushing up on the catch of the cover until you feel it detach M E N U E L L E C T S O U R C E A U T O A D J U S T...

Page 52: ...tone to correct the trapezoid distortion See page E 28 or 33 Adjust the focus See page E 25 Reposition the projector to improve its angle to the screen See page E 14 Ensure that the distance between the projector and screen is within the adjustment range of the lens See page E 17 Use menus or a source button on the remote control or the cabinet to select the source you want to input Install new ba...

Page 53: ... While an image with over 1024 768 dots MT850 800 600 dots is projected several lines of information will be lost Use the supplied software change the image to 1024 768 dots in size Use a computer etc to repair the data Condition Status When using the PC Card Viewer function For more information contact your dealer No picture Part of a slide is not displayed Contents of PC Card are damaged ...

Page 54: ...TSC PAL NTSC4 43 YCbCr 350 TV lines SECAM RGB MT850 800 dots horizontal 600 dots vertical MT1055 MT1050 1024 dots horizontal 768 dots vertical Power Requirement 100 120 200 240 VAC 50 60 Hz Input Current 3 5 A 100 120 VAC 1 7A 200 240 VAC Mechanical Dimensions MT1050 MT850 11 1 W 4 8 H 14 3 D 281mm W 121mm H 364mm D not including lens and feet MT1055 11 1 W 4 8 H 14 9 D 281mm W 121mm H 376mm D not...

Page 55: ...WER STATUS ON STAND BY SOURCE AUTO ADJUST AC IN USB S VIDEO VIDEO AUDIO RGB INPUT 2 AUDIO RGB INPUT 1 L MONO R PC CARD AUDIO RGB MONITOR OUTPUT 1 5 0 06 281 11 06 73 5 2 89 121 4 76 4 0 16 7 5 0 3 39 5 1 56 376 14 9 PC CONTROL MOUSE OUTPUT REMOTE CONTROL INPUT Lens center Lens center ...

Page 56: ... STATUS SOURCE AUTO ADJUST AC IN USB S VIDEO VIDEO AUDIO RGB INPUT 2 AUDIO RGB INPUT 1 L MONO R AUDIO RGB MONITOR OUTPUT 1 5 0 06 281 11 06 73 5 2 89 121 4 76 4 0 16 6 6 0 26 364 14 33 39 5 1 56 ON STAND BY PC CONTROL MOUSE OUTPUT REMOTE CONTROL INPUT Lens center Lens center ...

Page 57: ...round 5 Ground 6 Red Ground Cr Ground 7 Green Ground Y Ground 8 Blue Ground Cb Ground 9 No Connection 10 Sync Signal Ground 11 Ground 12 Bi directional DATA SDA 13 Horizontal Sync or Composite Sync 14 Vertical Sync 15 Data Clock Signal Level Video signal 0 7Vp p Analog Sync signal TTL level RGB Input 1 only 5 1 4 2 3 10 11 12 13 14 15 6 9 7 8 ...

Page 58: ...681 75 06 100 Y SUN 1152 900 61 796 65 95 92 94 Y SGI 1152 900 71 736 76 05 105 6 Y VESA 1280 960 60 60 108 Y SGI 1280 1024 63 9 60 107 35 Y VESA 1280 1024 63 981 60 02 108 Y MAC 1280 1024 64 31 60 38 107 Y MAC 1280 1024 69 9 65 2 118 5 Y HP 1280 1024 78 125 72 01 135 Y SUN 1280 1024 81 13 76 11 135 Y VESA 1280 1024 79 976 75 03 135 Y VESA 1280 1024 91 146 85 02 157 5 Y HDTV 1080i 1125i 1920 1080 ...

Page 59: ...MUTE ON 02H 10H 00H 00H 00H 12H PICTURE MUTE OFF 02H 11H 00H 00H 00H 13H SOUND MUTE ON 02H 12H 00H 00H 00H 14H SOUND MUTE OFF 02H 13H 00H 00H 00H 15H ON SCREEN MUTE ON 02H 14H 00H 00H 00H 16H ON SCREEN MUTE OFF 02H 15H 00H 00H 00H 17H NOTE Contact your local dealer for a full list of the PC Control Codes if needed Cable Connection Communication Protocol Baud rate 38400 bps Data length 8 bits Parit...

Page 60: ...Printed in Japan 7N8P0161 ...

Reviews: