background image

English

English-19

Tag3

Auto Adjust

Automatically adjusts the Image Position and H.Size settings and Fine settings.

(Analog input only)

Press “SELECT” to activate Auto Adjustment.

Signal Adjust

Determines when the auto adjustment is activated automatically.

(Analog input only)

The choices are “SIMPLE” and “FULL”. Press “Left” or “Right” to select.

Auto Adjust Level

Determines the automatic adjustment level for Auto Adjust. The choices are “SIMPLE”,

(Analog input only)

“FULL” and “DETAIL”. Press “Left” or “Right” to select. Refer to the below table.

A-NTAA SW

The Advanced No Touch Auto Adjust function is able to recognize new signals even when

(Analog input only)

neither the resolution nor the refresh rate has changed. If several PCs are connected to
the monitor, and each transmit very similar (or even the same) signals in terms of
resolution and refresh rates, the monitor recognizes that there is a new signal and
automatically optimizes the picture without the need for any action on the part of the user.
OFF: A-NTAA is disabled.
ON: If a change in signal is detected A-NTAA will adjust the monitor to the optimal settings
for the new signal. If no change in the signal is detected then A-NTAA does not activate.
The screen will be blank while the monitor optimizes the signal.
OPTION: Functions the same as ON, except that the screen does not go blank when the
monitor makes adjustments for changes in signal, allowing the monitor to display the new
signal faster. When using an external switching device to connect 2 or more PCs to the
monitor, using the ON or OPTION settings is suitable.

Tag4

H. Position

Controls Horizontal Image Position within the display area of the LCD.
Press “Left” or “Right” to adjust.

V. Position

Controls Vertical Image Position within the display area of the LCD.
Press “Left” or “Right” to adjust.

H. Size

Adjusts the horizontal size of the screen.

(Analog input only)

If the “AUTO Adjust function” do not give you a satisfactory picture setting, a further
tuning can be performed using the “H.Size (V.Size)” function (dot clock). For this a Moiré
test pattern could be used. This function may alter the width of the picture. Use left/Right
Menu to center the image on the screen. If the H.Size (V.Size) is wrongly calibrated, the
result would look like on the left drawing. The image should be homogeneous.

Fine

Improve focus, clarity and image stability by increasing or decreasing this setting.

(Analog input only)

If the “Auto Adjust function” and the “H.Size” function do not give you a satisfactory
picture setting, a fine tuning can be performed using the “Fine” function. For this a Moiré
test pattern could be used. If the Fine value is wrongly calibrated, the result would look
like on the left drawing. The image should be homogeneous.

Auto Fine

This function automatically and periodically adjusts the “FINE” setting for change in signal

(Analog input only)

condition. This function adjusts approximately every 33 minutes.

H. Resolution

Adjusts the horizontal size by increasing or decreasing the setting.
Press “Right” button to expand the width of the image on the screen.
Press “Left” button to narrow the width of the image on the screen.

V. Resolution

Adjusts the vertical size by increasing or decreasing the setting.
Press “Right” button to expand the height of the image on the screen.
Press “Left” button to narrow the height of the image on the screen.

Expansion

Sets the zoom method.
FULL: The image is expanded to 1280 x 1024, regardless of the resolution.
ASPECT: The image is expanded without changing the aspect ratio.
OFF: The image is not expanded.
CUSTOM: When CUSTOM is selected as the Expansion mode, it becomes possible to
adjust the H. ZOOM., V. ZOOM, and ZOOM POS.

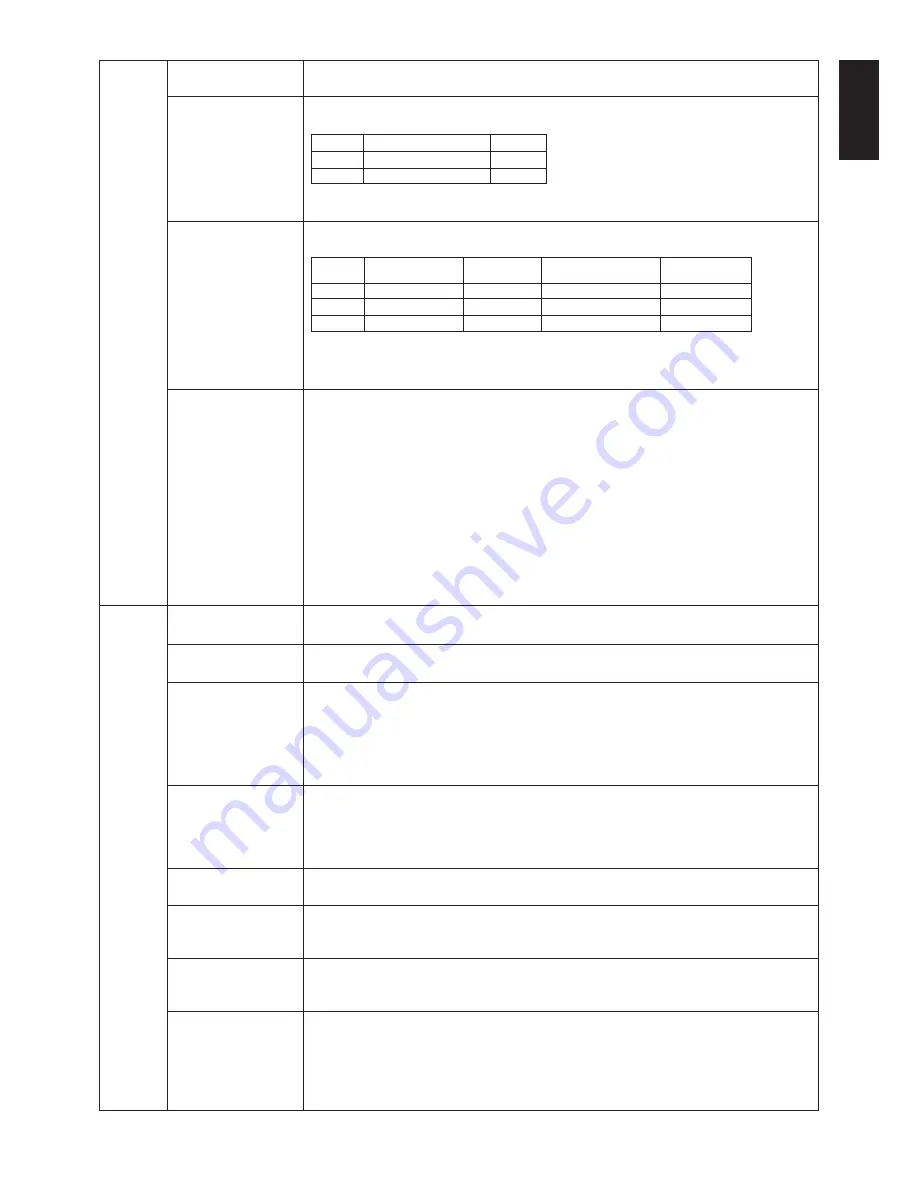
H-size, Fine, H/V Position

Contrast

SIMPLE

O

X

FULL

O

O

O: Automatic Adjustment   X: No Automatic Adjustment

NOTE: Automatic Adjustment does not work at resolutions less than 800x600 resolution.

Size, Fine, Position

Contrast

Black Level,

Time

Long cable capability**

SIMPLE

O

X

X

1 second

FULL

O

O

X

1.5 seconds

DETAIL*

O

O

O

5 seconds

O: Automatic Adjustment X: No Automatic Adjustment

* “DETAIL” activates automatic long cable (skew, peaking) adjustment.
** Black level, RGB sharpness, RGB delay and RGB position are adjusted using “Long cable software”
which is included in the attached CD-ROM.

Summary of Contents for LCD1990SXi BK MultiSync -LCD

Page 1: ...MultiSync LCD1990SXi User s Manual...

Page 2: ...ion of Conformity English 2 Contents English 3 Quick Start English 4 Controls English 8 Recommended use English 13 Specifications English 15 Features English 16 Troubleshooting English 17 Appendix Eng...

Page 3: ...irective 73 23 EEC EN 60950 1 Council Directive 89 336 EEC EN 55022 EN 61000 3 2 EN 61000 3 3 EN 55024 and marked with NEC Display Solutions Ltd 4 13 23 Shibaura Minato Ku Tokyo 108 0023 Japan Windows...

Page 4: ...a particular installation If this equipment does cause harmful interference to radio or television reception which can be determined by turning the equipment off and on the user is encouraged to try t...

Page 5: ...VI D cable User s Manual CD ROM Cable Cover Screw x 4 to mount the monitor to a flexible arm page 7 Power Cord Continental User s Manual DVI D to DVI D cable Cable Cover CD ROM 15 pin mini D SUB male...

Page 6: ...C 1 4 Connect all cables to the appropriate connectors Figure C 1 NOTE Incorrect cable connections may result in irregular operation damage display quality components of LCD module and or shorten the...

Page 7: ...monitor must be turned on Turn on the monitor with the front power button Figure E 1 and the computer NOTE The Vacation Switch is a true on off switch If this switch is on the OFF position the monitor...

Page 8: ...raise the screen place hands on each side of the monitor and lift up to the highest position Figure RL 1 To rotate screen place hands on each side of the monitor screen and turn clockwise from Landsca...

Page 9: ...ns on how Remove Monitor Stand for Mounting to remove the stand 2 Using the 4 screws from the stand removal and attach the arm to the monitor Figure F 1 Caution Use ONLY the screws 4 pcs that are incl...

Page 10: ...s to various settings resulting in a more comfortable viewing experience Do not cover this sensor Turns the monitor on and off Indicates that the power is on Can be changed between blue and green in t...

Page 11: ...tal Image Position within the display area of the LCD DOWN UP Controls Vertical Image Position within the display area of the LCD H SIZE V SIZE Analog input only Adjusts the horizontal size by increas...

Page 12: ...p image at any timings It is continuously adjustable to get distinct image or soft one as you prefer and set independently by different timings DVI SELECTION This function selects the DVI input mode D...

Page 13: ...e to appear on your screen Selecting OSD Location allows you to manually adjust the position of the OSD control menu left or right OSD DOWN UP You can choose where you would like the OSD control image...

Page 14: ...lay and technical data including the preset timing being used and the horizontal and vertical frequencies Indicates the model and serial numbers of your monitor OSD Warning OSD Warning menus disappear...

Page 15: ...all outlet and refer servicing to qualified service personnel under the following conditions When the power supply cord or plug is damaged If liquid has been spilled or objects have fallen into the mo...

Page 16: ...patterns on the monitor for long periods of time to avoid image persistence after image effects Get regular eye checkups Ergonomics To realize the maximum ergonomics benefits we recommend the followi...

Page 17: ...s 1280 x 960 1 at 60 Hz recommended resolution at 60 Hz for 1280 x 1024 at 60 Hz to 75 Hz optimal display performance 1024 x 1280 1 at 60 Hz Active Landscape Horiz 376 mm 14 8 inches Display Area Vert...

Page 18: ...of your monitor to a variety of standards OSD On Screen Display Controls Allow you to quickly and easily adjust all elements of your screen image via simple to use on screen menus ErgoDesign Features...

Page 19: ...en not in use Message OUT OF RANGE is displayed screen is either blank or shows rough images only Image is displayed only roughly pixels are missing and OSD warning OUT OF RANGE is displayed Either si...

Page 20: ...djusts the brightness automatically by detecting the brightness level of your environment and adjusting the monitor with your BRIGHTNESS setting 2 Adjusts the brightness automatically for the best BRI...

Page 21: ...n dot clock For this a Moir test pattern could be used This function may alter the width of the picture Use left Right Menu to center the image on the screen If the H Size V Size is wrongly calibrated...

Page 22: ...to 4 0 by 0 1 steps When the COLOR CONTROL is sRGB the value is fixed at 2 2 and NOT ADJUSTABLE Offset The OFFSET digitally adjusts the black level after the signal is converted from analog to digital...

Page 23: ...ower save mode automatically when the amount of surrounding light goes below the level that is determined by the user OFF MODE Setting Adjusts the luminance value for OFF MODE Response Improve Turns t...

Page 24: ...olor Adjust Window frame color can be changed Signal Information Signal information can be displayed in the corner of the screen Signal information is either On Off Resolution Notifier The optimal res...

Page 25: ...or composite input signals Try this option if the FINE adjustment does not successfully eliminate the noise SOG Threshold Analog input only Adjusts the sensitivity of the Sync On Green input signals A...

Page 26: ...on time select in the ON time slot If you do not want to use a power off time select in the OFF time slot If there is no input selected showing in the input spot the input from the previous schedule w...

Page 27: ...vel Figure 2 2 Set the DARK level This is the level of brightness that the monitor will go down to when the ambient light level is low Make sure the room is at its darkest when setting this level Then...

Page 28: ...Energy saving mode after a certain time beneficial both for the user and the environment Electrical safety Emissions Electromagnetic fields Noise emissions Ecology The product must be prepared for rec...

Page 29: ...d signal is sent to the monitor the Energy Saving mode is activated The monitor enters a single Energy Saving mode Mode Power consumption LED colour Normal Operation Approx 46W Green or Blue Energy Sa...

Reviews: