background image

24

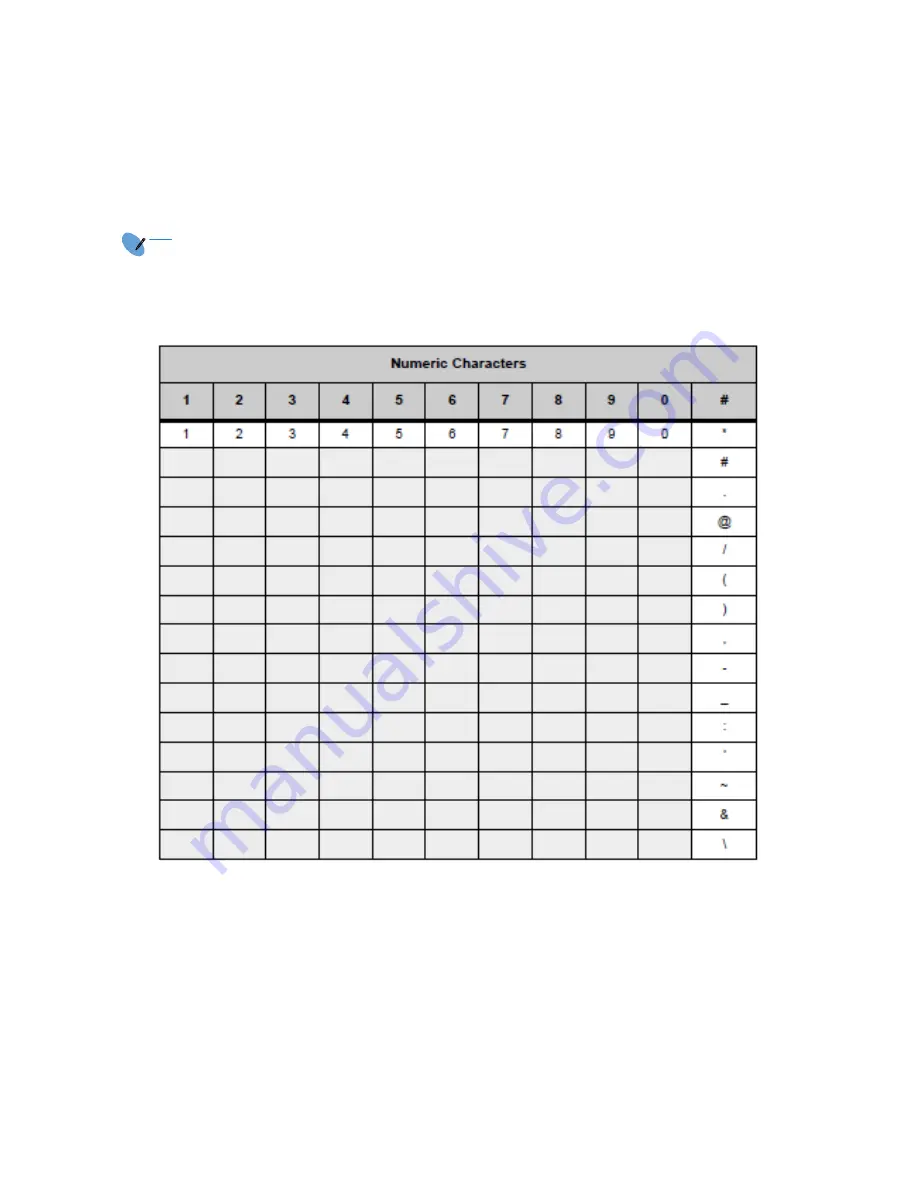
Numeric Character Set 

When in numeric character entry mode, you can use the numbered keys on the 

phone to enter numbers, and the # key to enter special characters. You can 

switch between character sets by pressing the 

*

 key.   

NOTE

The full numeric character set is only available when you are in a field that also allows 

alphabetic input. If you are not in a field that allows for alphabetic input, the only 

special characters you can enter are 

*

 and #.

Summary of Contents for ITK-6DGS-1

Page 1: ... Orchestrating a brighter world UNIVERGE BLUE CONNECT START GUIDE ITK 6DGS 1 NDA 32023 Issue 2 0 ...

Page 2: ...ic property damage or ix cause or permit any third party to do any of the foregoing 3 Upon giving prior written notice to you NECPF shall have the right to audit your use deployment and exploitation of the Licensed Products for the purpose of confirming whether you comply with the terms and conditions of this Agreement Such audit shall be conducted during regular business hours at your site and in...

Page 3: ...DUCTS BY YOU 7 Open Source Software The Software includes the Open Source Software components hereinafter called the OSS Such OSS is not subject to the terms and conditions of this Agreement but those of the applicable license Please visit following website for obtaining details of such OSS and terms and conditions of use there for https mind bcom nec co jp customernet soft license DT900S_OSS_V500...

Page 4: ...EMEA NEC Enterprise Solutions Olympia 4 1213 NT Hilversum The Netherlands TEL 31 35 6899111 Asia NEC Platforms Ltd 1753 Shimonumabe Nakahara ku Kawasaki Kanagawa 211 8666 Japan TEL 81 44 435 5342 ...

Page 5: ...WELCOME TO UNIVERGE BLUE CONNECT All of your business communications integrated efficient and reliable ...

Page 6: ...1 What s in the box NEC ITK 6DGS 1 ITK 6DGS 1 Base and Handset ...

Page 7: ... height upward to raise the height and downward to lower the height Connect Cables Please follow the diagram to install your phone Once plugged in the phone automatically downloads its configuration and starts to work The voicemail box is functional with a default greeting 1 Connect an Ethernet cable to the LAN port on the phone and connect the other end to your network 1 To PC Connector 2 LAN Con...

Page 8: ...st first enable headset mode on the ITK 6DGS 1 1 Press the Menu button 2 Arrow down and select User Settings 3 Arrow down and select Headset 4 Select Enable Disable 5 Arrow down to Enable and press OK 6 Press the Exit button several times to return to the main menu 1 Multiline Terminal 2 Module Plug 3 Curl Cord 4 Groove 5 Connector ...

Page 9: ...of the phone The phone picks the headset as the default communication method that is used when placing and answering phone calls To return the phone to non headset mode follow the steps in Configure a Headset and set Headset to Disabled 1 Multiline Terminal 2 Module Plug 3 Curl Cord 4 Groove 5 Headset Connector ...

Page 10: ...ady red for message waiting If missed call notification for the call indicator lamp is enabled the lamp flashes for incoming calls and missed calls including missed calls where someone has left a voice mail The lamp only display steady red if you still have mes sages waiting after you have cleared your missed calls 2 LCD The LCD Liquid Crystal Display provides call status activity information plus...

Page 11: ...Menu key Press this key to access the features and settings provided on the local telephone menu such as Call History Personal Directory or User Settings 7 Mute key Press key to mute the microphone The LED on this key flashes when the microphone is muted Press the key again to un mute the microphone This button displays a red light when the phone is idle The light does not display when the micro p...

Page 12: ... personal options 4 Select option 1 to record your voicemail greeting 5 Follow the voice prompts to record and check your greeting CHANGING THE PIN FROM THE PHONE 1 Press the Voicemail soft key 2 Enter the PIN provided to you by your Administrator followed by the key 3 Select option 3 for personal options 4 Select option 2 to change your PIN 5 Enter the new PIN when prompted Press when done ...

Page 13: ...e original call is put on hold 4 Dial an extension or telephone number ANSWERING AN INCOMING CALL On the Handset Pick up the handset to answer the call On a Headset Press the Headset button On Speakerphone Press the Speaker button or the Answer soft key to answer the call REJECTING AN INCOMING CALL Press the Reject soft key to immediately send the caller to voicemail REDIAL LAST NUMBER DIALED Pres...

Page 14: ...To mute the microphone on an active call press the Mute button 2 To un mute the microphone press the Mute button again TRANSFERRING CALLS Blind Transfers 1 While on a call press the Transfer soft key 2 Dial the desired phone number or extension number 3 While the destination is ringing press the Transfer soft key again 4 The call is automatically transferred Attended Consultative or Warm Transfers...

Page 15: ... the Answer soft key The first call will be placed on hold 3 Once your second call has ended resume the original call by pressing the Resume button To Reject the Second Call 1 Press the first line key The line key will begin blinking 2 Press the Reject soft key to immediately send the caller to voicemail VOLUME ADJUSTMENT In Call Volume While on a call press the Up and Down cursor pad buttons to a...

Page 16: ...ect the Monitor Park Slot Line Key programmed previously via Control Panel The Monitor Park slot line key enables you to add the Park Extensions to line keys for accessing the parked call as well as a visual indication of the parked call CALL PICKUP To Pickup a Call from an Extension Directed Call Pickup From any phone dial 95 and the extension number of the ringing station you would like to answe...

Page 17: ...ey to initiate the call or wait a few seconds for the call to be automatically dialed 4 If you decide not to complete the conference then the call can be terminated by pressing the EndCall soft key 5 If you want to switch between each party before the conference is established you can use the Shuttle soft key 6 You can complete the conference by pressing the Conf soft key Hang up while conferencin...

Page 18: ...VM Box Direct Quick Transfer to VM While on a call select the Transfer soft key then Dial and the extension number of the caller to whom you want to leave the VM and hang up ON DEMAND CALL RECORDING To Enable On Demand Call Recording While on a call dial 9 or select the Record line key programmed previously via Control Panel to start and stop the recording The recording feature must be enabled by ...

Page 19: ...nal Contacts You can also select the Search soft key and use the keypad to search for an entry Once the entry is highlighted you can call the contact by simply going off hook on handset speaker or headset if enabled To view a specific Personal Contacts entry 1 Use the Up and Down soft keys or the Up and Down keys on the cursor pad to scroll through the Personal Contacts 2 Press the soft key twice ...

Page 20: ...key 4 Use the keypad to enter a name for the Personal Contact 5 then press the middle button on the cursor pad or the OK soft key Use the key to switch between uppercase and lowercase keypad entry mode 6 Use the telephone keypad to enter a phone number for the entry and press the middle button on the cursor pad or the OK soft key ...

Page 21: ...se connections Try using another network cable to connect your phone to the network or try connecting to another active LAN port on the network Missed Call Appears when there is a missed call Once you check the missed call log in the Call History information this icon disappears Voice mail Provides notification of incoming voice mail Once the user has checked the voice mail this icon disappears He...

Page 22: ...nference call Call Conferencing Hold This icon is displayed when you have two other callers in a 3 way conference and have the conference both callers on hold Conference With Hold Primary and Consult Indicates that you are connecting to a conference that is in a held state See icons with Transfer to Hold Feature Images Description Handset Ringing Volume Shows the ringing volume of the handset for ...

Page 23: ...18 Monitor Presence Icons Type Status Images Line Key Registered Unregistered Speed Dial Key No Monitoring Not Available BLF Idle Ringing Subscription Failed Online 3C system only On the Phone Held Busy ...

Page 24: ...guage Select this option to set up for the language English Internal Volumes Select this option to set up for the volume Refer to Volumes on page 20 Date Time Select this option to set up for date and time Refer to Date Time on page 20 LCD Select this option to set up for the LCD Refer to LCD on page 20 Data Clear Select this option to clear the terminal data User Settings or Personal Contacts or ...

Page 25: ...ings Phone Menu Item Description Default Value Call Waiting Volume Select this option to specify the volume of call waiting 19 Hold Reminder Volume Select this option to specify the volume of hold reminder 19 Menu Item Description Default Value Date Format Select this option to change the display order of date day of the week and year Mon Jan 1 Time Format Choose between 12 hour or 24 hour clock f...

Page 26: ...e name you can enter uppercase and lowercase standard and European characters The keypad is in upper case entry mode upon entering the screen You can switch between upper and lower case character sets by pressing the key An icon in the title bar will show which entry mode uppercase lowercase or numeric set is selected The following tables show the available characters ...

Page 27: ...22 Uppercase Alphabetical Character Set ...

Page 28: ...23 Lowercase Alphabetic Character Set ...

Page 29: ...rs and the key to enter special characters You can switch between character sets by pressing the key NOTE The full numeric character set is only available when you are in a field that also allows alphabetic input If you are not in a field that allows for alphabetic input the only special characters you can enter are and ...

Page 30: ...ing the WM L UNIT Wall Mounting a DT900 Multiline Terminal using the Base Plate Please note because of the variation in wall plates this method is not recommended To adjust the Hanger Hook 1 Remove the hook from the unit 2 Turn the hook with the tab toward the top 3 Slide the hook until it glides into position forming the hanger hook for the handset 1 Hanger Hook 2 Multiline Terminal Sliding the H...

Page 31: ...ilt Legs are in the flat unused position 3 Plug the line cord or LAN cable into the multiline terminal Refer to Connect Cables on page 2 for cable connection instructions 4 Align the two holes on the back of the multiline terminal with the two screws on the wall plate and slide downward 5 Push the spare line cord behind the multiline terminal Bundling the Line Cord Connecting to Wall Plate ...

Page 32: ...Wall Plate 1 Locate the screw holes on the base and hang the cover over the screws on the wall plate 2 Hang the terminal on the base When it is correctly mounted it will be flush with the wall Wall Mount on Wall Plate Wall Mounted Unit ...

Page 33: ... to record frequently dialed numbers or other important information To Install the Directory Card Unit 1 Insert the holder into the holder socket on the back of the multiline terminal 2 A protective sheet is attached to the surface of the cover to prevent scratches Peel off before attaching to the holder 3 Insert the Directory Card into the cover and attach it to the holder Removing Wall Mounted U...

Page 34: ...29 CG Directory Unit L 1 Cover 2 Directory Card 3 Holder 4 Holder Joint Hole ...

Page 35: ... the telephone When optional adapters are used the multiline terminal must be installed on the wall using the WM L UNIT To Mount a Multiline Terminal on the Wall using WM L UNIT 1 Use the appropriate template shown in the following figures for required spacing for each phone model before drilling ITK 6DGS 1 Wall Mount Spacing Guide WM L UNIT ...

Page 36: ...r using two wall mounted screws as shown in the following diagram 2 Plug one end of the line cord into the wall receptacle Leave about eight inches of cord and bundle the rest 3 Refer to Connect Cables on page 2 Attach WM L UNIT Using Screws 1 WM L UNIT 2 Screws 3 Screws 4 WM L Unit ...

Page 37: ...32 To Align Cutouts for WM L Unit 1 Align the four cutouts on the bottom of the multiline terminal with the tabs on the WM L UNIT as shown in the following diagrams Align Cutouts Align Tabs ...

Page 38: ...Push down until the multiline terminal snaps into place 3 To release the multiline terminal from the WM L UNIT press the release button and push the telephone up WM L UNIT Installed WM L UNIT Release Button ...

Page 39: ... 2 Plug one end of the line cord into the wall receptacle Leave about eight inches of cord and bundle the rest 3 Refer to Connect Cables on page 2 4 Now align the four cutouts on the bottom of the multiline terminal with the tabs on the WM L UNIT NOTE Because of variation in wall plates this method is not recommended Attach WM L UNIT to Wall Plate ...

Page 40: ...35 Align Cutouts Align Tabs ...

Page 41: ...6 5 Push down until the multiline terminal snaps into place 6 To remove the WM L UNIT from the wall panel push up on the telephone until it comes loose Attach WM L UNIT Installed Attach WM L UNIT Removed ...

Page 42: ...37 7 To separate the multiline terminal from the WM L UNIT press the release button and slide the multiline terminal up Attach WM L UNIT Release Button ...

Page 43: ...38 Weare hereto help http kb univerge blue main NECCorporation1994 2020 ...

Reviews: