background image

English-1

English

Declaration of the Manufacturer

We hereby certify that the colour monitor AccuSync LCD72XM
(L174F1)/AccuSync LCD92XM (L194F2) is in compliance with

Council Directive 73/23/EEC:

– EN 60950-1

Council Directive 89/336/EEC:

– EN 55022
– EN 61000-3-2
– EN 61000-3-3
– EN 55024

RISK OF ELECTRIC SHOCK • DO NOT OPEN

TO PREVENT FIRE OR SHOCK HAZARDS, DO NOT EXPOSE THIS UNIT TO RAIN OR MOISTURE. ALSO, DO NOT USE THIS UNIT’S
POLARIZED PLUG WITH AN EXTENSION CORD RECEPTACLE OR OTHER OUTLETS UNLESS THE PRONGS CAN BE FULLY INSERTED.
REFRAIN FROM OPENING THE CABINET AS THERE ARE HIGH VOLTAGE COMPONENTS INSIDE. REFER SERVICING TO QUALIFIED
SERVICE PERSONNEL.

WARNING

CAUTION: TO REDUCE THE RISK OF ELECTRIC SHOCK,

DO NOT REMOVE COVER (OR BACK). NO USER
SERVICEABLE PARTS INSIDE. REFER SERVICING
TO QUALIFIED SERVICE PERSONNEL.

This symbol warns user that uninsulated voltage
within the unit may have sufficient magnitude to cause
electric shock. Therefore, it is dangerous to make any
kind of contact with any part inside this unit.

This symbol alerts the user that important literature
concerning the operation and maintenance of this
unit has been included. Therefore, it should be read
carefully in order to avoid any problems.

CAUTION

and marked with

NEC Display Solutions, Ltd.

4-13-23, Shibaura,

Minato-Ku

Tokyo 108-0023, Japan
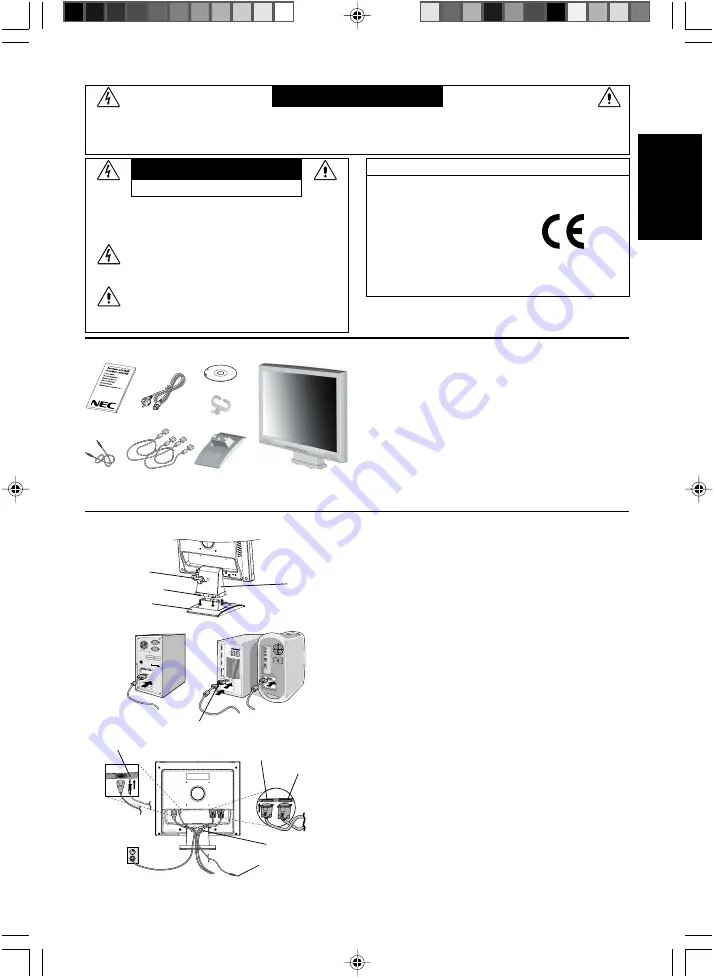
Contents

Your new NEC AccuSync LCD monitor box* should contain the
following:

AccuSync LCD monitor with tilt base

Audio Cable

Power Cord

Video Signal Cable

DVI-D Cable (LCD92XM only)

User’s Manual

CD-ROM

Base Stand

Cable Holder

*

Remember to save your original box and packing material to
transport or ship the monitor.

User’s

Manual

Audio
Cable

Power Cord

Video Signal

Cable and

DVI-D Cable

Base

Stand

AccuSync LCD monitor

(base stand not connected)

CD-ROM

Quick Start

To attach the Base to the LCD Stand:

1. Insert the front of the LCD stand into the holes in the front of the

Base (

Figure S.1

).

2. Next, position the locking tabs on the back side of the LCD stand

with the holes on the Base. Lower the Stand in place until locking
tabs are secure (

Figure S.1

).

To attach the Cable Holder:

1. Insert the tabs of Cable Holder into the hole of Stand neck (

Figure

S.1

). 

NOTE:

 Please confirm that the tabs are completely secure.

To attach the AccuSync LCD monitor to your system, follow these
instructions:

1. Turn off the power to your computer.

2.

For the PC or MAC with DVI digital output: 

Connect the DVI-D

signal cable (included with LCD92XM only) to the connector of the
display card in your system (

Figure B.1

). Tighten all screws.

For the PC with Analog output:

 Connect the 15-pin mini D-SUB

signal cable to the connector of the display card in your system
(

Figure A.1

). Tighten all screws.

For the Mac: 

Connect the MultiSync Macintosh cable adapter (not

included) to the computer. Attach the 15-pin mini D-SUB signal cable
to the MultiSync Macintosh cable adapter


(

Figure A.2

). Tighten all

screws.

NOTE:

Some Macintosh systems do not require a Macintosh cable
adapter.

3. Connect the 15-pin mini D-SUB of the video signal cable and Audio

Cable to the appropriate connector on the back of the monitor
(

Figure B.1

). Connect the Headphone (not included) to the

appropriate connector at the front of the monitor (

Figure C.1

).

4. Connect one end of the power cord to the monitor and the other end

to the power outlet. Place the Video Signal Cable and power cord to
the Cable holder (

Figure B.1

).

Figure S.1

Base

Locking Tabs

Stand

Figure A.1

Figure A.2

Macintosh Cable
Adapter (not included)

Cable holder

AUDIO INPUT

D-Sub (Input1)

Connect to Computer
audio output

Cable Holder

Figure B.1

Cable Holder

DVI-D (Input2)

01_English

11/08/2005, 12:25

1

Summary of Contents for AccuSync LCD72XM

Page 1: ...AccuSync LCD72XM AccuSync LCD92XM User s Manual Bedienerhandbuch Manual del usuario Manuel Utilisateur Manuale utente Руководство пользователя 00_Cover 11 08 2005 12 25 1 ...

Page 2: ... need to dispose of your NEC display products please follow the guidance of your local authority or ask the shop where you purchased the product or if applicable follow any agreements made between yourself and NEC The mark on electrical and electronic products only applies to the current European Union Member States Outside the European Union If you wish to dispose of used electrical and electroni...

Page 3: ...ase Stand AccuSync LCD monitor base stand not connected CD ROM Quick Start To attach the Base to the LCD Stand 1 Insert the front of the LCD stand into the holes in the front of the Base Figure S 1 2 Next position the locking tabs on the back side of the LCD stand with the holes on the Base Lower the Stand in place until locking tabs are secure Figure S 1 To attach the Cable Holder 1 Insert the ta...

Page 4: ... OSM controls Auto Adjust Contrast Auto Adjust Refer to the Controls section of this User s Manual for a full description of these OSM controls NOTE If you have any problem please refer to the Troubleshooting section of this User s Manual Tilt Grasp both sides of the monitor screen with your hands and adjust the tilt as desired Figure TS 1 Remove Monitor Stand for Mounting To prepare the monitor f...

Page 5: ...e reset by highlighting the control to be reset and pressing the RESET button EXIT Selecting EXIT allows you exit OSM menu sub menu LANGUAGE OSM control menus are available in seven languages OSM TURN OFF The OSM control menu will stay on as long as it is in use In the OSM Turn OFF submenu you can select how long the monitor waits after the last touch of a button to shut off the OSM control menu T...

Page 6: ...dfuß nicht montiert CD ROM Kurzanleitung So befestigen Sie den Standfuß am Fuß des LCD Monitors 1 Setzen Sie die Vorderseite des LCD Fußes in die Löcher auf der Vorderseite des Standfußes Abbildung S 1 2 Richten Sie nun die Verriegelungen auf der Rückseite des LCD Fußes auf die Löcher am Standfuß aus Lassen Sie den Monitorfuß in den Standfuß ein bis die Verriegelungen einrasten Abbildung S 1 Gehen...

Page 7: ...men Automatische Kontrasteinstellung Automatische Einstellung Im Abschnitt Bedienelemente dieser Bedienungsanleitung finden Sie eine ausführliche Beschreibung der OSM Steuerungen HINWEIS Treten Probleme auf beachten Sie das Kapitel Fehlerbehebung in dieser Bedienungsanleitung Neigen Fassen Sie den Monitor an beiden Seiten und neigen Sie ihn nach Bedarf Abbildung TS 1 Entfernen des Monitorfußes für...

Page 8: ... können durch Markieren der betreffenden Steuerung und anschließendes Drücken der Taste RESET zurückgesetzt werden EXIT Mit EXIT verlassen Sie das OSM Menü Untermenü SPRACHE Die OSM Menüs sind in sieben Sprachen verfügbar OSM ANZEIGEDAUER Das OSM Steuerungsmenü wird ausgeblendet wenn es nicht mehr verwendet wird Im Untermenü OSM Anzeigedauer können Sie festlegen nach welchem Zeitraum das OSM Steue...

Page 9: ...limentación Cable de señal de vídeo y Cable DVI D Base Monitor LCD AccuSync base no conectada CD ROM Inicio rápido Para conectar la base al soporte del monitor 1 Inserte la parte frontal del soporte del monitor en los orificios situados en la parte delantera de la base figura S 1 2 A continuación inserte las lengüetas de sujeción de la parte trasera del soporte del monitor en los orificios de la b...

Page 10: ...tes utilice los siguientes controles de OSM Contraste de autoajuste Auto ajuste Consulte el apartado Controles de este manual del usuario si desea obtener una descripción detallada de estos controles OSM NOTA si surgiera algún problema consulte el apartado Solución de problemas de este manual del usuario Inclinación Sostenga el monitor por ambos lados con las manos y ajuste la inclinación que dese...

Page 11: ...tive la función Podrá restablecer cada configuración resaltando el control correspondiente y pulsando el botón RESET EXIT Con EXIT podrá salir del menú submenú de OSM IDIOMA Los menús del control OSM están disponibles en siete idiomas ACTIVIDAD OSM El menú de control de OSM permanecerá activado mientras se esté utilizando En el submenú Actividad OSM puede indicar cuánto tiempo debe transcurrir des...

Page 12: ...ntation Câble de signal vidéo et Câble DVI D Support de socle Moniteur LCD AccuSync sans support de socle CD ROM Démarrage rapide Pour fixer le socle au support du LCD 1 Introduire l avant du support du LCD dans les trous à l avant du socle Figure S 1 2 Placer ensuite les pattes de fixation situées à l arrière du support du LCD sur les trous du socle Baisser le socle de manière à bloquer les patte...

Page 13: ...es supplémentaires utilisez les commandes OSM suivantes Contraste automatique Réglage Automatique Reportez vous à la section Commandes de ce manuel de l utilisateur pour une description complète de ces commandes OSM REMARQUE Si vous rencontrez le moindre des problèmes veuillez vous reporter à la section Résolution des problèmes du présent manuel Inclinaison Tenez les deux côtés de l écran du monit...

Page 14: ...ement des réglages en mettant la commande concernée en surbrillance et en appuyant sur le bouton RESET EXIT Sortie La sélection du bouton EXIT vous permet de quitter le menu de l OSM ou un sous menu LANGUE Les menus des commandes OSM sont disponibles en sept langues EXTINCTION DE L OSM Le menu des commandes OSM restera à l écran aussi longtemps qu il sera utilisé Dans le sous menu Extinction OSM v...

Page 15: ...e Utente Cavo audio Cavo di alimentazione Cavo segnali video e Cavo DVI D Supporto base Monitor LCD AccuSync supporto base non collegato CD ROM Guida rapida Per collegare la base al supporto LCD 1 Inserire la parte anteriore del supporto LCD nei fori presenti sulla parte anteriore della base Figura S 1 2 Quindi collocare le linguette di bloccaggio sulla parte posteriore del supporto LCD con i fori...

Page 16: ...r ulteriori regolazioni usare i seguenti controlli OSM Regolazione automatica del contrasto Auto Aggiust Fare riferimento alla sezione Controlli di questo Manuale Utente per una descrizione completa di questi controlli OSM NOTA In caso di problemi fare riferimento alla sezione Ricerca guasti di questo Manuale utente Inclinazione Afferrare con le mani i due lati dello schermo del monitor e inclinar...

Page 17: ...pulsante RESET deve essere tenuto premuto per diversi secondi per avere effetto È possibile resettare impostazioni individuali selezionando il relativo comando e premendo il pulsante RESET EXIT Selezionando EXIT è possibile uscire dal menu sottomenu OSM LINGUA I menu di controllo OSM sono disponibili in sette diverse lingue DISABILITAZIONE OSM Il menu di controllo OSM rimane attivo per il tempo ch...

Page 18: ...а Кабель питания Кабель видеосигнала и Кабель DVI D Подставка основания Монитор AccuSync LCD подставка основания не подсоединена CD ROM Краткое руководство по началу работы Чтобы подсоединить основание к подставке ЖКД 1 Вставьте переднюю часть подставки ЖКД в отверстия в передней части основания Рисунок S 1 2 Затем совместите фиксирующие выступы на задней стороне подставки ЖКД с отверстиями на осн...

Page 19: ...метров синхронизации Для дальнейших настроек используйте следующие параметры OSM Auto Adjust Contrast Автонастройка контрастности Auto Adjust Автонастройка Полное описание этих параметров OSM см в разделе Органы управления этого руководства пользователя ПРИМЕЧАНИЕ В случае какой либо неполадки обратитесь к разделу Устранение неисправностей этого руководства пользователя Наклон Установите требуемый...

Page 20: ...ачений установленных на заводе Для этого необходимо в течение нескольких секунд удерживать нажатой кнопку RESET СБРОС Отдельные настройки можно сбросить выделив их и нажав кнопку RESET EXIT ВЫХОД При выборе кнопки EXIT ВЫХОД можно закрыть меню OSM подменю LANGUAGE ЯЗЫК Меню параметров OSM переведены на семь языков OSM TURN OFF ОТКЛЮЧЕНИЕ МЕНЮ OSM Меню параметров OSM будет оставаться на экране пока...

Page 21: ...xx_Back 11 08 2005 12 26 1 ...

Page 22: ...Printed in China Part Number ________ Printed on recycled paper xx_Back 11 08 2005 12 26 2 ...

Reviews: