background image

Deutsch

Deutsch-2

Verriegelungen

Bedienelemente

Die OSD-Bedienelemente (On-Screen-Display) auf der Vorderseite des Monitors haben folgende Funktionen:

1. Basisfunktion beim Betätigen der jeweiligen Taste

Zeigt den OSD an.

Öffnet das Fenster für die
Helligkeitseinstellung.

Taste

Ohne OSD-
Anzeige

Öffnet das Fenster für die
Lautstärkeeinstellung.

Mit OSD-Anzeige

(Symbolauswahlmodus)

Wechselt zur
Einstellungsphase.

Cursor nach links.

Cursor nach rechts.

Mit OSD-Anzeige

(Einstellungsmodus)

Wechselt zum
Symbolauswahlmodus.

Verringert den Wert oder
bewegt Cursor nach links.

Erhöht den Wert oder
bewegt Cursor nach rechts.

SELECT

+

Aktiviert die automatische
Einstellung.

Zurücksetzen der Einstellung.
Schaltet im Fenster für die
Lautstärkeeinstellung die
Stummschaltung ein/aus.

AUTO/RESET

5. Schalten Sie den Computer und den Monitor mit dem Netzschalter

an der Vorderseite (

Abbildung C.1

) ein.

6. Die berührungslose Einstellungsautomatik nimmt beim ersten

Setup für die meisten Timings die optimalen Einstellungen für den
Monitor vor. Weitere Anpassungen werden mit den folgenden
OSD Steuerungen vorgenommen:

Automatische Kontrasteinstellung

Automatische Einstellung

Im Abschnitt 

Bedienelemente

 dieser Bedienungsanleitung finden

Sie eine ausführliche Beschreibung der OSD-Steuerungen.

HINWEIS:

Treten Probleme auf, beachten Sie das Kapitel

Fehlerbehebung

 in dieser Bedienungsanleitung.
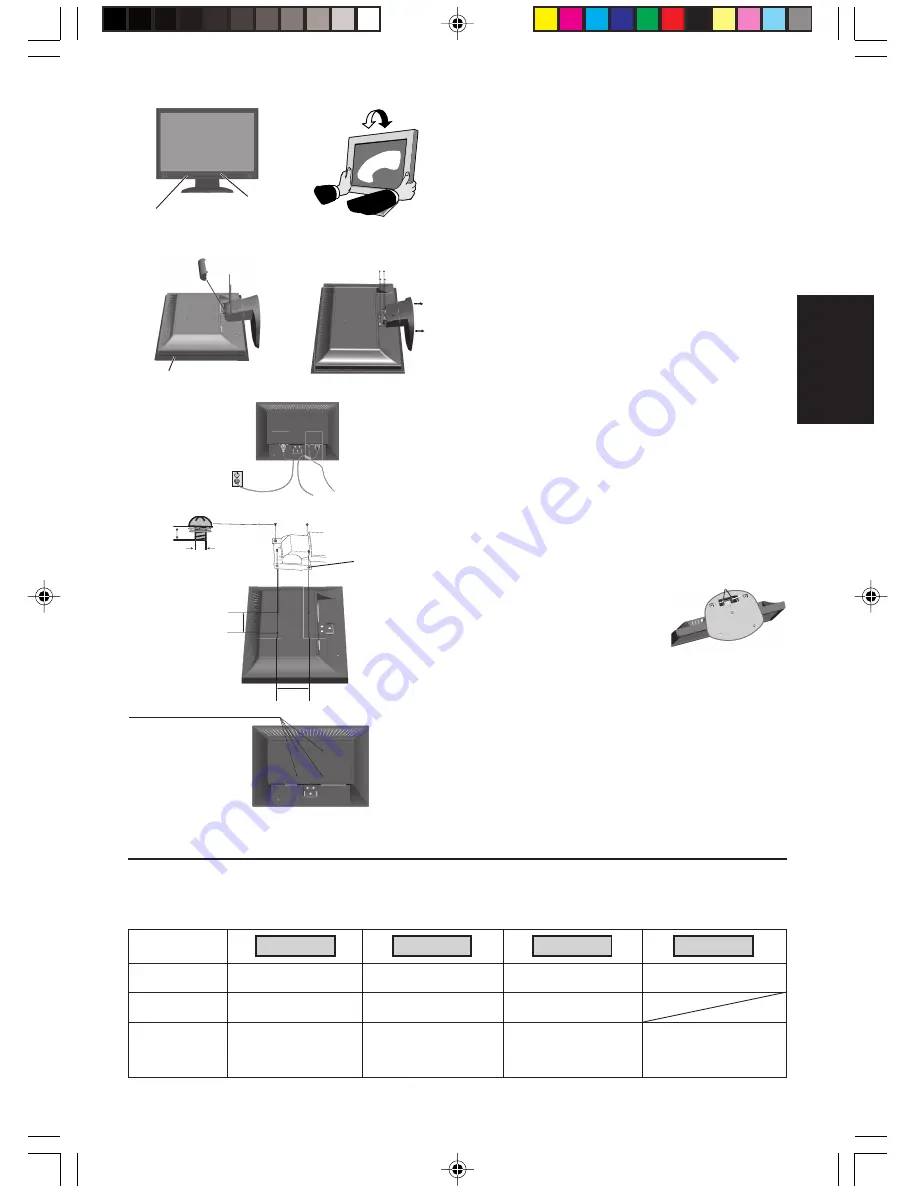
Neigen

Fassen Sie den Monitor an beiden Seiten und neigen Sie ihn nach
Bedarf (

Abbildung TS.1

).

Entfernen des Monitorfußes für die Montage

So bereiten Sie den Monitor für eine alternative Montage vor:

1. Ziehen Sie alle Kabel ab.

2. Nehmen Sie Gelenkabdeckung ab (

Abbildung R.1

).

3. Legen Sie den Monitor mit der Vorderseite nach unten auf eine

weiche Oberfläche (

Abbildung R.1

).

4. Entfernen Sie die 3 Schrauben (LCD193WM) oder 4 Schrauben

(LCD203WM/LCD223WM), mit denen der Fuß am Monitor
befestigt ist, und nehmen Sie den Fuß ab (

Abbildung R.2

).

Der Monitor kann jetzt auf andere Art montiert werden.

5. Schließen Sie Netz- und Signalkabel an der Rückseite des

Monitors an (

Abbildung R.3

).

6. Führen Sie die Schritte in umgekehrter Reihenfolge aus, um den

Fuß wieder anzubringen.

HINWEIS:

Verwenden Sie ausschließlich VESA-kompatible
Montagemethoden.

HINWEIS:

Entfernen Sie den Monitorfuß vorsichtig.

Entfernen des Standfußes

HINWEIS:

Entfernen Sie den Standfuß vor dem
Versenden des Monitors.

1. Legen Sie den Monitor mit der Vorderseite

nach unten auf eine weiche Oberfläche
(

Abbildung R.1

).

2. Drücken Sie mit Fingern auf die Verriegelungen, um den Fuß zu

lösen.

3. Ziehen Sie den gelösten Fuß heraus.

Befestigen eines Tragarms

Dieser LCD-Monitor kann mit einem Tragarm verwendet werden.

Verwenden Sie die beigefügten Schrauben (4 Stück) für die Montage,
wie es in der Abbildung dargestellt ist. Die Sicherheitsvorschriften
verlangen, dass der Monitor an einem Tragarm montiert wird, der für
das Gewicht des Monitors ausreichend stabil ist.

Der LCD-Monitor darf nur auf einem zugelassenen Arm montiert
werden, der beispielsweise mit einem GS-Zeichen versehen ist.

KOPFHÖRER

Abbildung C.1

Netzschalter

Abbildung TS.1

Abbildung R.1

Weiche Oberfläche

Abbildung R.2

Abbildung R.3

4 SCHRAUBEN (M4)
(maximale Tiefe: 10 mm)
Wenn Sie andere Schrauben
verwenden, prüfen Sie die
Tiefe der Bohrung.

Gewicht des LCD-Monitors komplett: 4,3 kg - LCD193WM (max.)

4,9 kg - LCD203WM (max.)
5,3 kg - LCD223WM (max.)

Technische Daten

Alle Schrauben

festziehen

100 mm

Stärke der Halterung

(Arm) 2,0 ~ 3,2 mm

3 Schrauben (LCD193WM) -

4 Schrauben (LCD203WM/LCD223WM)

4 x 12 mm mit Federring

und Federscheibe

M4

12 mm

100 mm

02_German

16/2/07, 8:01 AM

2

Summary of Contents for AccuSync LCD193WM

Page 1: ...AccuSync LCD193WM AccuSync LCD203WM AccuSync LCD223WM User s Manual Bedienerhandbuch Manual del usuario Manuel Utilisateur Manuale utente Руководство пользователя 00_Cover 16 2 07 8 00 AM 1 ...

Page 2: ... after a certain time beneficial both for the user and the environment Electrical safety Emissions Electromagnetic fields Noise emissions Ecology The product must be prepared for recycling and the manufacturer must have a certified environmental management system such as EMAS or ISO 14 001 Restrictions on chlorinated and brominated flame retardants and polymers heavy metals such as cadmium mercury...

Page 3: ...fine and comply with the latest independent standards from agencies such as ISO International Organisation for Standardization and TCO Swedish Trades Union Disposing of your old NEC product The aim of recycling is to gain an environmental benefit by means of re use upgrading reconditioning or reclamation of material Dedicated recycling sites ensure that environmentally harmful components are prope...

Page 4: ...Chinese RoHS information relevant for Chinese market 00_Cover 16 2 07 8 00 AM 4 ...

Page 5: ...Power Cord Video Signal Cable Base Stand AccuSync LCD monitor base stand not connected CD ROM Quick Start To attach the Base to the LCD Stand 1 Attach the Base to the Stand The locking tabs on the Stand should fit into the hole on the centre back of the Base Figure S 1 To attach the Cable Holder 1 Insert the tabs of Cable Holder into the hole of Stand and slide the Cable Holder downward into place...

Page 6: ...em please refer to the Troubleshooting section of this User s Manual Tilt Grasp both sides of the monitor screen with your hands and adjust the tilt as desired Figure TS 1 Remove Monitor Stand for Mounting To prepare the monitor for alternative mounting purposes 1 Disconnect all cables 2 Remove the hinge cover Figure R 1 3 Place monitor face down on a non abrasive surface Figure R 1 4 Remove the 3...

Page 7: ... LOCK OUT This control completely locks out access to all OSD control functions without Brightness and Contrast When attempting to activate OSD controls while in the Lock Out mode a screen will appear indicating the OSD are locked out To activate the OSD Lock Out function press AUTO RESET then key and hold down simultaneously To de activate the OSD Lock Out press AUTO RESET then key and hold down ...

Page 8: ...cuSync LCD Monitor Standfuß nicht montiert CD ROM Kurzanleitung So befestigen Sie den Standfuß am Fuß des LCD Monitors 1 Befestigen Sie den Standfuß am Monitor Die Verriegelungen an der Unterseite des Monitors müssen in die Aussparung in der Mitte des Standfußes einrasten Abbildung S 1 Gehen Sie folgendermaßen vor um den Kabelhalter zu befestigen 1 Stecken Sie die Verriegelungen des Kabelhalters i...

Page 9: ...mit der Vorderseite nach unten auf eine weiche Oberfläche Abbildung R 1 4 Entfernen Sie die 3 Schrauben LCD193WM oder 4 Schrauben LCD203WM LCD223WM mit denen der Fuß am Monitor befestigt ist und nehmen Sie den Fuß ab Abbildung R 2 Der Monitor kann jetzt auf andere Art montiert werden 5 Schließen Sie Netz und Signalkabel an der Rückseite des Monitors an Abbildung R 3 6 Führen Sie die Schritte in um...

Page 10: ...NG Mit OSD Abschaltung werden alle OSD Funktionen bis auf Helligkeit und Kontrast gesperrt Wenn Sie im Modus OSD Abschaltung auf die OSD Steuerungen zugreifen wird ein Bildschirm angezeigt der auf die Sperre der OSD Steuerungen hinweist Um die Funktion OSD Abschaltung zu aktivieren halten Sie die Tasten AUTO RESET und gleichzeitig gedrückt Um die Funktion OSD Abschaltung wieder zu deaktivieren drü...

Page 11: ...monitor en el futuro Manual del usuario Cable de audio Cable de alimentación Cable de señal de vídeo Base Monitor LCD AccuSync base no conectada CD ROM Inicio rápido Para conectar la base al soporte del monitor 1 Conecte la base al soporte Las lengüetas de sujeción del soporte deberían encajar en el orificio del centro posterior de la base figura S 1 Para montar el pasacables 1 Inserte las lengüet...

Page 12: ... R 1 3 Coloque el monitor boca abajo en una superficie no abrasiva figura R 1 4 Retire los 3 tornillos LCD193WM o los 4 tornillos LCD203WM LCD223WM que unen el monitor al soporte y retire el soporte como se indica figura R 2 El monitor ya está preparado para montarlo de otro modo 5 Conecte el cable de CA y el cable de señal a la parte posterior del monitor figura R 3 6 Repita el proceso en sentido...

Page 13: ...variable en intervalos de 5 segundos BLOQUEO OSD Este control bloquea totalmente el acceso a todas las funciones de control de OSD excepto Brillo y Contraste Si intenta activar los controles de OSD mientras está activado el modo de Bloqueo aparecerá una ventana notificándole que los controles de OSD están bloqueados Para activar la función de Bloqueo OSD pulse AUTO RESET y la tecla simultáneamente...

Page 14: ... audio Cordon d alimentation Câble de signal vidéo Support de socle Moniteur LCD AccuSync sans support de socle CD ROM Démarrage rapide Pour fixer le socle au support du LCD 1 Fixez le socle au support Les loquets de verrouillage du support doivent venir s insérer dans l orifice au centre arrière du socle Figure S 1 Pour fixer le support de câble 1 Insérez les attaches du support de câble dans le ...

Page 15: ...connectez tous les câbles 2 Retirez le couvercle à charnières Figure R 1 3 Placez le moniteur face vers le bas sur une surface non abrasive Figure R 1 4 Retirez les 3 vis LCD193WM ou les 4 vis LCD203WM LCD223WM fixant le moniteur à son support et enlevez l ensemble support comme indiqué Figure R 2 Le moniteur est maintenant prêt pour un montage différent 5 Connectez le cordon d alimentation AC et ...

Page 16: ...E OSD Cette commande bloque totalement l accès à toutes les fonctions de commande OSD en dehors de la luminosité et du contraste Toute tentative d activation de commande OSD lorsque ce dernier est en mode verrouillé provoque l apparition d un écran informant que les commandes OSD sont verrouillées Pour activer la fonction de verrouillage de l OSD maintenez enfoncés en même temps le bouton AUTO RES...

Page 17: ...monitor Manuale Utente Cavo audio Cavo di alimentazione Cavo segnali video Supporto base Monitor LCD AccuSync supporto base non collegato CD ROM Guida rapida Per collegare la base al supporto LCD 1 Fissare la base al supporto Le linguette di bloccaggio sul supporto devono essere inserite perfettamente nel foro al centro nella parte posteriore della base Figura S 1 Per collegare il supporto cavi 1 ...

Page 18: ...i i cavi 2 Rimuovere la copertura della cerniera Figura R 1 3 Sistemare il monitor verso il basso su una superficie non abrasiva Figura R 1 4 Togliere le 3 viti LCD193WM o le 4 viti LCD203WM LCD223WM che fissano il monitor al supporto e sollevare il supporto come illustrato Figura R 2 Il monitor ora è pronto per essere montato in modo diverso 5 Collegare il cavo di alimentazione AC ed il cavo segn...

Page 19: ...no 10 120 secondi intervallati da 5 secondi BLOCCO OSD Questo comando blocca l accesso a tutte le funzioni di comando OSD ad eccezione di Luminosità e Contrasto Se si tenta di attivare i controlli OSD in modalità Blocco OSD apparirà una schermata che informa del fatto che i controlli OSD sono bloccati Per attivare la funzione Blocco OSD premere il tasto AUTO RESET quindi il tasto e tenerli premuti...

Page 20: ...во пользователя Кабель аудиосигнала Кабель питания Кабель видеосигнала Подставка основания Монитор AccuSync LCD подставка основания не подсоединена CD ROM Краткое руководство по началу работы Чтобы подсоединить основание к подставке ЖКД 1 Закрепите подставку на основании Защелки на подставке должны войти в соответствующее отверстие по центру основания Рисунок S 1 Чтобы установить держатель кабеля ...

Page 21: ...е в другом положении 1 Отсоедините все кабели 2 Снимите крышку шарнира Рисунок R 1 3 Положите монитор экраном вниз на неабразивную поверхность Рисунок R 1 4 Отверните 3 винта LCD193WM или 4 винта LCD203WM LCD223WM с помощью которых монитор крепится к подставке и снимите подставку как показано на рисунке Рисунок R 2 Теперь монитор готов к установке другим способом 5 Подсоедините кабель питания пере...

Page 22: ...T БЛОКИРОВКА МЕНЮ OSD С помощью этого параметра можно полностью заблокировать доступ ко всем функциям параметров OSD кроме Brightness Яркость и Contrast Контрастность При попытке активизации параметров OSD в режиме блокировки появится сообщение указывающее что меню OSD заблокированы Чтобы включить функцию блокировки меню OSD нажмите кнопку AUTO RESET затем и удерживайте обе кнопки нажатыми Чтобы о...

Page 23: ...xx_Back 16 2 07 8 02 AM 1 ...

Page 24: ...Printed in China Part Number ________ Printed on recycled paper xx_Back 16 2 07 8 02 AM 2 ...

Reviews: