background image

51 


Figure 88 

b)


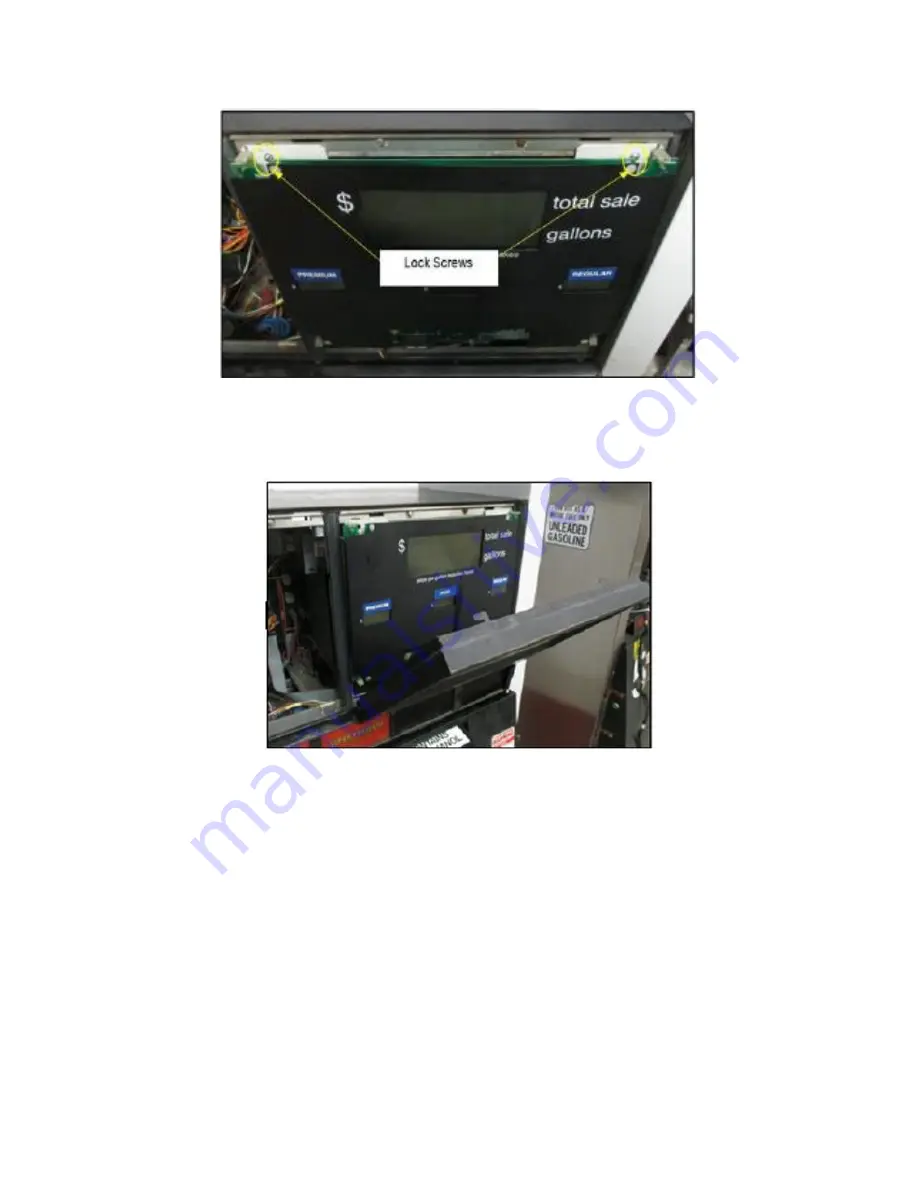
Re-insert the bottom lip of the Money/Volume Dial into the Electronics 
Enclosure Support. See Figure 89 


Figure 89 

c)


Push the top of the dial forward until it stops. 

d)


 Reach inside the OPT sub-door opening and push the Lock Latch (the one that 
was pulled to unlock the dial in the Disassembly Procedure) towards the right 
completely until the Money/Volume Dial is secured. See Figure 90. 

Summary of Contents for 6003-K001-V001

Page 1: ...2018 NCR Corporation All rights reserved NCR Confidential Use and Disclose Solely Pursuant to Company Instructions INSTALLATION INSTRUCTIONS 115V NCR OPTIC HEATER KIT 6003 K001 V001 497 0522 144 Issue A ...

Page 2: ......

Page 3: ...e terms and conditions of an agreement you have with NCR NCR s copyright notice must be included It is the policy of NCR Corporation NCR to improve products as new technology components software and firmware become available NCR therefore reserves the right to change specifications without prior notice All features functions and operations described herein may not be marketed by NCR in all parts o...

Page 4: ......

Page 5: ...en for end users System Administrator and Maintenance Technician NCR Field Engineering and VAR OEM Hardware and System Integrators Notice This document is NCR proprietary information and is not to be disclosed or reproduced without consent ...

Page 6: ...use these should they be required Locate the switch or circuit breakers that shut off all power to all fueling equipment and dispensing devices TOTAL ELECTRICAL SHUT OFF BEFORE ACCESS Any procedure requiring access to electrical components or the electronics of a pump dispenser requires total electrical shut off of that unit Understand the function and location of this switch or circuit breaker be...

Page 7: ...understand the procedures before beginning work FOLLOW THE REGULATIONS Regulations in OSHA Occupational Safety and Health Administration national state and local codes including customer requirements must be followed Failure to install inspect maintain or service this equipment in accordance with these codes regulations and standards may lead to legal citations with penalties and may affect the sa...

Page 8: ...ives that follow this symbol to avoid possible injury or death Signal Words Warning Alerts you to a hazard or unsafe practice which will result in death or serious injury Caution Designates a hazard or unsafe practice which may result in minor injury property or equipment damage Note To emphasize points or remind installer of something or to indicate the possibility of minor problems in the outcom...

Page 9: ...rt of defective missing wrong component Description of Failure please be specific For example display will not power on Customer Requestor s contact name phone number and or e mail address Address to ship replacement part s Transport the product in its original packaging to prevent impact damages If you do not have access to a computer you may leave a voice message at 1 800 528 8658 USA or Interna...

Page 10: ...d tear are not included in the warranty In general damages due to the following are not covered by the warranty Improper or insufficient maintenance Improper use or unauthorized modifications of the product Inadequate location or surroundings For detailed warranty arrangements please consult your contract documents ...

Page 11: ... the defective equipment Serial Number of the defective equipment Equipment location in the store Description of the problem including any system error codes error condition or guidance to the area of failure The NCR Agent will provide you with a work order number which serves as your Return Material Authorization RMA Please provide the RMA on the outside of the shipping box Note A work order must...

Page 12: ...viii REVISION RECORD Issue Date Remarks A October 2018 ...

Page 13: ...e Gilbarco Advantage Wide Dispenser 27 Closing the Gilbarco Advantage Narrow Dispenser 28 TOKHEIM PREMIER B DISPENSER 31 Tokheim Premier B Narrow 31 Tokheim Premier B Wide 54 TOKHEIM PREMIER C DISPENSER 61 Tokheim Premier C WIDE Installation 61 Tokheim Premier C NARROW Installation 67 GILBARCO ENCORE 300 500 500S DISPENSER 75 Opening the Gilbarco Encore 300 500 with OPTIC 5 Installed 75 Opening th...

Page 14: ...6 Figure 3 7 Figure 4 7 Figure 5 8 Figure 6 8 Figure 7 9 Figure 8 9 Figure 9 10 Figure 10 10 Figure 11 11 Figure 12 11 Figure 13 12 Figure 14 12 Figure 15 13 Figure 16 13 Figure 17 14 Figure 18 14 Figure 19 15 Figure 20 15 Figure 21 16 Figure 22 16 Figure 23 17 Figure 24 17 Figure 25 18 Figure 26 18 Figure 27 19 Figure 28 19 Figure 29 20 Figure 30 20 Figure 31 21 Figure 32 21 ...

Page 15: ...4 27 Figure 45 28 Figure 46 28 Figure 47 29 Figure 48 29 Figure 49 30 Figure 50 31 Figure 51 31 Figure 52 32 Figure 53 32 Figure 54 33 Figure 55 33 Figure 56 34 Figure 57 34 Figure 58 35 Figure 59 36 Figure 60 36 Figure 61 37 Figure 62 37 Figure 63 38 Figure 64 38 Figure 65 39 Figure 66 39 Figure 67 40 Figure 68 40 Figure 69 41 Figure 70 41 Figure 71 42 ...

Page 16: ...Figure 84 48 Figure 85 49 Figure 86 49 Figure 87 50 Figure 88 51 Figure 89 51 Figure 90 52 Figure 91 52 Figure 92 53 Figure 93 54 Figure 94 54 Figure 95 55 Figure 96 55 Figure 97 56 Figure 99 56 Figure 100 57 Figure 101 57 Figure 102 58 Figure 103 58 Figure 104 59 Figure 105 59 Figure 106 60 Figure 107 60 Figure 108 61 Figure 109 61 Figure 110 62 Figure 111 62 ...

Page 17: ...igure 124 70 Figure 125 70 Figure 126 71 Figure 127 71 Figure 128 72 Figure 129 72 Figure 130 73 Figure 131 73 Figure 132 74 Figure 133 75 Figure 134 75 Figure 135 76 Figure 136 76 Figure 137 77 Figure 138 77 Figure 139 78 Figure 140 78 Figure 141 79 Figure 142 79 Figure 143 80 Figure 144 80 Figure 145 81 Figure 146 81 Figure 147 82 Figure 148 82 Figure 149 83 Figure 150 83 ...

Page 18: ...163 90 Figure 164 91 Figure 165 91 Figure 166 92 Figure 167 92 Figure 168 93 Figure 169 93 Figure 170 94 Figure 171 94 Figure 172 95 Figure 173 95 Figure 174 96 Figure 175 97 Figure 176 98 Figure 177 98 Figure 178 99 Figure 179 99 Figure 180 100 Figure 181 101 Figure 182 101 Figure 183 102 Figure 184 102 Figure 185 103 Figure 186 103 Figure 187 104 Figure 188 104 Figure 189 105 ...

Page 19: ... 112 Figure 203 112 Figure 204 113 Figure 205 113 Figure 206 114 Figure 207 114 Figure 208 115 Figure 209 115 Figure 210 116 Figure 211 116 Figure 212 117 Figure 213 117 Figure 214 118 Figure 215 118 Figure 216 119 Figure 217 119 Figure 218 120 Figure 219 121 Figure 220 121 Figure 221 122 Figure 222 122 Figure 223 123 Figure 224 123 Figure 225 124 Figure 226 124 Figure 227 125 Figure 228 125 ...

Page 20: ...1 133 Figure 242 133 Figure 243 134 Figure 244 134 Figure 245 135 Figure 246 135 Figure 247 136 Figure 248 136 Figure 249 137 Figure 250 137 Figure 251 138 Figure 252 138 Figure 253 139 Figure 254 139 Figure 255 140 Figure 256 140 Figure 257 141 Figure 258 141 Figure 259 142 Figure 260 142 Figure 261 143 Figure 262 143 Figure 263 144 Figure 264 144 Figure 265 144 Figure 266 145 Figure 267 145 ...

Page 21: ...xvii Figure 268 146 Figure 269 146 Figure 270 147 ...

Page 22: ......

Page 23: ...e per side of the dispenser Option 9 OPTIC 5 for Wayne Ovation2 UL Listed by Report Retrofit Kit Part Number 6001 0012 8801 One per side of the dispenser Option 10 OPTIC 5 for Wayne Eclipse UL Listed by Report Retrofit Kit Part Number 6001 0006 8801 One per side of the dispenser Option 11 OPTIC 5 for Gilbarco Advantage NCR Solution UL Listed by Report Retrofit Kit Part Number 6001 0013 8801 One pe...

Page 24: ...W 8 32X3 8 TORX THREAD FORMING ZINC PLATED STEEL 4 Used 21 NCR Heater Assembly 1 OPTIC Heater Notes regarding placement or mounting location of thermostat For all dispensers the thermostat mounting location must be lower than the heater This will ensure that the thermostat is at a colder location within the dispenser and does not shut off the heater due to warmer air flow from the heater The therm...

Page 25: ...er and adjustable wrench for heater bracket installation Torx screwdriver for tightening cage against heater bracket Tape measure or 12 inch ruler for adjusting and setting heater cage length Applicable keys to open unlock each dispenser type ...

Page 26: ...4 RECOMMENDED MATERIALS N A ...

Page 27: ...on CUB or Non Invenco Link power supply Note The terms CUB and Invenco Link are used interchangeably throughout this document The Invenco Link or CUB is a communication device that creates a high speed network based on IEEE 1901 Note The power supply with the CUB attached as shown in Figure 1 below is NOT to be used to provide A C power to the OPTIC heater on any dispenser Figure 1 ...

Page 28: ...wer the electronics head bezel by pulling the top forward until it fully rests on the suspension cables 4 Acquire the heater NCR heater assembly and OPTIC heater wire guard 497 0522796 Note For Vista the power supply bracket can remain mounted to the inner dispenser wall during installation of the heater in the following steps even though the pictures below do show the power supply bracket removed...

Page 29: ...7 Figure 3 Figure 4 6 Insert and tighten four of the thread forming 006 8626667 screws at the locations shown in Figure 5 to secure the wire guard 497 0522796 to the NCR heater assembly ...

Page 30: ...7 Mount NCR heater wire guard 497 0522796 assembly to OPTIC Heater Shield Bracket Mount 497 0522505 using two pairs of 6 32 screws and nuts 006 8611215 006 8611426 As shown in Figure 6 and Figure 7 below Figure 6 ...

Page 31: ... B side of the dispenser See Figure 8 below Figure 8 9 Secure the NCR heater wire guard 497 0522796 OPTIC Heater Shield Bracket Mount 497 0522505 assembly to the non Invenco Link installed power supply bracket with the heater outlet facing the top of the power supply bracket as shown in Figure 9 and Figure 10 using two of the provided 8 32 nuts 006 8617730 ...

Page 32: ...10 Figure 9 Figure 10 10 The heater is to be installed in the following orientation in the dispenser as shown with the heater outlet facing upwards in a vertical orientation as shown in Figure 11 below ...

Page 33: ...tified in Figure 12 to the bottom corner hole in the OPTIC Heater Shield Bracket Mount 497 0522505 as shown in Figure 13 or on the NCR heater assembly bracket as shown in Figure 14 using one of the supplied cable ties 006 8616073 Figure 12 ...

Page 34: ...12 Figure 13 Figure 14 12 Disconnect the AC power cable that is attached to the power supply connector without the Invenco Link attached See Figure 15 below ...

Page 35: ...13 Figure 15 13 Attach Connector 1 identified in Figure 16 to the NON Invenco Link OPTIC power supply cable as shown in Figure 17 Figure 16 ...

Page 36: ...r cable leading from the Invenco Link Equipped OPTIC power supply should not be used to make this connection 14 Affix Connector 2 identified in Figure 18 to the existing dispenser A C power cable as shown in Figure 19 Figure 18 ...

Page 37: ...d away from the heater outlet using one of the additional supplied cable ties 006 8616073 16 All wires are to be routed away from any sharp edges and door joints gaskets 17 Raise the electronics head bezel by pushing the top of the head bezel upward toward the pump chassis ensuring no cables or wiring is in the threshold of the opening 18 Lock the dispenser by using a Wayne Security Key to fasten ...

Page 38: ...elow Figure 21 Note The security bolts have a captive shield attached Do not remove or discard from the dispenser 2 Disengage the security bolts from the dispenser using a 3 8in nut driver 3 Unlock the two dispenser electronic options doors to access the inner latches using GVR security key See Figure 22 Figure 22 4 Disengage 4 inner latches holding the main dispenser door see Figure 23 ...

Page 39: ... 1 Identify the security bolt locations either 2 or 4 bolts depending on the pump configuration See Figure 24 Figure 24 Note The security bolts have a captive shield attached Do not remove or discard from the dispenser 2 Disengage the security bolts from the dispenser using a 3 8in nut driver ...

Page 40: ...s door to access the inner latches using GVR security key See Figure 25 Figure 25 4 Disengage the vertical slide latch located inside the dispenser See Figure 26 Figure 26 5 Disengage 3 inner latches holding the main dispenser door See Figure 27 ...

Page 41: ...heater NCR heater assembly and OPTIC heater wire guard 497 0522796 2 Slide the wire guard 497 0522796 around the NCR heater assembly so that the edge of the bracket aligns with the Advantage Vista Encore Eclipse Tokheim B alignment mark as shown in Figure 28 and Figure 29 Figure 28 ...

Page 42: ...06 8626667 screws at the locations shown in Figure 30 to secure the wire guard 497 0522796 to the NCR heater assembly Figure 30 4 The heater NCR heater assembly with wire guard attached is to be oriented as shown in Figure 31 when mounting it inside the dispenser ...

Page 43: ...s shown in Figure 32 Figure 33 Figure 34 and Figure 35 using one provided thread forming screw 006 8626667 Note Ensure that the NCR heater Assembly Wire Guard Assembly should not interfere with the hole that is used for wire routing between the top and bottom enclosure cavities Figure 32 ...

Page 44: ...22 Figure 33 Figure 34 ...

Page 45: ...er must face the side wall of the dispenser 6 Secure the thermostat identified in Figure 36 to any available opening along the bottom rail of the dispenser 2 using a supplied cable tie 006 8616073 as shown in Figure 37 Figure 36 ...

Page 46: ...24 Figure 37 7 Disconnect the AC power cable that is attached to the power supply connector without the Invenco Link attached See Figure 38 below Figure 38 ...

Page 47: ... is located 9 Attach Connector 1 identified in Figure 39 to the non Invenco Link OPTIC power supply cable as shown in Figure 40 Figure 39 Figure 40 Note The power cable leading from the Invenco Link Equipped OPTIC power supply should not be used to make this connection 10 Affix Connector 2 identified in Figure 41 to the existing dispenser A C power cable as shown in Figure 42 ...

Page 48: ...the heater exit 11 Any remaining cables hanging in front of the heater or lying in front of the heater exit should be re routed and restrained using one of the additional supplied cable ties 006 8616073 Warning Heater surfaces are hot Do not touch 12 All wires are to be routed away from any sharp edges and door joints gaskets ...

Page 49: ...r door 2 Engage 4 inner latches holding the main dispenser door See Figure 43 Figure 43 3 Lock the two dispenser electronic options doors using GVR security key See Figure 44 Figure 44 4 Engage the security bolts from the dispenser using a 3 8in nut driver See Figure 45 below ...

Page 50: ...co Advantage Narrow Dispenser 1 Close the large dispenser door 2 Engage 3 inner latches holding the main dispenser door See Figure 46 below Figure 46 3 Engage the vertical slide latch located inside the dispenser See Figure 47 below ...

Page 51: ...29 Figure 47 4 Lock the dispenser electronic options door using GVR security key See Figure 48 below Figure 48 5 Engage the security bolts from the dispenser using a 3 8in nut driver See Figure 49 below ...

Page 52: ...30 Figure 49 ...

Page 53: ...ispenser a Look at the base of the dispenser b Locate the Model Serial number plate on one of the dispenser sides the U L and F C C plates are nearby and stand facing it c You are looking at SIDE A See Figure 50 Figure 50 2 Unlock OPTIC door on Side A See Figure 51 below Figure 51 3 Next let the door swing down See Figure 52 below ...

Page 54: ...penser a Unlock the Money Volume Display Dial by pulling the lock latch to the left towards the left side of the dispenser completely The lock latch is located behind the upper left hand side of the Money Volume Display Dial Use the following pictures as a visual aid to help locate and unlock the latch See Figure 53 and Figure 54 Figure 53 ...

Page 55: ...orward lift it off the track and set it aside Do not discard the Money Volume Dial It will be reused during the installation process See Figure 55 for the Money Volume dial being lowered and Figure 56 for the Money Volume Dial set aside Figure 55 ...

Page 56: ...s some setups of dispensers use half turn screws others use full thread screws that secure the Money Volume Assembly to the dispenser face See Figure 57 Figure 57 d Lower the Money Volume Assembly by laying it forward completely See Figure 58 ...

Page 57: ...ly that is to be associated with Side A of the Dispenser Note The power supply assembly without the Invenco Link installed is to be associated with Side B of the Dispenser 6 Uniquely label mark each connection prior to disconnecting connections from the power supplies so that they can easily be identified upon reinstallation 7 Unplug and label mark the Yellow Cat5e Network Cable from the Invenco L...

Page 58: ...Link port labeled RS232 1 annotated in Figure 60 below Figure 60 9 Similarly to steps 7 8 Unplug and mark the remaining Yellow Cat5e Red Cat5e and Tokheim communications wire assembly cables from the Invenco Link ports labeled LAN2 RS232 2 and LINE respectively See Figure 61 below ...

Page 59: ...om the Large 3 Position Harness male socket pigtail that is present on the Power Supply Assembly with the Invenco Link installed See Figure 62 Figure 62 11 On side A Remove the cable tie attached to the Cable Restraint Anchor Point located to the left of the tamper prevention shield See Figure 63 ...

Page 60: ...n the tamper prevention plate and two screws 1 per side on the back of the Tokheim Premier B Door EMV Sub Assembly See Figure 64 Figure 64 13 Disconnect the DC wiring assembly from port labeled VDC on the back of the Tokheim Premier B Door EMV Sub Assembly See Figure 65 ...

Page 61: ...inal to the male spade stud on the OPTIC unit s paper spool See Figure 66 Figure 66 15 Remove the power supply bracket with Invenco Link power supply attached by first loosening the two feet mounting screws Discard mounting screws See Figure 67 below ...

Page 62: ...ing the two feet mounting screws Retain mounting screws for reinstallation See Figure 68 Figure 68 17 Remove the Large 3 Position Harness female socket of the A C Wiring Assembly from the Large 3 Position Harness male socket pigtail that is present on the Non Invenco Link Power Supply Assembly See Figure 69 ...

Page 63: ...ink power supply bracket with power supply attached from the dispenser 21 Acquire the heater NCR heater assembly and OPTIC heater wire guard 497 0522796 22 Slide the wire guard 497 0522796 around the NCR heater assembly so that the edge of the bracket aligns with the Advantage Vista Encore Eclipse Tokheim B alignment mark as shown in Figure 70 and Figure 71 Figure 70 ...

Page 64: ... 8626667 screws at the locations shown in Figure 72 to secure the wire guard 497 0522796 to the NCR heater assembly Figure 72 24 Place both power supply assembles back to back 25 Ensure that both power supply brackets have the Premier B side down See Figure 73 below ...

Page 65: ...43 Figure 73 26 Secure both power supply assembles together back to back by installing two pairs of the provided 6 32 screws and nuts 006 8611215 and 006 8611426 at 1 See Figure 74 below Figure 74 ...

Page 66: ...ser frame by fastening the non Invenco Link power supply back to the inner DPT mount rail using either the bolts retained in step 16 in the dispenser or a pair of provided 6 32 screws and nuts 006 8611215 and 006 8611426 See Figure 75 below Figure 75 29 Insert the NCR heater wire guard 497 0522796 assembly 4 at the location shown with the heater aimed downward See Figure 76 below Figure 76 ...

Page 67: ...one provided 8 32 nut 006 8611730 This will ensure the front to back location of the heater wire guard 497 0522796 and ensure the wire guard does not slide forward See Figure 77 below Figure 77 31 Position thermostat identified in Figure 78 at the following location as shown in Figure 79 and secure with provided cable tie 006 8616073 Figure 78 ...

Page 68: ...46 Figure 79 32 Attach Connector 1 identified in Figure 80 to the NON Invenco Link OPTIC power supply cable previously marked as SIDE B in step 18 as shown in Figure 81 Figure 80 ...

Page 69: ...m the Invenco Link Equipped OPTIC power supply should not be used to make this connection 33 Affix Connector 2 identified in Figure 82 to the existing dispenser A C power cable previously marked as SIDE B in step 18 as shown in Figure 83 Figure 82 ...

Page 70: ...o Link attached to it 37 Feed the open end of the DC wiring assembly cable through the opening on the tamper prevention shield and plug it into the OPT Terminal labeled VDC See Figure 84 Figure 84 38 Re fasten the tamper prevention shield to the back of the OPT 39 Locate the Earth Ground Cables that is pre wired to the Power Supply with the Invenco Link and attach the female spade terminal to the ...

Page 71: ...p tie gather all cable assemblies attached to the OPT unit including the Earth Ground and secure them to the Cable Restraint Anchor Point located to the left of the tamper prevention shield See Figure 86 and Figure 87 Figure 86 ...

Page 72: ... hanging or lying in front of the heater exit Any remaining cables hanging in front of the heater or lying in front of the heater exit should be re routed and restrained using one of the additional supplied cable ties 006 8616073 Warning Heater surfaces are hot Do not touch 42 Re secure all loose wires such that they do not interfere with closing any panels 43 All wires are to be routed away from ...

Page 73: ...upport See Figure 89 Figure 89 c Push the top of the dial forward until it stops d Reach inside the OPT sub door opening and push the Lock Latch the one that was pulled to unlock the dial in the Disassembly Procedure towards the right completely until the Money Volume Dial is secured See Figure 90 ...

Page 74: ...52 Figure 90 45 Swing the OPTIC door closed See Figure 91 Figure 91 46 Use the appropriate key to lock the OPTIC door after ensuring that all cables are secured behind the OPTIC unit See Figure 92 ...

Page 75: ...53 Figure 92 47 Repeat steps 45 and 46 for the B side of the dispenser ...

Page 76: ...e Premier Dispenser a Look at the base of the dispenser b Locate the Model Serial number plate on one of the dispenser sides the U L and F C C plates are nearby and stand facing it c You are looking at SIDE A See Figure 93 Figure 93 2 Unlock OPTIC door on Side B See Figure 94 below Figure 94 ...

Page 77: ...und the NCR heater assembly so that the edge of the bracket aligns with the Advantage Vista Encore Eclipse Tokheim B alignment mark as shown in Figure 95 and Figure 96 Figure 95 Figure 96 6 Insert and tighten three of the thread forming 006 8626667 screws at the locations shown in Figure 97 to secure the wire guard 497 0522796 to the NCR heater assembly ...

Page 78: ... using the OPTIC heater offset link plate 497 0522788 to join both parts with the provided thread forming screw 006 8626667 and 8 32 nut 006 8611730 See Figure 98 Figure 98 8 Position thermostat identified in Figure 99 at the following location as shown in Figure 100 and secure with provided cable tie 006 8616073 ...

Page 79: ...ure 100 9 Remove the Large 3 Position Harness female socket of the A C Wiring Assembly from the Large 3 Position Harness male socket pigtail that is present on the Non Invenco Link Power Supply Assembly See Figure 101 ...

Page 80: ...58 Figure 101 10 Attach Connector 1 identified in Figure 102 to the NON Invenco Link OPTIC power supply cable as shown in Figure 103 Figure 102 ...

Page 81: ... cable leading from the Invenco Link Equipped OPTIC power supply should not be used to make this connection 11 Affix Connector 2 identified in Figure 104 to the existing dispenser A C power cable as shown in Figure 105 Figure 104 ...

Page 82: ... heater exit should be re routed and restrained using one of the additional supplied cable ties 006 8616073 Warning Heater surfaces are hot Do not touch 12 Re secure all loose wires such that they do not interfere with closing any panels 13 All wires are to be routed away from any sharp edges and door joints gaskets 14 Swing the OPTIC door closed 15 Use the appropriate key to lock the OPTIC door F...

Page 83: ... A on the Premier Dispenser a Look at the base of the dispenser b Locate the Model Serial number plate on one of the dispenser sides the U L and F C C plates are nearby and stand facing it c You are looking at SIDE A See Figure 107 Figure 107 2 Using a TPX88 Tokheim key unlock OPTIC door on Side A See Figure 108 Figure 108 ...

Page 84: ...mark as shown in Figure 109 Figure 109 6 Insert and tighten two of the thread forming 006 8626667 screws at the locations shown in Figure 110 to secure the wire guard 497 0522796 to the NCR heater assembly Figure 110 7 Mount the NCR heater and wire guard 497 0522796 assembly onto the power supply assembly by using the OPTIC heater offset link plate 497 0522788 to join both parts with the provided ...

Page 85: ...should be mounted on the power supply assembly bracket inside the dispenser in the following configuration See Figure 111 Figure 111 8 Tighten screws and nuts such that the weight of the heater allows the entire assembly to hang fixed like shown See Figure 112 ...

Page 86: ... to any available hole or slot along the bottom of the NCR heater assembly using a provided cable tie 006 8616073 Figure 113 10 Disconnect the AC power cable that is attached to the power supply connector without the Invenco Link attached See Figure 114 below ...

Page 87: ...65 Figure 114 11 Attach Connector 1 identified in Figure 115 to the NON Invenco Link OPTIC power supply cable as shown in Figure 116 Figure 115 ...

Page 88: ... cable leading from the Invenco Link Equipped OPTIC power supply should not be used to make this connection 12 Affix Connector 2 identified in Figure 117 to the existing dispenser A C power cable as shown in Figure 118 Figure 117 ...

Page 89: ... touch 14 All wires are to be routed away from any sharp edges and door joints gaskets 15 Swing the OPTIC door shut 16 Use the TPX88 Tokheim key to lock the OPTIC door after ensuring that all cables are secured behind the OPTIC unit Tokheim Premier C NARROW Installation 1 Identify the A Side of the dispenser To determine Side A on the Premier Dispenser a Look at the base of the dispenser b Locate ...

Page 90: ...t the door swing open 4 Acquire the heater NCR heater assembly and OPTIC heater wire guard 497 0522796 5 Slide the wire guard 497 0522796 around the NCR heater assembly so that the edge of the bracket aligns with the Helix Tokheim C alignment mark as shown in Figure 120 Figure 120 ...

Page 91: ...ure the wire guard 497 0522796 to the NCR heater assembly Figure 121 7 The wire guard can be assembled either to the right or left side of the power supply assembly as shown below See Figure 122 Figure 122 8 The NCR heater assembly will be mounted approximately in the locations shown in Figure 123 and Figure 124 ...

Page 92: ...ng the OPTIC heater offset link plate 497 0522788 to join both parts with the provided thread forming screw 006 8626667 and 8 32 nut 006 8611730 Note The NCR heater and wire guard 497 0522796 assembly should be mounted on the power supply assembly bracket inside the dispenser in the following configuration See Figure 125 ...

Page 93: ...6 to any available hole or slot along the bottom of the NCR heater assembly using a provided cable tie 006 8616073 Figure 126 11 Disconnect the AC power cable that is attached to the power supply connector without the Invenco Link attached See Figure 127 below ...

Page 94: ...72 Figure 127 12 Attach Connector 1 identified in Figure 128 to the NON Invenco Link OPTIC power supply cable as shown in Figure 129 Figure 128 ...

Page 95: ... cable leading from the Invenco Link Equipped OPTIC power supply should not be used to make this connection 13 Affix Connector 2 identified in Figure 130 to the existing dispenser A C power cable as shown in Figure 131 Figure 130 ...

Page 96: ...ying in front of the heater exit should be re routed and restrained using one of the additional supplied cable ties 006 8616073 Warning Heater surfaces are hot Do not touch 15 All wires are to be routed away from any sharp edges and door joints gaskets 16 Close the OPTIC door 17 Use the TPX88 Tokheim key to lock the OPTIC door after ensuring that all cables are secured behind the OPTIC unit ...

Page 97: ...OPTIC 5 Installed 1 Unlock and open the outer dispenser door using the appropriate key to access the internal components See Figure 132 and Figure 133 Figure 132 Figure 133 2 Disengage the side paddles inside the electronics cavity and open the main dispense door See Figure 134 below ...

Page 98: ... Figure 134 Opening the Gilbarco Encore 500s with OPTIC 5 and 12 or 300 500 with OPTIC 12 Installed 1 Remove the lower door using the GCBO Lower Door Key See Figure 135 and Set Figure 136 aside Figure 135 ...

Page 99: ...77 Figure 136 2 Using a 751 key unlock the main door on the dispenser 3 Undo door latch located underneath the lower left hand side of the dispenser door See Figure 137 and Figure 138 Figure 137 ...

Page 100: ...Install 1 Acquire the heater NCR heater assembly and OPTIC heater wire guard 497 0522796 2 Slide the wire guard 497 0522796 around the NCR heater assembly so that the edge of the bracket aligns with the Advantage Vista Encore Eclipse Tokheim B alignment mark as shown in Figure 140 and Figure 142 ...

Page 101: ...79 Figure 140 Figure 141 3 Insert and tighten four of the thread forming 006 8626667 screws at the locations shown in Figure 142 to secure the wire guard 497 0522796 to the NCR heater assembly ...

Page 102: ...other component is installed opposite of the OPTIC power supply where the heater is supposed to be installed Contact customer service 5 Orient and mount the heater assembly as shown using one of the provided 6 32 screws 006 8611215 and nuts 006 8611426 with nut on the bottom See Figure 143 Figure 143 6 The screw and nut should be installed at the locations called out in Figure 144 and Figure 145 ...

Page 103: ...81 Figure 144 Figure 145 7 Use a cable tie 006 8616073 to secure the thermostat identified in Figure 146 at the bottom of the dispenser to an available opening hole near area 2 See Figure 147 ...

Page 104: ...82 Figure 146 Figure 147 8 Disconnect the AC power cable that is attached to the power supply connector without the Invenco Link attached See Figure 148 below ...

Page 105: ...83 Figure 148 9 Attach Connector 1 identified in Figure 149 to the NON Invenco Link OPTIC power supply cable as shown in Figure 150 Figure 149 ...

Page 106: ... cable leading from the Invenco Link Equipped OPTIC power supply should not be used to make this connection 10 Affix Connector 2 identified in Figure 151 to the existing dispenser A C power cable as shown in Figure 152 Figure 151 ...

Page 107: ...e routed and restrained using one of the additional supplied cable ties 006 8616073 Warning Heater surfaces are hot Do not touch Closing the Gilbarco Encore 300 500 with OPTIC 5 Installed 1 All wires are to be routed away from any sharp edges and door joints gaskets 2 Close the main dispenser door see Figure 153 Figure 153 3 Engage the side paddles inside the electronics cavity to secure the main ...

Page 108: ...86 Figure 154 4 Close and lock the outer dispenser housing using the appropriate key See Figure 155 and Figure 156 Figure 155 ...

Page 109: ...TIC 12 Installed 1 Route cables and wires away from sharp edges or pinching in the modular door gasket 2 Disengage the prop rod and close the door 3 Push the door slightly up and in to engage the bottom latch See Figure 157 Figure 157 4 Secure and lock the top of the door See Figure 158 ...

Page 110: ...88 Figure 158 5 Replace Lower door using GCBO Lower Door Key See Figure 159 and Figure 160 Figure 159 ...

Page 111: ...89 Figure 160 ...

Page 112: ...nternal components See Figure 161 Figure 161 2 Acquire the heater NCR heater assembly 3 Remove and discard four M4 mounting screws M4 nuts secondary grill on the fan side of the heater and OPTIC heater bracket from the heater body See Figure 162 and Figure 163 Caution Be sure not to remove the grille on the Heater side opposite of the fan side Figure 162 ...

Page 113: ...ure 164 Note If a preexisting heater is present do not proceed with the installation of the kit and contact customer service 5 Route heater cable through opening 1 first before securing heater to dispenser 6 Orient and mount the heater as shown using two supplied 6 32 screws and nuts 006 8611215 and 006 8611426 as required at both corner locations 2 See Figure 165 below ...

Page 114: ...6 8616073 secure the thermostat identified in Figure 166 to any available mounting hole at the bottom of the dispenser 3 on the side that is opposite the heater out of the direct air flow from the heater See Figure 167 below Figure 166 ...

Page 115: ...er cable that is attached to the power supply connector without the Invenco Link attached See Figure 168 below Figure 168 9 Attach Connector 1 identified in Figure 169 to the NON Invenco Link OPTIC power supply cable as shown in Figure 170 ...

Page 116: ...e The power cable leading from the Invenco Link Equipped OPTIC power supply should not be used to make this connection 10 Affix Connector 2 identified in Figure 171 to the existing dispenser A C power cable as shown in Figure 172 ...

Page 117: ...uch 11 Any remaining cables hanging in front of the heater or lying in front of the heater exit should be re routed and restrained using one of the additional supplied cable ties 006 8616073 12 All wires are to be routed away from any sharp edges and door joints gaskets 13 Lock and close the outer dispenser housing using the appropriate key and or security torx driver See Figure 173 ...

Page 118: ...96 Figure 173 ...

Page 119: ...er and Identify the Weights and Measures Switch This is identified by the metal bracket closed by a sealed wire The side with this switch is Side A See Figure 174 Figure 174 2 Open the dispenser a Use a 751 key to open the bottom printer door and to reach the main door latch See Figure 175 ...

Page 120: ...re 176 c Pull open the main dispenser door 3 Acquire the heater NCR heater assembly and OPTIC heater wire guard 497 0522796 4 Slide the wire guard 497 0522796 around the NCR heater assembly so that the edge of the bracket aligns with the Advantage Vista Encore Eclipse Tokheim B alignment mark as shown in Figure 177 and Figure 178 ...

Page 121: ...99 Figure 177 Figure 178 5 Insert and tighten two of the thread forming 006 8626667 screws at the locations shown in Figure 179 to secure the wire guard 497 0522796 to the NCR heater assembly ...

Page 122: ...the power supply bracket plate 497 0517788 which could potentially lie in front of the heater This cable bundle must be re routed to go underneath the power supply bracket plate 6 First cut the cable restraint to enable more cable slack then tucking cable bundle under the bracket and securing with supplied cable tie 006 8616073 through the existing hole as shown in Figure 180 below ...

Page 123: ...101 Figure 180 7 Mount the heater assembly at location 1 below using one of the provided 6 32 screws 006 8611215 and 6 32 nuts 006 8611426 See Figure 181 and Figure 182 below Figure 181 ...

Page 124: ...uck all excess thermostat cabling into the bottom cavity below the heater 9 Secure the thermostat identified in Figure 183 with a cable tie 006 8616073 to an available opening like shown 2 See Figure 184 below Figure 183 ...

Page 125: ...er cable that is attached to the power supply connector without the Invenco Link attached See Figure 185 below Figure 185 11 Attach Connector 1 identified in Figure 186 to the NON Invenco Link OPTIC power supply cable as shown in Figure 187 ...

Page 126: ...ote The power cable leading from the Invenco Link Equipped OPTIC power supply should not be used to make this connection Affix Connector 2 identified in Figure 188 to the existing dispenser A C power cable as shown in Figure 189 ...

Page 127: ... cables hanging in front of the heater or lying in front of the heater exit should be re routed and restrained using one of the additional supplied cable ties 006 8616073 Warning Heater surfaces are hot Do not touch 13 All wires are to be routed away from any sharp edges and door joints gaskets 14 Push the dispenser door closed until the inner latch re engages ...

Page 128: ...106 15 Use a 751 key to close the bottom printer door ...

Page 129: ...ar See Figure 190 below Figure 190 2 Place the prop rod in the upper right corner of the frame collar See Figure 191 below Figure 191 3 Loosen and retain the two mounting screws that secure the OPTIC panel to the dispenser The OPTIC door panel will then swing forward and hang on its tethers See Figure 192 ...

Page 130: ...on locations Note To remove the grounding wire a screw must also be removed Retain the screw Figure 193 5 Temporarily detach the OPTIC door tethers by removing the M4 screw and washer One pair per side from the dispenser tether brackets Retain M4 screws and washers for reinstallation See Figure 194 ...

Page 131: ...e the heater NCR heater assembly and OPTIC heater wire guard 497 0522796 9 Slide the wire guard 497 0522796 around the NCR heater assembly so that the edge of the bracket aligns with the Helix Tokheim C alignment mark as shown in Figure 195 Figure 195 10 Insert and tighten two of the thread forming 006 8626667 screws at the locations shown in Figure 196 to secure the wire guard 497 0522796 to the ...

Page 132: ... power supplies and their associated cabling which are in the larger top cavity of Side B See Figure 197 below Figure 197 12 Attach OPTIC Heater Offset Link Plate 497 0522788 to NCR heater assembly bracket using two provided 8 32 006 8626667 screws at locations as shown See Figure 198 and Figure 199 below ...

Page 133: ...111 Figure 198 Figure 199 13 Fasten thermostat identified in Figure 200 to the location on the heater bracket as depicted in Figure 201 using one the provided cable ties 006 8616073 ...

Page 134: ...112 Figure 200 Figure 201 14 Position heater along bottom dispenser wall like shown See Figure 202 below Figure 202 ...

Page 135: ...inge plate 4 for additional heater stability See Figure 203 Figure 203 16 Secure OPTIC Heater Offset Link Plate 497 0522788 to existing screw boss in dispenser wall by inserting 6 19 screw 006 8627165 like shown by 5 in Figure 206 See Figure 204 Figure 205 and Figure 206 below Figure 204 ...

Page 136: ...the wire guard as shown in the following steps 18 On the A Side printer the printer on the same side as heater and directly in front of the wire guard 497 0522796 loosen the M4 screw holding the ground ring terminal and printer chassis lid to the printer chassis Retain screw for later use See location as described in Figure 207 ...

Page 137: ... screw 006 8627144 at the same location that the ground ring terminal and M4 screw were just removed from see Figure 208 Figure 208 20 Push ground bond wire that was just detached in step 18 to the B side of the dispenser See Figure 209 ...

Page 138: ...21 Route ground bond wire 8 up and over the inner top of the dispenser See Figure 210 Figure 210 22 Remove and discard the M4 screw that secures the other side of the printer lid to the printer chassis See Figure 211 ...

Page 139: ...ps 006 8611458 and screw retained in step 18 attach cable clamp and ground ring terminal to printer chassis through the mounting hole on the other side of the printer lid Hardware should be stacked as depicted in Figure 212 See Figure 213 below Figure 212 ...

Page 140: ...of the dotted line with one of the supplied cable ties 006 8616073 See Figure 214 below Figure 214 25 Secure the bundled printer cables to the pre mounted cable clamp at the same location determined in step 24 using supplied cable tie s 006 8616073 as applicable See Figure 215 below ...

Page 141: ...maining printer cable slack and secure with provided cable tie 006 8616073 See Figure 216 below Figure 216 27 Then tuck excess cable loop up under the APC module identified in the figure below and above the printer See Figure 217 below ...

Page 142: ...e B Side the printer ground wire does not have to be routed up and over the inner top of the dispenser since the heater is on the opposite A Side For the B side printer the printer ground wire can be bundled with the loop of printer cables that already are being tucked away up under the APC module identified previously in Figure 217 29 Disconnect the AC power cable that is attached to the power su...

Page 143: ...121 Figure 218 30 Attach Connector 1 identified in Figure 219 to the NON Invenco Link OPTIC power supply cable as shown in Figure 220 Figure 219 ...

Page 144: ...r cable leading from the Invenco Link Equipped OPTIC power supply should not be used to make this connection 31 Affix Connector 2 identified in Figure 221 to the existing dispenser A C power cable as shown in Figure 222 Figure 221 ...

Page 145: ...attach the top M4 screws and washers securing both door tethers to the dispenser See Figure 223 Figure 223 34 Reattach all connections to the customer display See Figure 224 Note To attach the grounding wire reattach the screw that was previously removed and retained ...

Page 146: ...ying in front of the heater exit should be re routed and restrained using one of the additional supplied cable ties 006 8616073 Warning Heater surfaces are hot Do not touch 36 All wires are to be routed away from any sharp edges and door joints gaskets 37 Secure the door panel to the dispenser with the two mounting screws See Figure 225 Figure 225 38 Open printer door See Figure 226 ...

Page 147: ...ter outward 6 to confirm that there is a minimal amount of slack 7 in the printer cables to allow the cables to remain connected when the printer slides in and out See Figure 227 below Figure 227 40 Close the printer door See Figure 228 ...

Page 148: ...h up on the dispenser frame that is held up by the prop rod 42 Remove and stow the prop rod in the upper right corner of the frame collar See Figure 229 Figure 229 43 Swing the door frame closed and lock the dispenser See Figure 230 ...

Page 149: ...127 Figure 230 44 Repeat steps 32 43 for the opposite side of the dispenser ...

Page 150: ...IX STANDARD DISPENSER 1 Unlock the Helix The lock is located on the bottom of the frame collar See Figure 231 below Figure 231 2 Place the prop rod in the upper right corner of the frame collar See Figure 232 below ...

Page 151: ...Repeat steps 1 3 for the opposite side of the dispenser to allow internal access to both sides of the dispenser 5 Acquire the heater NCR heater assembly and OPTIC heater wire guard 497 0522796 6 Slide the wire guard 497 0522796 around the NCR heater assembly so that the edge of the bracket aligns with the Helix Tokheim C alignment mark as shown in Figure 234 ...

Page 152: ...ns shown in Figure 235 to secure the wire guard 497 0522796 to the NCR heater assembly Figure 235 8 Mount the heater on Side A of the dispenser so that it is not directly under the OPTIC power supplies and their associated cabling which are in the larger top cavity of Side B See Figure 236 below ...

Page 153: ...Figure 236 9 Attach OPTIC Heater Offset Link Plate 497 0522788 to NCR heater assembly bracket using two provided 8 32 screws 006 8626667 at locations as shown See Figure 237 and Figure 238 below Figure 237 ...

Page 154: ...132 Figure 238 10 Fasten thermostat identified in Figure 239 to the location on the heater bracket as depicted in Figure 240 using one the provided cable ties 006 8616073 Figure 239 ...

Page 155: ...ser wall like shown See Figure 241 below Figure 241 12 Secure OPTIC Heater Offset Link Plate 497 0522788 to existing centerline screw boss in dispenser wall by inserting 6 19 screw 006 8627165 like shown by 3 See Figure 242 Figure 243 and Figure 244 below ...

Page 156: ...134 Figure 242 Figure 243 ...

Page 157: ...de as heater and directly in front of the wire guard 497 0522796 loosen the M4 screw holding the ground ring terminal and printer chassis lid to the printer chassis Retain screw for later use See location as described in See Figure 245 Figure 245 15 Install the M4X12 screw 006 8627144 at the same location that the ground ring terminal and M4 screw were just removed from See Figure 246 below ...

Page 158: ...gure 246 16 Push ground bond wire that was just detached in step 14 to the B side of the dispenser See Figure 247 Figure 247 17 Route ground bond wire up and over the inner top of the dispenser See Figure 248 ...

Page 159: ...ite side of the screw that was replaced in 15 See Figure 249 Figure 249 19 Using one of the provided cable clamps 006 8611458 and screw retained in step 14 attach cable clamp and ground ring terminal to printer chassis through the mounting hole on the other side of the printer lid Hardware should be stacked as depicted in Figure 250 See Figure 251 ...

Page 160: ...138 Figure 250 Figure 251 20 Secure both printer cables together at the approximate height of the dotted line with one of the supplied cable ties 006 8616073 See Figure 252 ...

Page 161: ...o the pre mounted cable clamp at the same location determined in step 20 using supplied cable tie s 006 8616073 as applicable Figure 253 Figure 253 22 Identify all remaining printer cable slack and secure with provided cable tie 006 8616073 See Figure 254 ...

Page 162: ...placement of printer cables and printer ground wire for the printer located on the B Side of the dispenser using the remaining provided cable ties 006 8616073 and one more provided cable clamp 006 8611458 Note On the B Side the printer ground wire does not have to be routed up and over the inner top of the dispenser since the heater is on the opposite A Side So for the B ...

Page 163: ...ked away up under the APC module 25 Disconnect the AC power cable that is attached to the power supply connector without the Invenco Link attached See Figure 256 below Figure 256 26 Attach Connector 1 identified in Figure 257 to the NON Invenco Link OPTIC power supply cable as shown in Figure 258 Figure 257 ...

Page 164: ...r cable leading from the Invenco Link Equipped OPTIC power supply should not be used to make this connection 27 Affix Connector 2 identified in Figure 259 to the existing dispenser A C power cable as shown in Figure 260 Figure 259 ...

Page 165: ...routed and restrained using one of the additional supplied cable ties 006 8616073 Warning Heater surfaces are hot Do not touch 30 All wires are to be routed away from any sharp edges and door joints gaskets 31 Open printer door See Figure 261 Figure 261 Note There is additional slack in the two cables exiting the back of the printer that must be secured 32 Use a supplied cable tie 006 8616073 to b...

Page 166: ...144 Figure 262 33 Affix both printer cables to the last moving hole on the slide rails as shown using a supplied cable tie 006 8616073 See Figure 263 and Figure 264 below Figure 263 Figure 264 ...

Page 167: ...e printer cables to allow the cables to remain connected when the printer slides in and out See Figure 265 below Figure 265 35 Close the printer door See Figure 266 Figure 266 36 Secure the door panel to the dispenser with the two mounting screws See Figure 267 ...

Page 168: ...h up on the dispenser frame that is held up by the prop rod 38 Remove and stow the prop rod in the upper right corner of the frame collar See Figure 268 Figure 268 39 Swing the door frame closed and lock the dispenser See Figure 269 ...

Page 169: ...147 Figure 269 40 Repeat steps 28 39 for the opposite side of the dispenser ...

Page 170: ......

Page 171: ...1 MERLIN REVISION A ...

Reviews: