background image

NComputing N-series User Manual rev11.09.12


Page 

17

 of 

25


3.0 Connecting to your Citrix Environment 


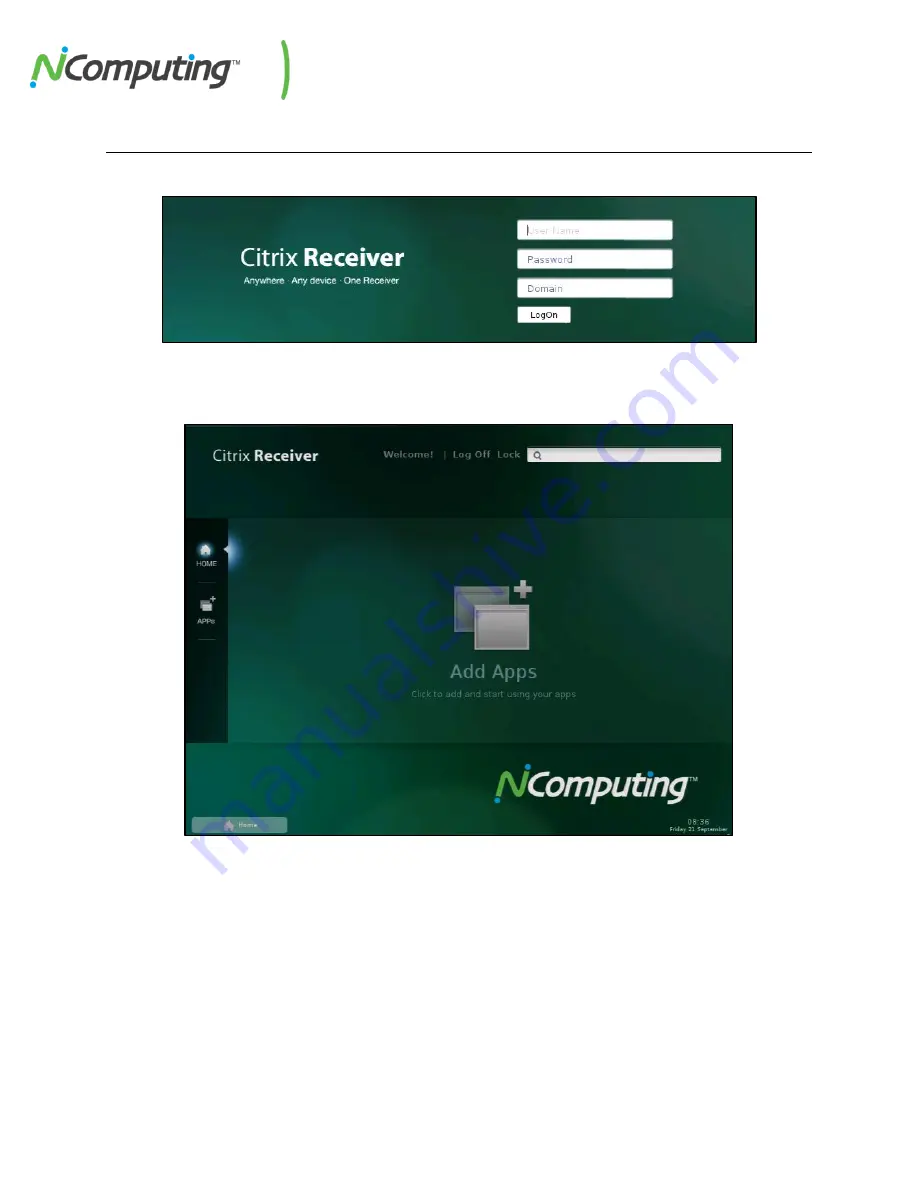
From the initial Log-in screen, enter the User Name, Password, and Domain information of the Citrix 
Environment you wish to connect to. Once this information is entered, press the “LogOn” button. 


Once you’ve logged into your Citrix environment, you’ll be presented with a standard Citrix desktop 
layout as shown below. From this screen you can return to the Log-in screen by clicking “

Log Off

” 

towards the top of the window. You can lock your desktop using the “

Lock

” button, and unlock the 

desktop using the same password you used to log into your Citrix environment. The 

search bar

 at the 

top of the window can be used to locate applications available to your Citrix environment. 

The “

Home

” icon on the left side of the screen returns you to this default desktop layout. The “Apps” 

icon allows you to browse through available applications and environments. Click the “Add Apps” button 
in the center of the screen to create shortcuts for available applications and environments. 

Summary of Contents for N400

Page 1: ...N series Thin Clients for Citrix HDX User Manual ...

Page 2: ... This product gives users shared access to computer resources It is not a computer and may not support all software applications especially high resolution graphics applications or 3D games that are designed to be supported by stand alone computers Similarly it may not support all hardware peripherals that are designed to be supported by stand alone computers Refer to your computer operating syste...

Page 3: ...vice Configuration 10 2 1 The XenDesktop Tab 11 2 2 The General Tab 12 2 3 The Display Tab 13 2 4 The Audio Tab 13 2 5 The Network Tab 14 2 6 The Date Time Tab 15 2 7 The Keyboard Tab 16 2 8 The Security Tab 16 3 0 Connecting to your Citrix Environment 17 4 0 Support and Additional Resources 18 4 1 Accessing your vSpace Management Center License s and Premium Support Entitlement 18 4 2 DHCP Option...

Page 4: ...levision reception which can be determined by turning the equipment off and on the user is encouraged to try and correct the interference by one or the following measures Reorient or relocate the receiving antenna Increase the separation between the equipment and the receiver Connect the equipment to a power outlet on a circuit different from which the receiver is connected Consult your dealer or ...

Page 5: ...dable copy of the complete corresponding source code for the version of the software that we distributed to you For additional information refer to this page on the NComputing website www ncomputing com gplcodedownload Safety Information Refer to the following to prevent any physical injury or loss of assets caused by damage to the product A user must read this User Manual carefully before use and...

Page 6: ...inct versions the N400 N500 and N500w The entry level N400 is the thin client of choice for task workers and those workers with light multimedia needs The N500 adds client side video rendering to enable the delivery of full 1080p multimedia content improved network capabilities as well as options for dual monitor and wireless connectivity N400 N500 N500w Network Bandwidth 10 100 10 100 1000 10 100...

Page 7: ...r 1 3 N series Peripheral Connections Each of the different models within the N series lineup feature the following peripheral options listed below from left to right in order of appearance on the device Front of Device Back of Device Power On Off Reset Switch 2x USB 2 0 Ports Analog Speaker Port Analog Microphone Port Wireless Network Antennae N500w only 2x USB 2 0 Ports RJ45 Ethernet Port DVI Mo...

Page 8: ...monitor as shown below 1 5 Citrix Requirements To utilize the N series device you will need access to a Citrix environment The N series is compatible with the following Citrix environments XenDesktop versions 5 0 5 5 and 5 6 XenApp 5 versions 6 and 6 5 VDI in a box 5 0 and 5 1 For more information on the installation and configuration of Citrix environments visit http www citrix com lang English h...

Page 9: ... output to the full native resolution of most monitors Installing the Secondary Display Adaptor 1 With the N series powered off connect the Secondary Display Adaptor to the lower USB port on the back of the device This USB port is marked with a keyboard symbol Note You can relocate your USB keyboard to either of the USB ports on the front of the N series If you have run out of USB ports a powered ...

Page 10: ...configuration screen by clicking the gear icon to the bottom left of the initial Log in screen Next to the gear icon is a dropdown that will allow you to change your keyboard layout to match a number of regional and national standards as shown above Once in the configuration screen you can return to the Log in screen at any time using the Home button Remember to SAVE your configuration changes as ...

Page 11: ... N series device to access your Citrix environment securely from outside your network via the Citrix Access Gateway Auto launch if only one application is published If your XenDesktop environment is configured to only publish a single application to the user session obtained by a given device you can use this feature to automatically launch that application on login Auto logoff on last application...

Page 12: ...ualified Domain Name of a vSpace Management Center server within your network o Reset zone membership Enabling this feature will clear any previous zone membership information as the device joins a new vSpace Management Center server Firmware o Username Password Enter the username and password of the FTP server you ve stored your updated N series firmware on o URL Enter the URL of the FTP server y...

Page 13: ...ired monitor resolution Screensaver Delay The N series can be instructed to turn off its video signal after a predefined period of idle time Use this slider to enable this feature and define the desired idle period 2 4 The Audio Tab The Audio Tab allows you to configure audio input and output settings The Audio Tab contains the following options Enable speakers When checked enables sound Enable mi...

Page 14: ...es device s network settings IP Enter the desired IP address for the N series device Netmask Enter the desired Netmask for the N series device Gateway Enter the desired Gateway for the N series device Primary DNS Enter the address of your primary DNS server Secondary DNS Enter the address of your secondary DNS server if applicable PING Enter an IP address and press the button marked P to test your...

Page 15: ...e zone Dropdown Select the appropriate time zone from this dropdown menu Set date time automatically Enables the use of the NTP service to obtain automatic date time information via your network Time server This field allows you to specify the NTP enabled time server you wish to use for your device Date Time Click on these fields to set the current date and time Apply Now Press the Apply Now butto...

Page 16: ...Tab allows you to password protect your device settings and manage your security certificates Settings Password Enabling this feature and entering a password in the field provided will prevent other users from making changes to your device settings unless they have the specified password Root CA Certificates This field lists the certificates currently loaded on your device You can manage certifica...

Page 17: ... you can return to the Log in screen by clicking Log Off towards the top of the window You can lock your desktop using the Lock button and unlock the desktop using the same password you used to log into your Citrix environment The search bar at the top of the window can be used to locate applications available to your Citrix environment The Home icon on the left side of the screen returns you to t...

Page 18: ... also gives you access to various resources including posting on the NComputing Community make sure you enter your e mail address correctly as this will be used to deliver your licenses and entitlement information Return to the http www ncomputing com enroll page and fill out all the fields b Click Submit 2 You will receive an e mail confirmation immediately after your submit your request 3 Within...

Page 19: ... this process using Server 2003 and Server 2008 R2 It should be noted however that any DHCP server can be used If you are already familiar with the administration of DHCP servers and the creation of option tags feel free to skip to the N series DHCP Tags section of this guide for a list of tags that the N series supports For those less familiar with DHCP administration the following pages describe...

Page 20: ... 2 Click Manage this DHCP server as seen below 3 Select DHCP and click Set Predefined Options as seen below 4 Proceed to the N series DHCP Tags section of this guide for a description of available DHCP tags and instructions for adding them to your DHCP server ...

Page 21: ...e Computer Management window open the Roles section and then the DHCP Server section as seen below 3 Open the DHCP Server Name in question right click on IPv4 and select Set Predefined Options You are now ready to specify which DHCP tags you wish to add to your N series environment Each of the potential tags and their functions are explained in the next section of this guide ...

Page 22: ...ng out the Name Data type Code and Description fields as specified below Note that the STRING VALUE is used later in step 5 XenDesktop Tag 181 This tag will automatically link your N series device s with their designated XenDesktop server s Name XenDesktop Data Type String Code 181 Description Default XenDesktop server STRING VALUE The IP URL or Fully Qualified Domain Name of your XenDesktop serve...

Page 23: ...his tag to store the firmware server s network address If your firmware server requires a username and password use tags 173 and 174 to store those details Name N series Firmware URL Data Type String Code 172 Description Address of firmware update server STRING VALUE The FTP HTTP or HTTPS address of your firmware server Notes If the server you are storing N series firmware on requires a username a...

Page 24: ...entry in this case the VMC 171 tag 3 You can now verify that the tag you created has been saved by clicking on the Option Name drop down see image below and searching for the tag s in question 4 Once again from the Predefined Options and Values window select each tag and fill in the Value field with the string values specified earlier in step 2 a Example For Tag 171 the string value would be the I...

Page 25: ...om a third party This information is for informational purposes only Information may be changed or updated without notice NComputing reserves the right to make improvements and or changes in the products programs and or specifications described herein anytime without notice All NComputing software is subject to NComputing intellectual property rights and may be used only in conjunction with Genuin...

Reviews: